Inhaltsverzeichnis

Verwandte Anleitungen für Rollei Candela 220 RGB


Inhaltszusammenfassung für Rollei Candela 220 RGB
- Seite 1 CANDELA Candela 220 RGB Ultra-kompaktes COB-Dauerlicht mit Bowens-S-Type-Halterung Ultra-Compact COB Continuous Light with Bowens S-Type Mount Anleitung auf Deutsch Manual in English www.rollei.de...
-
Seite 2: Inhaltsverzeichnis
Inhalt Vor dem ersten Gebrauch . . . . . . . . . . . . . . . . . . . . . . . . 4 Bestimmungsgemäßer Gebrauch . - Seite 3 Content Before the First Use . . . . . . . . . . . . . . . . . . . . . . . . . . . . 32 Intended Use .
-
Seite 4: Vor Dem Ersten Gebrauch
Vor dem ersten Gebrauch Lesen Sie vor dem ersten Gebrauch die Bedienungsanleitung und die Sicherheitshinweise aufmerksam durch . Bewahren Sie die Bedienungsanleitung zusammen mit dem Gerät für den späteren Gebrauch auf . Sollten andere Personen dieses Gerät nutzen, so stellen Sie ihnen diese Anleitung zur Verfügung . Wenn Sie das Gerät an Dritte weitergeben, gehört diese Anleitung zum Gerät und muss mitgeliefert werden . -
Seite 5: Sicherheitshinweise
Zeichenerklärung Geräte mit diesem Zeichen haben eine zusätzliche oder verstärkte Isolierung und entsprechen der Schutzklasse II . Nur für innen . Geräte mit diesem Zeichen dürfen nur im Haus betrieben werden (trockene Umgebung) . Sicherheitshinweise Gefahr durch elektrischen Strom! Fehlerhafte elektrische Installationen oder eine übermäßige Netz- spannung können Stromschlag verursachen . - Seite 6 Sicherheitshinweise – Wenn Sie das Gerät für längere Zeit nicht benutzen, trennen Sie es immer von der Stromquelle . – Schützen Sie das Produkt vor Feuchtigkeit . Berühren Sie es nicht mit nassen/feuchten Händen und tauchen Sie es nicht unter Wasser .
- Seite 7 Sicherheitshinweise Achtung! – Niemals das Netzkabel als Tragegriff benutzen . Produkt und Zubehör von offenen Flammen, heißen Oberflächen und leicht entflammbaren Materialien fernhalten . – Verlegen Sie das Netzkabel so, dass es keine Stolpergefahr dar- stellt . – Knicken Sie das Netzkabel nicht und legen Sie es nicht über scharfe Kanten .
-
Seite 8: Lieferumfang
Sicherheitshinweise – Filmen Sie weder Auto-, Bus-, Fahrrad-, Motorradfahrer noch Zugführer während der Fahrt mit diesem Produkt . Der Fahrer kann geblendet werden und so einen Unfall verursachen . Dieses gilt auch für nicht aufgeführte Personen oder Gruppen, wenn durch eine mögliche Blendung ein Unfall verursacht werden könnte . -
Seite 9: Übersicht
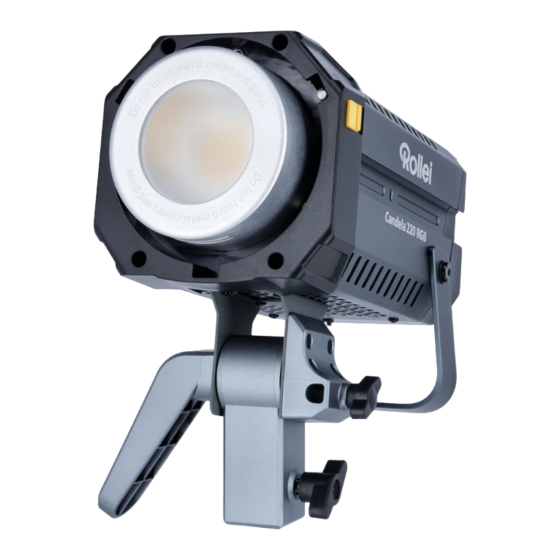
Übersicht Effektmodus-Knopf COB-Kühlung LED-Bildschirm Verriegelungsgriff zur Modus-Knopf Einstellung des Lampen- Einstellungen-Taste winkels Rechtes Einstellrad Stativ-Halterung mit Neiger (Parameter) Luftauslass Ein-/Ausschalt-Taste Führungsschiene DC-48-V-Stromanschluss Lufteinlass Linkes Einstellrad Lampengriff (Optionen) Schirmhalterung Frequenz-Knopf Schraube der Bowens-Halterung Schirmhalterung Schraube der Stativhalterung 1) Nur im Effektmodus verwendbar . -
Seite 10: Aufbau Und Kombinationsmöglichkeiten Zusätzliches Equipment
Aufbau und Kombinationsmöglichkeiten zusätzliches Equipment 1. Schutzkappe entfernen – Entfernen Sie vor jedem Gebrauch die Schutzkappe und die Schutzfolie, BEVOR Sie das COB-Dauerlicht anschalten . – Um die Schutzkappe von dem Licht zu entfernen, drehen Sie diese und ziehen sie dann nach vorne ab . 2. - Seite 11 Aufbau und Kombinationsmöglichkeiten zusätzliches Equipment 3. Anschluss des COB-Dauerlichts auf ein Stativ – Drehen Sie die Schraube der Stativhalterung [20] so weit heraus, dass Sie das Licht auf das Stativ setzen können . – Setzen Sie dann das Licht mit der Halterung auf das Stativ und ziehen Sie die Schraube der Halterung [20] zur Fixierung an .
- Seite 12 Aufbau und Kombinationsmöglichkeiten zusätzliches Equipment 5. Anschluss des Netzteils – Montieren Sie den Netzadapter . Hängen Sie den Netzadapter nicht in die Luft, sondern verwenden Sie die Drahtschlaufe am Adapter, um es am Lampenständer aufzu- hängen . – Schließen Sie den Netzadapter an, richten Sie den Stift auf den Gleichstromanschluss...
-
Seite 13: Aufbau Und Kombinationsmöglichkeiten 13 Zusätzliches Equipment
Aufbau und Kombinationsmöglichkeiten zusätzliches Equipment Hinweis: – Bei der Nutzung eines 14,8 V V-Mount-Akkus beträgt die maxima- le Helligkeit des Produkts 50 % der vollen Leistung . – Wenn die Akkukapazität unzureichend ist, wird die Helligkeit der Produktbeleuchtung angepasst, um die Gefahr einer Über hitzung des Netzkabels durch zu hohen Strom zu vermeiden . -
Seite 14: Bedienung
Bedienung Wichtig: Ziehen Sie vor der ersten Verwendung des COB-Dauerlichts die Schutzfolien auf der COB-LED-Einheit und dem Display ab . Entfernen Sie vor jedem Gebrauch die Schutzkappe, BEVOR Sie das COB-Dau- erlicht anschalten . Drücken Sie den Ein-/Ausschalt-Taste [6], sodass das COB-Dauerlicht aufleuchtet . - Seite 15 Bedienung CCT-Modus Drücken Sie kurz den Modus-Knopf [3], um zwischen CCT- und HSI- Modus zu wechseln . DIM (Helligkeit) Modus-Knopf CCT (Farb - temperatur) G/M Balance (Grün/ Magenta-Balance) – Drehen Sie das linke Einstellrad (Optionen) [8], um zwischen den Optionen (Farbtemperatur, Helligkeit und G/M-Balance) zu wählen .
- Seite 16 Bedienung HSI-Modus Drücken Sie kurz den Modus-Knopf [3], um zwischen CCT- und HSI- Modus zu wechseln . HUE (Farbton) Modus-Knopf (Sättigung) INT (Intensität) – Drehen Sie das linke Einstellrad (Optionen) [8], um zwischen den Optionen (Farbton, Sättigung und Intensität) zu wählen . –...
- Seite 17 Bedienung Effektmodus (CCT) Helligkeit EFF Modus- Knopf Farb- Frequenz-Knopf temperatur Frequenz Lichteffekt – Drücken Sie kurz den Effektmodus-Knopf [1], um in den EFF-CCT- Modus zu gelangen . – Durch wiederholtes Drücken können Sie den Effekt wechseln . Ins- gesamt können Sie aus 13 Effekten wählen (siehe Tabelle Seite 19) . –...
- Seite 18 Bedienung Effektmodus (HSI) Drücken Sie kurz den Effektmodus-Knopf [1] und anschließend das linke Einstellrad [8], um in den EFF-HSI-Modus zu wechseln . Lichteffekt-Modus- Helligkeit Knopf (EFF) Farbtemperatur Lichteffekt- Frequenz-Knopf Frequenz (RATE) – Durch wiederholtes Drücken des Effektmodus-Knopfes [1] können Sie den Effekt wechseln . Ins gesamt können Sie aus 13 Effekten wählen (siehe Tabelle) .
- Seite 19 Bedienung Lichteffekte Candela 220 RGB CCT: 1000 K – 10000 K CCT- Dimmen: 0 % – 100 % Modus Frequenz: Lv1 – 5 Feuer Farbton: 0° – 359° HSI- Sättigung: 0 % – 100 % Modus Intensität: 0 % – 100 % Frequenz: Lv1 –...
- Seite 20 Bedienung Lichteffekte Candela 220 RGB CCT: 2700 K – 6500 K + RANDOM CCT- Dimmen: 0 % – 100 % + RANDOM Modus Frequenz: Lv1 – 5 + RANDOM Farbton: 0° – 359° + RANDOM HSI- Sättigung: 0 % – 100 % + RANDOM Modus Intensität: 0 % –...
- Seite 21 Bedienung Lichteffekte Candela 220 RGB CCT: 2700 K – 6500 K CCT- Dimmen: 0 % – 100 % Modus Frequenz: Lv1 – 5 Schweißen Farbton: 0° – 359° HSI- Sättigung: 0 % – 100 % Modus Intensität: 0 % – 100 % Frequenz: Lv1 –...
-
Seite 22: Einstellungen Des Cob-Dauerlichts
Einstellungen des COB-Dauerlichts Drücken Sie die Einstellungen- Taste [4], um in das Einstellungs- Menü zu gelangen . Indem RESET SMART GROUP Sie das rechte Einstellrad [5] betätigen, können Sie durch das Einstellungs-Menü navigieren und die Einstellungen auswäh- len . Die ausgewählte Einstellung ist grau hinterlegt . -
Seite 23: Überhitzungs-Alarm
Einstellungen des COB-Dauerlichts Leistungsstarker Modus (Power): Lüfter läuft mit der höchsten Drehzahl, um die Wärmeableitung zu gewährleisten . Überhitzungs-Alarm Bei einem blinkenden Überhitzungs-Alarm-Symbol ist die Tempe- ratur im Inneren des COB-Dauerlichts zu hoch . Das COB-Dau- erlicht muss ausgeschaltet werden, um Schäden zu vermeiden . Sollte es nicht rechtzeitig ausgeschaltet werden, schaltet sich das COB-Dauerlicht automatisch aus . -
Seite 24: Response (Reaktionszeit Licht)
Einstellungen des COB-Dauerlichts Communication (Verbindungen) Über das Drehen des linken Einstellrads [8] COMM. kann zwischen TX, RX und TXRX gewählt werden . TXRX ist werksseitig eingestellt . CURVE LINEAR Response (Reaktionszeit Licht) Über das Drehen des Farbtemperatur-Einstell- RESP. SHARP rads [8] kann zwischen weicher oder harter INIT BRT DEF. -
Seite 25: Verbinden Mit Der App
Verbinden mit der App 1 . Laden Sie die Candela LED-App direkt aus dem App Store herunter (iOS 9 .0 oder höher) . Aus technischen Gründen ist die App zur Zeit nur für iOS verfügbar . 2 . Aktivieren Sie Bluetooth * auf Ihrem Smartphone . - Seite 26 Verbinden mit der App 6 . Klicken Sie auf „Gerät hinzufügen“, danach auf „Neues Gerät“ . DEUTSCH...
- Seite 27 Verbinden mit der App 7 . Wählen Sie das gewünschte Licht aus und klicken Sie auf „Zur Szene hinzufügen“ . 8 . Sollte eine Verbindung nicht sofort zu Stande kommen, wählen Sie erneut das Gerät wie in Schritten 6 und 7 beschrieben aus und drücken Sie parallel die Einstellungen-Taste [4] am Gerät .
- Seite 28 Verbinden mit der App Hier können Sie die App downloaden: Erhältlich im DEUTSCH...
-
Seite 29: Technische Daten
Technische Daten Anzahl LEDs 1 (COB-LED) Leistung LED 220,0 W Energieeffizienzklasse (EU 2017/1369) EU-Energieeffizienz- A – G klasse-Spektrum (EU 2017/1369) Farbtemperatur 2 .700 – 6 .500 K Farbnuancen 360 RGB-Farben, anpassbare Sättigung Farbwiedergabeindex (CRI) Television Lighting Consistency Index (TLCI) TN-30-18 Rf 93 / Rg 103 Leistungsregelung 0 –... - Seite 30 *Die Bluetooth -Wortmarke und Logos sind eingetragene Warenzeichen der ® Bluetooth SIG, Inc . und die Verwendung dieser Marken durch Rollei erfolgt unter Lizenz . Andere Warenzeichen und Handelsnamen sind Eigentum ihrer jeweiligen Inhaber . ** Nicht im Lieferumfang enthalten .
-
Seite 31: Entsorgung
Sammelstellen, die Altgeräte kostenlos entgegennehmen, erhalten Sie bei Ihrer Gemeinde- oder Stadtverwaltung . Konformität Hiermit erklärt die Rollei GmbH & Co . KG, dass der Funkanlagentyp „Rollei Candela 220 RGB“ der Richtlinie 2014/53/EU entspricht . Der vollständige Text der EU-Konformitätserklärung ist unter der folgenden Internetadresse verfügbar:... -
Seite 32: Before The First Use
Before the First Use Please read the operating instructions and the safety instructions carefully before using the device for the first time . Keep the operating instructions together with the device for future use . If you pass on the device to a third party, this manual is part of the device and must be supplied with the device . -
Seite 33: Safety Instructions
Explanation of Symbols Products with this symbol have additional or reinforced insulation and comply with protection class II . For indoor use only . Devices with this symbol may only be operated indoors (dry environment) . Safety Instructions Danger due to electric current! Faulty electrical installations or excessive mains voltage can cause electric shock . - Seite 34 Safety Instructions – If you are not going to use the unit for a long time, always dis- connect it from the power source . – Protect the product from moisture . Do not touch it with wet / damp hands and do not immerse it in water . –...
- Seite 35 Safety Instructions Attention! – Never use the power cord as a carrying handle . Keep the product and accessories away from naked flames, hot surfaces and highly flammable materials . – Lay the mains cable so that it does not pose a trip hazard . –...
-
Seite 36: What's In The Box
Safety Instructions – Do not film car, bus, bicycle, motorbike drivers or train drivers while driving with this product . The driver may be blinded and cause an accident . This also applies to persons or groups not listed if an accident could be caused by possible glare . –... -
Seite 37: Overview
Overview Effect mode button Bowens mount LED display COB cooling Mode button Lamp angle adjustment Settings button locking grip Right adjustment wheel Tripod mount with tilt (parameters) Air outlet On/off button Guide rail DC 48 .0 V power supply Air inlet Left adjustment wheel Lamp grip (options) -
Seite 38: Structure And Possible Combinations
Structure and Possible Combinations Additional Equipment 1. Remove the protective cap – Before each use, remove the protective cap and the protective film BEFORE you switch on the COB permanent light . – To remove the protective cap from the light, turn it and then pull it off towards the front . - Seite 39 Structure and Possible Combinations Additional Equipment 3. Connecting the COB permanent light to a tripod – Unscrew the screw of the tripod holder [20] so that you can place the light on the tripod . – Then place the light with the holder on the tripod and tighten the screw of the holder [20] to fix it .
-
Seite 40: Connecting The Mains Adapter
Structure and Possible Combinations Additional Equipment 5. Connecting the mains adapter – Mount the mains adapter . Do not hang the mains adapter in the air, but use wire rings to hang it from the lamp stand . – Connect the power adapter, align the pin with the DC connector of the lamp body and connect the... - Seite 41 Structure and Possible Combinations Additional Equipment Note: – When using a 14 .8 V battery, the maximum brightness of the product is 50 % of full power . – If the battery capacity is insufficient, the brightness of the product lighting will be adjusted to avoid the risk of overheating the power cord due to excessive current .
-
Seite 42: Operation
Operation Important: Before using the COB continuous light for the first time, remove the protective films from the COB LED unit and the display . Before each use, remove the protective cap BEFORE you switch on the COB continuous light . Press and hold the on/off button [6] so that the COB continuous light lights up . - Seite 43 Operation CCT mode Briefly press the mode button [3] to switch between CCT and HSI mode . DIM (Brightness) Mode button CCT (Color temperature) G/M Balance (Green/Magenta Balance) – Turn the left adjustment wheel (options) [8] to select between the options (color temperature, brightness and G/M balance) .
- Seite 44 Operation HSI mode Briefly press the mode button [3] to switch between CCT and HSI mode . HUE (color hue) Mode button (Sättigung) INT (Intensity) – Turn the left adjustment wheel (options) [8] to select between the options (Hue, Saturation and Intensity) . –...
- Seite 45 Operation Effect mode (CCT) Brightness EFF mode button Color Frequency temperature button Frequency Light effect – Briefly press the effect mode button [1] to enter EFF CCT mode . – You can change the effect by pressing it repeatedly . You can choose from a total of 13 effects (see table on page 47) .
- Seite 46 Operation Effect mode (HSI) Briefly press the effect mode button [1] and then the left-hand dial to switch to EFF-HSI mode . EFF mode button Brightness Color temperature Light effect frequency button Frequency (RATE) – Press the effect mode button [1] repeatedly to change the effect . You can choose from a total of 13 effects (see table) .
- Seite 47 Operation Light effects Candela 220 RGB CCT: 1000 K – 10000 K Dimming: 0 % – 100 % mode Frequency: Lv1 – 5 Fire HUE: 0° – 359° Saturation: 0 % – 100 % mode Intensity: 0 % – 100 % Frequency: Lv1 –...
- Seite 48 Operation Light effects Candela 220 RGB CCT: 2700 K – 6500 K + RANDOM Dimming: 0 % – 100 % + RANDOM mode Frequency: Lv1 – 5 + RANDOM HUE: 0° – 359° + RANDOM Saturation: 0 % – 100 % + RANDOM mode Intensity: 0 % –...
- Seite 49 Operation Light effects Candela 220 RGB CCT: 2700 K – 6500 K Dimming: 0 % – 100 % mode Frequency: Lv1 – 5 Welding HUE: 0° – 359° Saturation: 0 % – 100 % mode Intensity: 0 % – 100 % Frequency: Lv1 –...
-
Seite 50: Settings Of The Cob Continuous Light
Settings of the COB Continuous Light Press the settings button [4] to enter the settings menu . By pressing the right adjustment RESET SMART GROUP wheel [5], you can navigate through the settings menu and select the settings . The selected setting is highlighted in grey . - Seite 51 Settings of the COB Continuous Light Overheating alarm: When the overheating alarm symbol flashes, the temperature inside the COB continuous light is too high . The COB continuous light must be switched off to avoid damage . If it is not switched off in time, the COB continuous light switches off automatically .
-
Seite 52: Product Info
Settings of the COB Continuous Light Communication Turn the left adjustment wheel (options) [8] to select between TX, RX and TXRX . TX, RX COMM. and TXRX can be selected . TXRX is set at the CURVE LINEAR factory . Response (reaction time light) Turn the color temperature adjustment wheel RESP. -
Seite 53: Connect With The App
Connect with the App 1 . Download the app Candela LED directly from the App Store (iOS 9 .0 or higher) . For technical reasons, the app is currently only available for iOS . 2 . Activate Bluetooth * on your smartphone . ®... - Seite 54 Connect with the App 6 . Click ”Add Device“, then click ”New Device“ . ENGLISH...
- Seite 55 Connect with the App 7 . Select the desired light and click on „Add to scene“ . 8 . If a connection is not established immediately, select the device again as described in steps 6 and 7 and press the settings button [4] on the device at the same time .
- Seite 56 Connect with the App You can download the app here: Download on the ENGLISH...
-
Seite 57: Technical Data
Technical Data Number of LEDs 1 (COB LED) Power LED 220 .0 W Energy efficiency class (EU 2017/1369) EU energy efficiency class A – G range (EU 2017/1369) Color temperature 2,700 – 6,500 K Hues 360 RGB colors, adjustable saturation Color Rendering Index (CRI) Television Lighting... - Seite 58 *The Bluetooth word mark and logos are registered trademarks of ® the Bluetooth SIG, Inc . and any use of such marks by Rollei is under licence . Other trademarks and trade names are the property of their respective owners .
-
Seite 59: Disposal
. Conformity Rollei GmbH & Co . KG hereby declares that the radio equipment type ”Rollei Candela 220 RGB“ is in compliance with Directive 2014/53/ EU . -
Seite 60: Service-Hotline
Rollei GmbH & Co. KG In de Tarpen 42 D-22848 Norderstedt Service Hotline: +49 40 270750277 /rollei.foto.de @rollei_de Item No.: 20167 www.rollei.com...