Inhaltsverzeichnis
Werbung
Verfügbare Sprachen
Verfügbare Sprachen
Quicklinks
Geh-pad
DE
Unter dem Schreibtisch-Laufband
Benutzerhandbuch
MS306220AAA
Herzlichen Glü ckwunsch zur Wahl dieses Produkts.
Bevor Sie dieses Produkt zum ersten Mal verwenden, lesen Sie bitte die Bedienungsanleitung sorgfä ltig durch
und verwenden Sie das Gerä t nur wie im Handbuch beschrieben, um Gefahren und Verletzungen zu vermeiden.
Bitte bewahren Sie dieses Handbuch zum spä teren Nachschlagen auf.
Anwendbares Modell: P80C
VORSICHT
Lesen Sie alle Vorsichtsmaß nahmen und Anweisungen in diesem Handbuch, bevor Sie dieses Gerä t verwenden.
Bei Fragen zu diesem Produkt wenden Sie sich bitte rechtzeitig an Ihren Lieferanten.
Werbung
Kapitel
Inhaltsverzeichnis

Verwandte Anleitungen für Merax MS306220AAA


Inhaltszusammenfassung für Merax MS306220AAA
- Seite 1 Geh-pad Unter dem Schreibtisch-Laufband Benutzerhandbuch MS306220AAA Herzlichen Glü ckwunsch zur Wahl dieses Produkts. Bevor Sie dieses Produkt zum ersten Mal verwenden, lesen Sie bitte die Bedienungsanleitung sorgfä ltig durch und verwenden Sie das Gerä t nur wie im Handbuch beschrieben, um Gefahren und Verletzungen zu vermeiden.
-
Seite 2: Inhaltsverzeichnis
Inhalt Vorsichtsmaßnahmen ........................1 Liste der Einzelteile ........................2 Produktbeschreibung ........................3 Montageanleitung ......................3 Faltanleitung ......................4 Bedienerfü hrung ........................5 Fernbedienung .........................6 Einstellung und Wartung ....................8 Übungsprogramme ......................9 Fehlermeldungen und Lösungen ....................10 Service ........................11 Vorsichtsmaßnahmen Wichtig: Lesen Sie alle Anweisungen, bevor Sie dieses Laufband verwenden. -
Seite 3: Liste Der Einzelteile
Garantie: * Auf das Fahrgestell gibt es eine Garantie von 3 Jahren. Für bewegliche Teile gilt eine Garantie von 1 Jahr. Die Garantie gilt für die normale Nutzung durch eine Privatperson zu Hause. Liste der Einzelteile 1. Laufband * 1 3. -
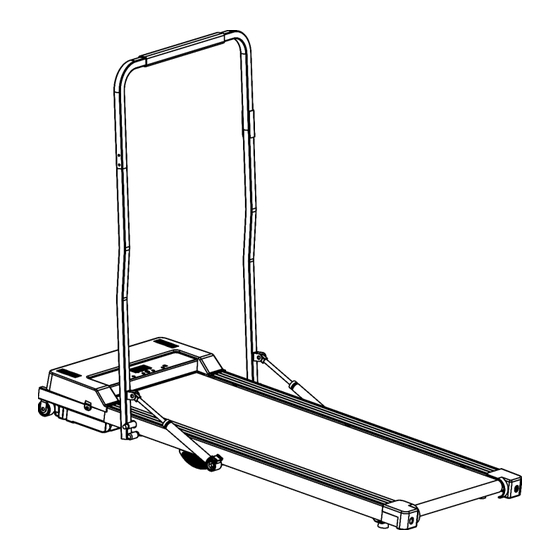
Seite 4: Produktbeschreibung
Produktbeschreibung Handrail Air Spring Montageanleitungen Heben Sie den Handlauf von der Rückseite der Laufbandeinheit nach vorne. Die Luftfedern halten die aufrechte Säule fest , wenn sie einrastet. -
Seite 5: Faltanleitung
Faltanleitung 1. Aufklappen der Maschine. VORSICHT: Die Handläufe dienen lediglich dazu, Sie in der Mitte (im Gleichgewicht) zu halten. Legen Sie nicht Ihr gesamtes Gewicht auf den Handlauf. Heben Sie den Handlauf an, bis er einrastet. 2. Zusammenklappen der Maschine. Handlauf fest und ziehen Sie ihn wie abgebildet zum Ende des Trittbretts . -
Seite 6: Bedienerführung
Bedienerführung SCHALTTAFEL Stellen Sie den Hauptnetzschalter, der sich an der Vorderseite des Laufbands befindet, auf die EIN-Position. Beschreibung der LED-Anzeige · Geschwindigkeitsanzeige · Zeitanzeige · Entfernungsanzeige · Kalorienanzeige Parameterbeschreibung · Mindestanzeigegeschwindigkeit von 1 . 0 KM/H · Maximale Anzeigegeschwindigkeit von 12,0 KM/H GESCHWINDIGKEIT 1,0 –... -
Seite 7: Fernbedienung
Fernbedienung Die Fernbedienung war bereits vor der Auslieferung mit dem Laufband gekoppelt und kann sofort verwendet werden, eine erneute Kopplung ist nicht erforderlich. (*So koppeln Sie die Fernbedienung mit dem Laufband: Drücken Sie die Geschwindigkeitstasten „-“ und „M“ gleichzeitig länger als 3 Sekunden , lassen Sie dann beide Tasten gleichzeitig los und schalten Sie den Netzschalter des Laufbands nach 2 Sekunden ein . - Seite 8 *DISTANZ: In diesem Modus wird die von Ihnen zurückgelegte Distanz angezeigt. *KALORIEN: In diesem Modus werden die Kalorien angezeigt, die Sie während Ihres Trainings verbrannt haben. Achtung: Nach dem Beschleunigen und Abbremsen wechselt der Monitor automatisch abwechselnd den Modus. P01-P12 Programmzuordnung (optionale Funktion) Voreingestellte Zeit / 10 Perioden = Zeit jedes Geschwindigkeitssegments —...
-
Seite 9: Einstellung Und Wartung
Einstellung und Wartung Einstellung des Laufbandes Während des Transports kann sich der Laufgurt zu einer Seite durchbiegen. Bitte stellen Sie den Laufgurt wie folgt ein. 1) If the left gap of the running belt is too big, please keep the treadmill running at the slowest speed. -
Seite 10: Übungsprogramme
Tragen Sie das Gleitmittel (Silikon-Gleitmittel) auf. The running belt/ deck plays a major role in the function and life of your treadmill, thus requiring periodic lubrication. Please DO NOT over lubricate the running deck. Übungsprogramme SICH WARM LAUFEN Beginnen Sie jedes Training mit 5 bis 10 Minuten Dehnübungen und einigen leichten Übungen. Ein richtiges Aufwärmen erhöht Ihre Körpertemperatur, Herzfrequenz und Durchblutung als Vorbereitung auf das Training. -
Seite 11: Fehlermeldungen Und Lösungen
So sollte sich Ihr Puls bei allgemeinem Fitnesstraining verhalten. Denken Sie daran, sich einige Minuten lang aufzuwärmen und abzukühlen. Fehlermeldungen und Lösungen FALSCHE FEHLER LÖSUNGEN BESCHREIBUNG Der Monitor zeigt den Fehlercode an und der Summer ertönt Nach dem Einschalten ist die dreimal. -
Seite 12: Allgemeine Fehlerbehebung
Allgemeine Fehlerbehebung PROBLEM MÖGLICHE URSACHEN KORREKTUREN 1. Laufband nicht angeschlossen. 1. Laufband angeschlossen. Das Laufband startet 2. Der Schutzschalter im Haus 2. Der Schutzschalter im Haus wurde ausgelöst. nicht. wurde ausgelöst. 3. Der Schutzschalter des Laufbandes wurde 3. Der Schutzschalter ausgelöst. - Seite 13 Walking Pad Under Desk Treadmill User’s Manual MS306220AAA Congratulations for choosing this product. Before using this product for the first time, please read the manual carefully and use the equipment only as described in the manual to avoid hazards and personal injury.
- Seite 14 Content Precautions .........................1 Parts List ..........................2 Product Brief ........................3 Assembly Instructions ......................3 Folding Instructions ......................4 Operation Guide ........................5 Remote Control ........................6 Adjustment & Maintenance ....................8 Exercise Programs ......................9 Error Messages & Solutions ....................10 Service ..........................11 Precautions Important: Read all instructions before using this treadmill. Safety * The equipment is for home use rather than commercial use.
-
Seite 15: Parts List
Parts List Notice:If any part is missing, distorted or broken when you receive the package, please contact us. 1. Treadmill x 1 3. Wrench x 2 2. Lubricant x 1 4. Remote Control x 1... -
Seite 16: Product Brief
Product Brief Handrail Air Spring Assembly Instructions Lift the handrail forward from the rear of treadmill unit, the air springs will hold on the upright column when it locks into place. -
Seite 17: Folding Instructions
Folding Instructions 1. Unfolding the machine. CAUTION: The handrails are there to help keep you centered (balanced) only. Do not put your full weight on handrail. Lift the handrail up until it locks into place. 2. Folding the machine. Hold onto the handrail and pull it towards to the end of running board as pictured. Once the locking system is released, gently lower the handrail to the ground. -
Seite 18: Operation Guide
Operation Guide CONTROL PANEL Flip the Master Power Switch that is located at the front of treadmill to the ON position. LED Display Description · Speed display · Time display · Distance display · Calorie display Parameter Description · Minimum display speed of 1.0 KM/H ·... -
Seite 19: Remote Control
Remote Control The remote control was already paired to treadmill before delivery, it can be used immediately, no need to pair it again. (*How to pair remote control to treadmill: Press speed “-” and “M” keys at the same time for more than 3 seconds, then release two keys at the same time, turn on the power switch of treadmill in 2 seconds, after that pairing will be completed.) 1. - Seite 20 P01-P12 Program Map (Optional Function) —→\ Preset Time / 10 period = Time each speed segment Time period (Unit: KM/H) Program Speed Speed Speed Speed Speed Speed Speed Speed Speed Speed Speed Speed - Countdown Function: 1. First turn on the power switch of the treadmill. 2.
-
Seite 21: Adjustment & Maintenance
Adjustment & Maintenance Adjustment of the running belt The running belt may deflect to one side during transportation, please adjust the running belt as follows. 1) If the left gap of the running belt is too big, please keep the treadmill running at the slowest speed. -
Seite 22: Exercise Programs
Exercise Programs WARM UP Start each workout with 5 to 10 minutes of stretching and some light exercises. A proper warm-up increases your body temperature, heart rate and circulation in preparation for exercise. Ease into your exercise. After warming up, increase the intensity to your desired exercise program. -
Seite 23: Error Messages & Solutions
Error Messages & Solutions ERROR FAILURE DESCRIPTION SOLUTIONS The monitor displays the fault code, and the buzzer sounds 3 After turning on the power, the times. Possible cause: The communication between the communication between the electronic control system and the monitor is blocked. monitor and the lower control Check whether the circuit connecting the electronic meter is line is abnormal. - Seite 24 After Sales Service To guarantee an efficient service of damaged or missing parts problem, make sure you have the following items before you contact our After Sales Service: The name or SKU reference of the product. The PO number shown on the main chassis or on the packing box. We will try our best to solve the problem for you ASAP.
- Seite 25 Tapis de marche Tapis roulant sous le bureau Manuel d'utilisation MS306220AAA Fé licitations pour avoir choisi ce produit. Avant d'utiliser ce produit pour la premiè re fois, veuillez lire attentivement le manuel et utilisez l'é quipement uniquement comme dé crit dans le manuel pour é viter les dangers et les blessures.
- Seite 26 Contenu Précautions .........................1 Liste des pieces ..........................2 Présentation du produit ........................3 Instructions de montage .........................3 Instructions de pliage .......................4 Guide d'opération ........................5 Télécommande ........................6 Réglage et entretien ....................8 Programmes d'exercices ..........
-
Seite 27: Liste Des Pieces
Garantie: * Le châssis est garanti 3 ans. Les pièces mobiles sont garanties 1 an. La garantie s'applique à une utilisation normale par un particulier à domicile. Liste des pieces 1. Tapis roulant x 1 3. Clé x 2 2. Lubrifiant x 1 4. -
Seite 28: Présentation Du Produit
Présentation du produit Handrail Air Spring Instructions de montage Soulevez la main courante vers l'avant depuis l'arrière du tapis roulant, les ressorts pneumatiques tiendront sur la colonne verticale lorsqu'elle se verrouille en place. -
Seite 29: Instructions De Pliage
Instructions de pliage 1. Dépliage de la machine. AVERTIR: Les mains courantes sont là pour vous aider à rester centré (équilibré) uniquement. Ne mettez pas tout votre poids sur la main courante. Soulevez la main courante jusqu'à ce qu'elle se verrouille en place. 2. -
Seite 30: Guide D'opération
Guide d'opération PANNEAU DE COMMANDE Basculez l'interrupteur d'alimentation principal qui se trouve à l'avant du tapis roulant sur la position ON. Description de l'affichage à DEL · Affichage de la vitesse · Affichage de l'heure · Affichage des distances · Affichage des calories Paramètre Description ·... -
Seite 31: Télécommande
Télécommande La télécommande était déjà couplée au tapis de course avant la livraison, elle peut être utilisée immédiatement, pas besoin de la coupler à nouveau. (*Comment coupler la télécommande au tapis de course : appuyez sur les touches de vitesse "-" et "M" en même temps pendant plus de 3 secondes , puis relâchez deux touches en mê... - Seite 32 *DISTANCE : Ce mode affiche la distance parcourue. *CALORIES : Ce mode affiche les calories que vous avez brûlées pendant votre exercice. Attention : après une accélération et une décélération, le moniteur changera automatiquement de mode à tour de rôle. Carte de programme P01-P12 (fonction facultative) —...
-
Seite 33: Réglage Et Entretien
Réglage & Entretien Ré glage de la bande de course La bande de course peut dévier d'un côté pendant le transport, veuillez ajuster la bande de course comme suit. 1) If the left gap of the running belt is too big, please keep the treadmill running at the slowest speed. -
Seite 34: Programmes D'exercices
Appliquer le lubrifiant (lubrifiant au silicone) The running belt/ deck plays a major role in the function and life of your treadmill, thus requiring periodic lubrication. Please DO NOT over lubricate the running deck. Programmes d'exercices RÉCHAUFFER Commencez chaque entraî nement par 5 à 10 minutes d'étirements et quelques exercices légers. Un bon échauffement augmente la température de votre corps, votre fréquence cardiaque et votre circulation en vue de l'exercice. -
Seite 35: Messages D'erreur Et Solutions
C'est ainsi que votre pouls doit se comporter pendant un exercice de fitness général. N'oubliez pas de vous échauffer et de vous rafraî chir pendant quelques minutes. Messages d'erreur et solutions DESCRIPTION DE ERREUR SOLUTIONS L'ÉCHEC Après la mise sous tension, la Le moniteur affiche le code d'erreur et le buzzer retentit 3 fois. -
Seite 36: Dé Pannage Géné Ral
Dé pannage géné ral PROBLÈME CAUSES POTENTIELLES CORRECTIONS 1. Tapis de course non branché. 2. Le disjoncteur de la maison 1. Tapis roulant branché. Le tapis roulant ne s'est déclenché. 2. Le disjoncteur de la maison s'est déclenché. démarre pas. 3.