Inhaltsverzeichnis
Werbung
Verfügbare Sprachen
Verfügbare Sprachen
Quicklinks
Werbung
Inhaltsverzeichnis
Fehlerbehebung

Verwandte Anleitungen für Blaupunkt BLUEBOT COMFORT PLUS


Inhaltszusammenfassung für Blaupunkt BLUEBOT COMFORT PLUS
- Seite 1 BLUEBOT COMFORT PLUS USER MANUAL BEDIENUNGSANLEITUNG MANUEL DE L'UTILISATEUR GEBRUIKERSHANDLEIDING MANUAL DE INSTRUCCIONES MANUAL DE INSTRUÇÕES DISPOSAL & RECYCLING Enjoy it.
-
Seite 2: Inhaltsverzeichnis
Welcome! Safety regulations ................03 Product information ..............05 Thank you for choosing the Blaupunkt Bluebot Comfort Plus. Installation of the robot & auto station ........08 Installation of the Bluebot application .........10 With this manual we would like to support you in the set-up and usage of your Blaupunkt Bluebot robot. -
Seite 3: Safety Regulations
1. SAFETY REGULATIONS GENERAL SAFETY REGULATIONS: Before using this product, please read the following safety instructions and follow all routine safety precautions. Please read the instructions carefully, please keep the instructions. Any operation inconsistent with this instruction manual may cause damage to this product. WARNING: ·... - Seite 4 SAFETY REGULATIONS NOTE · Only authorized technicians can disassemble this product. Users are not recommended to disassemble this product by themselves. · Please carefully check whether the power adapter is connected to the socket before · This product can only use the power adapter provided by the factory. lf other use, otherwise the battery may be damaged.
-
Seite 5: Product Information
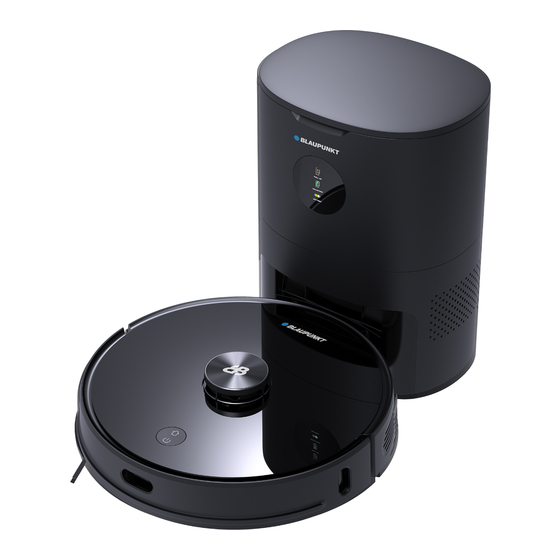
2. PRODUCT INFORMATION Comfort Plus robot Auto station for dust Instruction manual Side Brush (1 installed + 1 extra) collection and charging Mop cloth support Mop (2x) Cleaning brush Main brush cover with knife (installed) HEPA lter n°14 + 2-in-1 combi watertank 250 ml Main Brush Dust bag 3,3L (3x) Sponge lter... - Seite 6 PRODUCT INFORMATION TOP & FRONT BOTTOM Mop cloth Cleaning on&o assembly Anti-collision sensor for radar Charging/local cleaning LDS laser ranging sensor Indicator light Filter cover Wall, Main brush Anti-collision, cover Infrared recharging Main brush sensors Side wheel Side wheel Side brush Battery Cli sensor Upper cover...
- Seite 7 PRODUCT INFORMATION INDICATORS REMINDER Standby Blue light long bright Light o Charging Blue light breath Light o Pause Blue light slowly ash Light o Cleaning/remote control Blue light long bright Light o Recharging Light o Orange light long bright Abnormal Red light fast ash Light o Turned o...
-
Seite 8: Installation Of The Robot & Auto Station
3. INSTALLATION OF THE ROBOT & AUTO STATION AUTO STATION 2 Ensure that there are no obstacles whitin 1.2m in front of the auto station 1 Lay the dust collection charging pile on the at ground over 5cm and 0.5m on both sides. away from the wall, insert the power plug into the socket meeting the requirements, and connect the power supply. -
Seite 9: Product Assembly
INSTALLATION OF THE ROBOT & AUTO STATION PRODUCT ASSEMBLY 4 Fully charge the robot (before 1st time use) 1 Install the side brush with a screw driver untill tight. 5 Connect with Bluebot app (optional) 6 Start cleaning NOTE • Please do not move the auto station without reason and keep it out of direct sunlight. -
Seite 10: Installation Of The Bluebot Application
4. INSTALLATION BLUEBOT APP BLUEBOT APPLICATION 1 Fully charge robot 2 Download Bluebot app 3 Steps for registration 4 Connect robot with app (steps) Make sure the Robot is on, by holding in the ‘On button’ Place the robot in the charging station to charge and Remove the robot from the charging station. - Seite 11 INSTALLATION BLUEBOT APP Select the enter the password and After your registration, make sure the robot is BLUEBOT COMFORT PLUS removed from it's charging station. Turn on your (2.4 + 5Ghz) Robot by pressing the 'On button' . After that is...
-
Seite 12: Usage Of The Robot & Auto Station
5. USAGE OF THE ROBOT & AUTO STATION REMOVE THE LIMIT BAR • Fully charge the robot before starting cleaning. Put the robot on the flat indoor ground, and remove the protection device • Before starting the cleaning, tidy away the wires and articles on the of the limit bar at both ends of the front bumper. -
Seite 13: Cleaning Mode
USAGE OF THE ROBOT & AUTO STATION CLEANING MODE SPOT CLEANING After the robot is powered on, it will scan and generate the map and divide When a local area needs a deep sweep, the user specifies a point on the map on the APP, the machine will automatically drive to the vicinity of the it into areas intelligently. -
Seite 14: Cleaning Settings
6. CLEANING SETTINGS MORE OPTIONS Record* View all your previous vacuum cleaning records. You can see how many m2 has been cleaned and the time it took. Here you can also load previously Timer* Set a timer to program the robot to clean at a certain time or day. saved maps. -
Seite 15: Maintenance
7. MAINTENANCE REPLACE THE DUST BAG CLEAN THE DUST PASSAGE When the dust bag is full, the ‘FULL UP’sign is continuously high If the 'FULL UP' sign ,The 'COLLECTING' sign and the BATTERY sign all is brightness, and app notice is given. Please replace the dust bag in twinkling after the dust bag is replaced, it is recommended to pull out time. - Seite 16 MAINTENANCE CLEAN THE INFRARED LENS/CHARGING AND DUST CLEAN THE FILTER SCREEN OF THE FAN COLLECTION SENSOR HEAD The lter screen of the fan is below the dust bag. If there is dust Wipe them gently with a clean, soft, dry cloth. It is recommended to clean accumulation, wipe it gently with a clean, soft, dry cloth.
- Seite 17 MAINTENANCE CLEAN THE MAIN BRUSH 2 Cut o the hair twisted around on the main brush with the cleaning The main brush is consumable and should be cleaned at least once a week. knife, and then clean the main brush with the cleaning brush with the other end of the cleaning knife.
- Seite 18 MAINTENANCE CLEAN/REPLACE THE SIDE BRUSH 1 Remove the side brush with a screwdriver. 2 Reinstall the side brush after cleaning, or install a new side brush.
- Seite 19 MAINTENANCE CLEAN THE SENSORS It is recommended to use a clean, soft, dry cloth to wipe each sensor gently every week to ensure the normal use of the machine. Robot: Cli sensor X4 Infrared sensor X3 Charging electrode tip X2 Wall-following position sensitive detector X1 Cli sensor Infrared sensor...
-
Seite 20: Firmware-Upgrade
MAINTENANCE Auto Station: BATTERY Infrared lens X2 · The robot is furnished with high-performance lithium-ion batteries. Charging and dust collection sensor head X2 · To maintain battery performance, please keep the robot charged in daily use · If the machine is left unused for any length of time, please shut down and keep it properly. - Seite 21 MAINTENANCE Clean the 2in1 water tank 1 Press and hold the release button of the two-in-one water tank 2 Open the dustbin by pressing the dustbin snap. and at the same time pull it outwards. Dustbin Water tank cover/ water injection port 3 Remove the lter screen clip.
- Seite 22 MAINTENANCE 4 Take out the lter screen. 5 Remove the dirt on the lter screen and screen clip with a cleaning brush. Filter screen clip Filter screen...
- Seite 23 MAINTENANCE 6 Turn on the tap to clean the dustbin 8 Please remove the water tank ttings from the machine according to the illustration and reverse it, remove the mop and clean it. 7 Open the water tank cover and inject an appropriate amount of water.
-
Seite 24: Basic Parameters
8. BASIC PARAMETERS Item Parameter BLUEBOT Comfort Plus Model 350X350X98mm Overall dimension ROBOT 3.65 kg Product weight 14.4V 5000mAh Li-ion battery 1.2A Rated input Item Parameter Overall dimension 260x210X350mm AUTO STATION 220-240V ~ 50/60Hz 950W Rated input 1.2A Rated output... -
Seite 25: Usage Limitations
9. USAGE LIMITATIONS • The product is only used for oor cleaning in a home environment and • Please do not wipe any part of the product using a wet cloth or any liquid. cannot be used for outdoor (such as an open terrace), non-ground (such •... -
Seite 26: Troubleshooting
10. TROUBLESHOOTING When the machine runs abnormally, the power indicator will blink in orange, and the machine will give a voice prompt when some faults occur. Please refer to the table below for a solution. Voice prompt/fault phenomena Possible causes Solution Remove the obstacle or move the machine to an open place and Please check whether the radar is stuck... - Seite 27 Voice prompt/fault phenomena Possible causes Solution The auto station is blocked or too far away; the auto station Please put the auto station in the open area, and put the machine is not conn ected to the power supply; there are strange near the auto station to retry;...
-
Seite 28: Warranty
(according to the Owner’s Manual). This warranty will be void if it is found that the device has been tampered with, has been repaired by a person or service not authorised by Blaupunkt. The guarantee is only valid with the receipt/ invoice provided at purchase. -
Seite 29: Willkommen
Einrichtung Ihres Roboters unterstützen: Willkommen! Sicherheitshinweise ............... 30 Produktinformation ............... 32 Vielen Dank, dass Sie sich für den Blaupunkt Bluebot Comfort Plus Installation des Roboters und der Autostation ......35 entschieden haben. Installation der app .................37 Mit diesem Handbuch möchten wir Sie bei der Einrichtung und Nutzung Nutzung des Roboters und der Autostation ........39... -
Seite 30: Sicherheitshinweise
1. SICHERHEITSHINWEISE ALLGEMEINE SICHERHEITSVORSCHRIFTEN: Bevor Sie dieses Produkt verwenden, lesen Sie bitte die folgenden Sicherheitshinweise und befolgen Sie alle üblichen Sicherheitsvorkehrungen. Bitte lesen Sie die Anleitung sorgfältig durch und bewahren Sie diese auf. Jede Bedienung, die nicht mit dieser Anleitung übereinstimmt, kann zu Schäden an diesem Produkt führen. WARNUNG: •... - Seite 31 SICHERHEITSHINWEISE ACHTUNG · Bitte leeren Sie den Staubbehälter, bevor Sie dieses Produkt verwenden, wenn der Staubbehälter voll ist. · Dieses Produkt kann nur von autorisierten Technikern zerlegt werden. Wir raten den Benutzern dringend · Dieses Produkt kann in einem Temperaturbereich von 0 bis 40 Grad Celsius in Betrieb genommen werden. davon ab, dieses Produkt selbst zu zerlegen.
-
Seite 32: Produktinformation
2. PRODUKTINFORMATION Comfort Plus robot Autostation für Staubabsaugung Benutzerhandbuch Seitenbürste (1 installiert + 1 extra) und Au adung Mopphalterung Wischtuch (2x) Reinigungsbürste mit Hauptbürstenabdeckung Messer (installiert) HEPA lter n°14 + Staubsaugerbeutel Rollbürste 2 in 1 elektrisch Schwamm lter (installiert) (3x) (1 installiert + 1 extra) gesteuerter wassertank... -
Seite 33: Oben Ansicht
PRODUKTINFORMATION OBEN ANSICHT BODENANSICHT Mopptuch- Reinigung ein&aus Montage Au aden/lokale Reinigung Kollisionsschutzsensor für Anzeigelicht LDS-Laser-Reichweitensensor den Radar Filterabdeckung Wand, Hauptbürsten- Anti-Kollision, abdeckung Infrarot- Rollbürste Au adungssensoren Battery Seitenbürste Anti-sturz- Obere Abdeckung Sensor Staubbehälter Taste Ö nen Sie die obere Abdeckung, Universalrad Staubbeutel installieren/entfernen. -
Seite 34: Indikatoren Zur Erinnerung
PRODUKTINFORMATION INDIKATOREN ZUR ERINNERUNG Standby Blaues Licht lange hell au euchtend Licht aus Au aden Blaues Licht Atem Licht aus Pause Blaues Licht langsam blinkend Licht aus Reinigung/Fernbedienung Blaues Licht lange hell au euchtend Licht aus Orangefarbenes Licht lange Licht aus Au aden hell au euchtend Rotes Licht schnell blinkend... -
Seite 35: Installation Des Roboters Und Der Autostation
3. MONTAGEANLEITUNG ROBOTER & AUTOSTATION AUTOSTATION 2 Vergewissern Sie sich, dass sich in einem Abstand von 1,2 m vor der 1 Legen Sie die Autostation mit einem Abstand von 5 cm zur Wand auf den Autostation und 0,5 m auf beiden Seiten keine Hindernisse be nden. achen Boden, stecken Sie den Netzstecker in die entsprechende Steckdose und schließen Sie die Stromversorgung an. -
Seite 36: Mit Bluebot App Verbinden (Optional)
MONTAGEANLEITUNG ROBOTER & AUTOSTATION PRODUKTMONTAGE 4 Laden Sie den Roboter vollständig auf (vor dem 1. Einsatz) 1 Montieren Sie die Seitenbürste mit einem Schraubendreher, bis sie fest sitzt. 5 Mit Bluebot App verbinden (optional) 6 Reinigung starten HINWEIS • Bitte bewegen Sie die Ladestation nicht ohne Grund und halten Sie sie von direkter Sonneneinstrahlung fern. -
Seite 37: Installation Der App
4. INSTALLATION DER APP BLUEBOT ANWENDUNG 1 Roboter vollständig au aden 2 Bluebot-App herunterladen 3 Schritte zur Registrierung 4 Roboter mit App verbinden (Schritte) Stellen Sie sicher, dass der Roboter eingeschaltet ist, indem Stellen Sie den Roboter zum Laden in die Ladestation und Sie die ‘Ein-Taste’... - Seite 38 Wahlen sie lhr WLAN Stellen Sie sicher, dass der Roboter aus der Wählen Sie den Netzwerk, geben Sie die Ladestation entfernt ist. Schalten Sie nach der Bluebot COMFORT PLUS Passwort und drücken Sie Registrierung Ihren Roboter ein. (2.4 + 5 Ghz). ‘Weiter’.
-
Seite 39: Verwendung Des Roboters & Autostation
5. VERWENDUNG DES ROBOTERS & AUTOSTATION ENTFERNEN DER BEGRENZUNGSSTANGE • Laden Sie den Roboter vor Beginn der Reinigung vollständig auf. Stellen Sie den Roboter auf einen ebenen Hallenboden und entfernen • Räumen Sie vor Beginn der Reinigung Drähte und Gegenstände auf dem Sie die Schutzvorrichtung der Begrenzungsstange an beiden Enden der Boden weg, um Schäden durch Aufwickeln, Ziehen und Stöße während der vorderen Stoßfängers. -
Seite 40: Spot-Reinigung
VERWENDUNG DES ROBOTERS & AUTOSTATION REINIGUNGSMODUS SPOT-REINIGUNG Nachdem der Roboter eingeschaltet ist, scannt und generiert er die Karte und teilt sie intelligent in Bereiche ein. Dann fegt er die Bereiche Wenn ein lokaler Bereich tief gereinigt werden muss, gibt der Benutzer nacheinander geordnet, effizient und gründlich an der Wand entlang und einen Punkt auf der Karte in der APP an. -
Seite 41: Reinigungseinstellungen
6. REINIGUNGSEINSTELLUNGEN MEHR OPTIONEN Benutzerdefinierter Modus* So kann sich der Roboter pro Bereich merken, welchen Weg er für die Reinigung nehmen Timer* soll. Stellen Sie einen Timer ein, um den Roboter so zu programmieren, dass er zu einer bestimmten Zeit oder an einem bestimmten Tag reinigt. Aufzeichnung* Sehen Sie sich alle Ihre bisherigen Staubsaugaufzeichnungen an. -
Seite 42: Den Staubsaugerbeutel Austauschen
7. WARTUNG DEN STAUBSAUGERBEUTEL AUSTAUSCHEN DEN STAUBKANAL REINIGEN Wenn der Staubsaugerbeutel voll ist, leuchtet das "VOLLSTÄNDIG Wenn das "VOLLSTÄNDIG GEFÜLLT"-Zeichen, das "AUFSAMMELN"- GEFÜLLT"-Zeichen kontinuierlich hell auf und es wird ein Zeichen und das AKKU-Zeichen nach dem Auswechseln des entsprechender Hinweis angezeigt. Bitte tauschen Sie den Staubbeutels blinken, wird empfohlen, den Netzstecker zu ziehen und Staubbeutel rechtzeitig aus. -
Seite 43: Die Infrarotlinse/Den Lade Und Staubsammel Sensorkopf Reinigen
WARTUNG DIE INFRAROTLINSE/DEN LADE UND STAUBSAMMEL REINIGEN DES FILTERSIEBS DES VENTILATORS SENSORKOPF REINIGEN Das Filtersieb des Ventilators be ndet sich unterhalb des Staubsauger- beutels. Wenn sich Staub angesammelt hat, wischen Sie es vorsichtig mit Wischen Sie sie vorsichtig mit einem sauberen, weichen und trockenen einem sauberen, weichen und trockenen Tuch ab. - Seite 44 WARTUNG ROLLBÜRSTE | REGELMÄSSIGE REINIGUNG 2 Schneiden Sie die auf der Hauptbürste verdrehten Haare mit dem Die Hauptbürste ist ein Verschleißteil und sollte mindestens einmal pro Reinigungsmesser ab und reinigen Sie dann die Hauptbürste mit der Woche gereinigt werden. Es wird empfohlen, die Hauptbürste alle 6-12 Reinigungsbürste mit dem anderen Ende des Reinigungsmessers.
- Seite 45 WARTUNG SEITENBÜRSTE | REGELMÄSSIGE REINIGUNG 1 Entfernen Sie die Seitenbürste mit einem Schraubendreher. 2 Setzen Sie die Seitenbürste nach der Reinigung wieder ein oder setzen Sie eine neue Seitenbürste ein.
-
Seite 46: Die Sensoren Reinigen
WARTUNG DIE SENSOREN REINIGEN Es wird empfohlen jeden Sensor wöchentlich mit einem sauberen, weichen und trockenen Tuch vorsichtig abzuwischen, um die normale Nutzung des Geräts zu gewährleisten. Roboter: Anti-sturz-Sensor X4 Infrarotsensor X3 Spitze der Au adeelektrode X2 Anti-sturz-Sensor Positionssensor zur Wandnachführung X1 Infrarotsensor Infrarotsensor Infrarotsensor... -
Seite 47: Aktualisierung Der Firmware
WARTUNG Autostation: BATTERIE Infrarotsensor X2 • Das Gerät ist mit Hochleistungs-Lithium-Ionen-Batterien ausgestattet. Sensorkopf zum Au aden und Sammeln von Staub X2 • Bitte halten Sie das Gerät im täglichen Gebrauch aufgeladen, um die Batterieleistung aufrechtzuerhalten. • Wenn das Gerät längere Zeit nicht benutzt wird, fahren Sie es bitte herunter und bewahren Sie es ordnungsgemäß... - Seite 48 WARTUNG Reinigen Sie den 2in1-Wassertank 1 Halten Sie die Entriegelungstaste des Zwei-in-Eins-Wassertanks 2 Ö nen Sie den Staubbehälter, indem Sie auf den Druckknopf gedrückt und ziehen Sie ihn gleichzeitig nach außen. des Staubbehälters drücken. Staubbehälter Wassertankdeckel / Wassereinspritzö nung 3 Die Klammer des Filtersiebs wieder anbringen Staubbehälter-Schnappverschluss Auslösetaste...
- Seite 49 WARTUNG 4 Nehmen Sie den Filterschirm heraus 5 Entfernen Sie den Schmutz auf dem Filterschirm und der Schirm- klammer mit einer Reinigungsbürste Filter screen clip Filter screen...
-
Seite 50: Drehen Sie Den Wasserhahn Auf, Um Den Staubbehälter Zu Reinigen
WARTUNG 6 Drehen Sie den Wasserhahn auf, um den Staubbehälter zu 8 Bitte entfernen Sie die Anschlüsse des Wassertanks gemäß der reinigen Abbildung und drehen Sie sie um, nehmen Sie den Wischmopp heraus und reinigen Sie ihn. 7 Ö nen Sie den Wassertankdeckel und füllen Sie eine angemess- ene Menge Wasser ein 1. -
Seite 51: Grundsätzliche Parameter
8. GRUNDSÄTZLICHE PARAMETER Einzelheiten Parameters BLUEBOT Comfort Plus Modell 350X350X98mm Gesamtgröße GERÄT 3.65 kg Gewicht des Produkts Li-ion Batterie 14.4V 5000mAh Nennspannung 1.2A Einzelheiten Parameters 260x210X350mm Gesamtgröße AUTOSTATION 220-240V ~ 50/60Hz 950W Nennleistung 1.2A Bemessungsleistung... -
Seite 52: Nutzungsbeschränkungen
9. NUTZUNGSBESCHRÄNKUNGEN • Das Produkt wird nur zur Bodenreinigung in einer häuslichen Umgebung Teppichen (einige dunkle Teppiche können möglicherweise nicht verwendet und kann nicht im Freien (wie einer o enen Terrasse), normal gereinigt werden). nicht auf Erhöhungen (wie einem Sofa) sowie in gewerblichen oder indus- •... -
Seite 53: Problembehebung
10. PROBLEMBEHEBUNG Wenn das Gerät nicht ordnungsgemäß läuft, blinkt die Betriebsanzeige orange und das Gerät gibt eine Sprachansage aus, wenn eine Störung auftritt. In der nachstehenden Tabelle finden Sie dazu eine Lösung. Sprachausgabe/Störungsphänomene Mögliche Ursachen Lösungen Entfernen Sie das Hindernis oder fahren Sie die Maschine an einen Bitte prüfen Sie, ob das Radar blockiert ist Das Lidar ist blockiert oder klemmt freien Platz und starten Sie sie neu. - Seite 54 Sprachausgabe/Störungsphänomene Mögliche Ursachen Lösungen Bitte stellen Sie die Autostation in den o enen Bereich, und stellen Die Autostation ist blockiert oder zu weit entfernt; Sie die Maschine zur Wiederholung in die Nähe der Autostation; die Autostation ist nicht an die Stromversorgung anges- Au aden fehlgeschlagen.
-
Seite 55: Garantie
Person oder Dienstleistung repariert wurde. Die Garantie ist nur mit der beim Kauf vorgelegten Quittung/Rechnung gültig. Blaupunkt verp ichtet sich, die o.g. Leistungen in der Garantiezeit nur dort zu erbringen, wo es einen autorisierten Service unterhält. Verbraucher, die sich nicht in der Nähe einer autorisierten Servicestelle be nden, tragen die Kosten und das Risiko des Transports zu einer autorisierten Servicestelle ihrer Wahl. - Seite 56 Bienvenue! Règles de sécurité ................57 Informations sur le produit ............59 Nous vous remercions d'avoir choisi le Blaupunkt Bluebot Comfort Plus Installation de l'aspirateur robot et de la station automatique Installation de l'application Bluebot ..........65 Avec ce manuel, nous souhaitons vous aider à con gurer et à utiliser votre robot Blaupunkt Bluebot.
-
Seite 57: Règles De Sécurité
1. RÈGLES DE SÉCURITÉ RÈGLES GÉNÉRALES DE SÉCURITÉ : Avant d'utiliser ce produit, veuillez lire les instructions de sécurité suivantes et suivre toutes les mesures de sécurité habituelles. Veuillez lire attentivement les instructions, veuillez les conserver. Toute opération non conforme à ce manuel d'instructions peut endommager ce produit. AVERTISSEMENT: ·... - Seite 58 RÈGLES DE SÉCURITÉ NOTE · Pour éviter de trébucher, veuillez informer les autres membres de la maison lorsque · Seuls les techniciens autorisés peuvent démonter ce produit. Il n'est pas recom- ce produit fonctionne. mandé aux utilisateurs de démonter ce produit eux-mêmes. ·...
-
Seite 59: Informations Sur Le Produit
2. INFORMATIONS SUR LE PRODUIT Comfort Plus robot Station automatique de Manuel d'instruction Brosse latérale (1 installé + 1 extra) dépoussiérage et de chargement Support du chi on Chi on de nettoyage (2x) Brosse de nettoyage Couvercle de la brosse avec couteau principale (installé) Filtre HEPA n°14 + ltre éponge... - Seite 60 INFORMATIONS SUR LE PRODUIT TOP & FRONT BOTTOM Assemblage de Nettoyage on&o la serpillière Capteur anti-collision pour radar Chargement/ nettoyage Capteur de distance laser LDS local Voyant lumineux Couvercle du ltre Mur, Couvercle Anti-collision, de la brosse Capteurs de recharge Brosse principale roulante infrarouge...
- Seite 61 INFORMATIONS SUR LE PRODUIT RAPPEL DES INDICATEURS Veille Lumière bleue longuement brillante Lumière éteinte Chargement Sou e de lumière bleue Lumière éteinte Pause Lumière bleue clignotant lentement Lumière éteinte Nettoyage/télécommande Lumière bleue longuement brillante Lumière éteinte Lumière orange Lumière éteinte Recharge longuement brillante Anormal...
-
Seite 62: Installation De L'aspirateur Robot Et De La Station Automatique
3. INSTALLATION OF THE ROBOT & AUTO STATION AUTO STATION 2 Assurez-vous qu'il n'y a pas d'obstacles à moins de 1,2 m devant la station 1 Placez la station automatique sur un sol plat à plus de 5 cm du mur, insérez automatique et 0,5 m de chaque côté. - Seite 63 INSTALLATION OF THE ROBOT & AUTO STATION ASSEMBLAGE DU PRODUIT 4 Chargez complètement le robot (avant la première 1 Installez la brosse latérale à l'aide d'un tournevis jusqu'à ce utilisation). qu'elle soit bien serrée. 5 Connectez-vous à l'application Bluebot (en option) 6 Commencez le nettoyage NOTE •...
- Seite 64 4. INSTALLATION DE L'APPLICATION BLUEBOT APPLICATION BLUEBOT 1 Chargement complet du robot 2 Téléchargement de l'application Bluebot 3 Étapes de l'enregistrement 4 Connexion du robot avec l'application (étapes) Assurez-vous que le robot est allumé, en maintenant le bouton "On" enfoncé pendant quelques secondes sur le Retirez le robot de la station de charge.
-
Seite 65: Installation De L'application Bluebot
Sélectionnez votre réseau Sélectionnez le wi , entrez le mot de passe Après votre enregistrement, assurez-vous que le BLUEBOT COMFORT PLUS et appuyez sur la touche de robot est retiré de sa station de charge. Allumez (2.4 + 5Ghz) con rmation. - Seite 66 5. USAGE OF THE ROBOT & AUTO STATION RETIRER LA BARRE DE LIMITE • Chargez complètement le robot avant de commencer le nettoyage. • Avant de commencer le nettoyage, rangez les fils et les articles sur le Posez le robot sur le sol plat de l'intérieur, et retirez le dispositif de sol pour éviter les dommages causés par l'enroulement, le traînage et les protection de la barre de limite aux deux extrémités du pare-chocs avant.
-
Seite 67: Mode Nettoyage
USAGE OF THE ROBOT & AUTO STATION MODE NETTOYAGE NETTOYAGE SPOT Une fois le robot mis sous tension, il scanne et génère la carte et la Lorsqu'une zone locale a besoin d'un balayage en profondeur, l'utilisateur spécifie un point sur la carte de l'APP, la machine se déplace divise en zones de manière intelligente. -
Seite 68: Paramètres De Nettoyage
6. PARAMÈTRES DE NETTOYAGE PLUS D'OPTIONS Enregistrement* Affichez tous vos enregistrements d'aspirateurs précédents. Vous pouvez voir Minuterie* Réglez une minuterie pour programmer le robot afin qu'il nettoie à une certaine combien de m2 ont été nettoyés et le temps que cela a pris. Vous pouvez également heure ou un certain jour. -
Seite 69: Entretien
7. ENTRETIEN REMPLACER LE SAC À POUSSIÈRE NETTOYEZ LE PASSAGE DE LA POUSSIÈRE Lorsque le sac à poussière est plein, le signe "FULL UP" est en Si le signe 'FULL UP' , le signe 'COLLECTING' et le signe BATTERY permanence très lumineux et un message d'avertissement est émis. clignotent tous après le remplacement du sac à... - Seite 70 ENTRETIEN NETTOYER LA LENTILLE INFRAROUGE/LA TÊTE DU NETTOYER LA GRILLE DU FILTRE DU VENTILATEUR CAPTEUR DE CHARGEMENT ET DE DÉPOUSSIÉRAGE La grille du ltre du ventilateur se trouve sous le sac à poussière. En cas Essuyez-les délicatement avec un chi on propre, doux et sec. Il est d'accumulation de poussière, essuyez-le doucement avec un chi on pro- pre, doux et sec.
-
Seite 71: Nettoyer La Brosse Principale
ENTRETIEN NETTOYER LA BROSSE PRINCIPALE 2 Coupez les poils enroulés sur la brosse principale à l'aide du couteau de La brosse principale est un consommable et doit être nettoyée au moins nettoyage, puis nettoyez la brosse principale à l'aide de l'autre extrémité du couteau de nettoyage. - Seite 72 ENTRETIEN CLEAN/REPLACE THE SIDE BRUSH 1 Retirez la brosse latérale à l'aide d'un tournevis.. 2 Réinstallez la brosse latérale après l'avoir nettoyée, ou installez une nouvelle brosse latérale.
-
Seite 73: Nettoyer Les Capteurs
ENTRETIEN NETTOYER LES CAPTEURS Il est recommandé d'utiliser un chi on propre, doux et sec pour essuyer délicatement chaque capteur chaque semaine a n de garantir une utilisation normale de la machine. Robot: Capteur Cli X4 Capteur infrarouge X3 Pointe d'électrode de charge X2 Capteur anti-chute Détecteur sensible à... -
Seite 74: Mise À Jour Du Firmware
ENTRETIEN Auto Station: BATTERIE Objectif infrarouge X2 · Le robot est équipé de batteries lithium-ion haute performance. Tête de capteur de chargement et de dépoussiérage X2 · Pour maintenir les performances des batteries, veuillez garder le robot chargé lors d'une utilisation quotidienne. ·... - Seite 75 ENTRETIEN Nettoyage du réservoir d'eau 2 en 1 1 Maintenez enfoncé le bouton de déverrouillage du réservoir 2 Ouvrez la poubelle en appuyant sur le bouton de la poubelle. d'eau 2 en 1 et tirez-le en même temps vers l'extérieur. Poubelle Couvercle du réservoir d'eau / Ori ce d'injection d'eau...
- Seite 76 ENTRETIEN 5 Enlevez la saleté sur le ltre et le clip du ltre avec une brosse de 4 Retirez la grille du filtre. nettoyage. Couvercle de la brosse principale ltre éponge...
- Seite 77 ENTRETIEN 6 Ouvrez le robinet pour nettoyer la poubelle. 8 Veuillez retirer les raccords du réservoir d'eau de la machine conformément à l'illustration et inversez-les, retirez la serpillière et nettoyez-la. 7 Ouvrez le couvercle du réservoir d'eau et injectez une quantité d'eau appropriée.
-
Seite 78: Paramètres De Base
8. PARAMÈTRES DE BASE Article Paramètre Modèle BLUEBOT Comfort Plus 350X350X98mm Dimension totale ROBOT 3.65 kg Poids du produit Batterie Li-ion 14.4V 5000mAh 1.2A Tension nominale Article Paramètre 260x210X350mm Dimension totale AUTO STATION Puissance nominale 220-240V ~ 50/60Hz 950W 1.2A... -
Seite 79: Limites D'utilisation
9. LIMITES D'UTILISATION • Le produit est uniquement utilisé pour le nettoyage des sols dans un ou en état d'extinction. environnement domestique et ne peut pas être utilisé pour un environne- • N'essuyez aucune partie du produit avec un chi on humide ou un liqui- ment extérieur (tel qu'une terrasse ouverte), non terrestre (tel qu'un de quelconque. -
Seite 80: Dépannage
10. DÉPANNAGE Lorsque la machine fonctionne anormalement, le voyant d'alimentation clignote en orange, et la machine émet un message vocal lorsque certaines anomalies se produisent. Veuillez consulter le tableau ci-dessous pour trouver une solution. Phénomènes d'alerte vocale/ phénomènes de défaut Causes possibles Solution Retirez l'obstacle ou déplacez la machine vers un endroit ouvert... - Seite 81 Phénomènes d'alerte vocale/ phénomènes de défaut Causes possibles Solution La station automatique est bloquée ou trop éloignée ; Veuillez placer la station automatique dans une zone ouverte, et placer la machine près de la station automatique pour réessayer la station automatique n'est pas connectée à l'alimentation La rechargement a échoué.
-
Seite 82: Garantie
(selon le manuel d'utilisation). Cette garantie sera annulée s'il s'avère que l'appareil a été altéré, a été réparé par une personne ou un service non autorisé par Blaupunkt. La garantie n'est valable qu'avec le reçu/facture fourni lors de l'achat. - Seite 83 Welkom! Veiligheidsinformatie ..............84 Productinformatie ................86 Bedankt voor het kiezen van de Blaupunkt Bluebot Comfort Plus. Installatie van de robot & auto station ........89 Installatie van de Bluebot-applicatie..........91 Met deze handleiding willen wij u graag ondersteunen bij de installatie en het gebruik van jouw Blaupunkt Bluebot robot.
-
Seite 84: Veiligheidsinformatie
1. VEILIGHEIDSINFORMATIE ALGEMENE VEILIGHEIDSINFORMATIE: Voordat u dit product gebruikt, dient u de volgende veiligheidsinstructies te lezen en alle gebruikelijke veiligheids-voorzorgsmaatregelen te volgen. Lees de instructies zorgvuldig door, bewaar de instructies. Elk gebruik dat niet in overeenstemming is met deze gebruiksaanwijzing kan leiden tot schade aan dit product. - Seite 85 VEILIGHEIDSINFORMATIE NOTE • Alleen bevoegde technici kunnen dit product demonteren. We raden het onze • Controleer zorgvuldig of de adapter is aangesloten op het stopcontact alvorens het gebruikers niet aan om dit product zelf te demonteren. te gebruiken, anders kan de batterij beschadigd raken. •...
- Seite 86 2. PRODUCT INFORMATION Comfort Plus robot Auto station voor Handleiding Zijborstels stofafzuiging en opladen (1 geïnstalleerd + 1 extra) Dweilhouder Dweil (2x) Cleaning brush Hoofdborstel deksel with knife (geïnstalleerd) HEPA lter n°14 + spns lter Stofzak 3,3L (3x) 2 in 1 elektrisch geregeld Spiraal vormige rolborstel (1 geïnstalleerd + 1 extra) waterreservoir...
-
Seite 87: Productinformatie
PRODUCTINFORMATIE BOVEN & ONDERAANZICHT ONDERAANZICHT Mopdoek Reiniging aan&uit montage Anti-botssensor voor radar Opladen/lokaal reinigen LDS laser afstandssensor Controlelampje Filterdeksel Muur, Hoofdborstel Anti-botsing, deksel Infrarood opladen Rolborstel sensoren Aandrijfwiel Aandrijfwiel Battery Side brush Anti-valsensor Upper cover Open the upper cover, Knop stofreservoir Universeel Install/remove dust bag. - Seite 88 PRODUCTINFORMATIE INDICATOREN HERINNERING Standby Blauw licht lang helder Licht uit Opladen Blauw licht adem Licht uit Pauze Blauw licht langzaam knipperend Licht uit Reinigen/afstandsbediening Blauw licht lang helder Licht uit Opladen Licht uit Oranje lichtje lang helder Abnormaal Rode lichte snelle its Licht uit Uitgeschakeld Blauwe lichte snelle its...
-
Seite 89: Installatie Van De Robot & Auto Station
3. INSTALLATIE VAN DE ROBOT & AUTO STATION AUTO STATION 2 Zorg ervoor dat er geen obstakels zijn binnen 1,2 m voor het autostation 1 Plaats het auto-station op de vlakke grond op meer dan 5 cm afstand van en 0,5 m aan weerszijden. de muur, steek de stekker in het stopcontact dat aan de eisen voldoet, en sluit de voeding aan. - Seite 90 INSTALLATIE VAN DE ROBOT & AUTO STATION PRODUCTASSAMBLAGE 4 Laad de robot volledig op (voor het eerste gebruik) 1 Monteer de zijborstel met een schroevendraaier tot hij goed vastzit. 5 Maak verbinding met de Bluebot app (optioneel) 6 Start met schoonmaken NOTE •...
-
Seite 91: Installatie Van De Bluebot-Applicatie
4. INSTALLATIE BLUEBOT APP 1 Laad de robot volledig op 2 Download de Bluebot app 3 Volg de stappen voor registratie 4 Verbind de robot met de app (zie onderstaande stappen) BLUEBOT APP Plaats de robot op het oplaadstation om op te laden en zorg Zorg ervoor dat de robot aan staat, door de ‘Aan knop’... - Seite 92 INSTALLATIE BLUEBOT APP Selecteer de Voer uw WIFI-wachtwoord in BLUEBOT COMFORT PLUS en druk op bevestigen. Zorg er na uw registratie voor dat de robot van (2.4 + 5Ghz) zijn oplaadstation is afgehaald. Zet uw robot aan door op de ‘Aan-knop’ te drukken.
-
Seite 93: Installatie Van De Robot & Auto Station
5. GEBRUIK VAN DE ROBOT & AUTO STATION DE BESCHERMRANDEN VERWIJDEREN • Laad de robot volledig op voordat u met de reiniging begint. Zet de robot op een vlakke ondergrond en verwijder de beveiliging aan • Alvorens met de reiniging te beginnen, ruim de draden en voorwerpen beide uiteinden van de voorbumper. - Seite 94 GEBRUIK VAN DE ROBOT & AUTO STATION SPOT SCHOONMAAK SCHOONMAAK MODUS Wanneer een plaatselijk gebied een extra schoonmaak nodig heeft, kun je in de app deze plek selecteren. De robot zal dan twee keer reinigen binnen Gebruik deze functie bij het eerste gebruik van de robot. De robot zal dan een straal van1,5mx1,5m met de startpositie als centraal punt.
-
Seite 95: Reinigingsinstellingen
6. SCHOONMAAK INSTELLINGEN Custom mode* MEER OPTIES Deze functie zorgt ervoor dat de robot per gebied routes onthoudt. Timer* Record* Zet een timer die aangeeft wanneer de robot op vaste tijden moet gaan schoonma- Hiermee kunt u al uw vorige schoonmaaksessies bekijken. Hier ziet u het aantal ken. -
Seite 96: Onderhoud
7. ONDERHOUD DE STOFZAK VERVANGEN REINIG DE STOFDOORGANG Wanneer de stofzak vol is, brandt het 'FULL UP'-symbool continu fel, Als het 'FULL UP' teken, het 'COLLECTING' teken en het BATTERY teken en wordt er een waarschuwing gegeven. Vervang de stofzak op tijd. allemaal knipperen nadat de stofzak is vervangen, is het raadzaam om Het 'COLLECTING'-symbool is helder terwijl de stofzuiger in werking is. - Seite 97 ONDERHOUD DE INFRARODE LENS/OPLAAD EN HET FILTERSCHERM VAN DE VENTILATOR REINIGEN STOFVERZAMELSENSORKOP SCHOONMAKEN Het lterscherm van de ventilator bevindt zich onder de stofzak. Als er zich stof ophoopt, veeg het dan voorzichtig schoon met een schone, zachte, Veeg ze voorzichtig schoon met een schone, zachte, droge doek. Het wordt droge doek.
- Seite 98 ONDERHOUD ROLBORSTEL | REGELMATIG SCHOONMAKEN 2 Snijd met het reinigingsmes de haren af die op de hoofdborstel gedraaid De hoofdborstel is een verbruiksartikel en moet ten minste eenmaal per zitten en maak vervolgens de hoofdborstel met de reinigingsborstel week worden gereinigd. Het wordt aanbevolen om de hoofdborstel om de schoon met het andere uiteinde van het reinigingsmes.
- Seite 99 ONDERHOUD ZIJBORSELS | REGELMATIG SCHOONMAKEN 1 Verwijder de zijborstel met een schroevendraaier. 2 Installeer de zijborstel opnieuw na het reinigen, of installeer een nieuwe zijborstel.
- Seite 100 ONDERHOUD DE SENSOREN REINIGEN Het wordt aanbevolen om elke week met een schone, zachte, droge doek elke sensor voorzichtig schoon te vegen om een normaal gebruik van het apparaat te garanderen. Robot: Anti-valsensor X4 Infrarood sensor X3 Uiteinde oplaadelektrode X2 Anti-valsensor Muur-volgende positie sensor X1 Infrarood sensor...
- Seite 101 ONDERHOUD Auto Station: BATTERIJ Infrarood sensor X2 • De robot is uitgerust met krachtige lithium-ion batterijen. De infrarode lens/oplaad- en stofverzamelsensorkop schoonmaken X2 • Om de prestaties van de batterij te behouden, dient u de robot bij dagelijks gebruik opgeladen te houden. •...
- Seite 102 ONDERHOUD De 2in1 watertank reinigen 1 Houd de ontgrendelknop van de 2-in-1 watertank ingedrukt en 2 Open de vuilnisbak door op de vuilnisbakvergrendeling te trek hem tegelijkertijd naar buiten. drukken Stofreservoir Watertankdeksel / waterinjectiepoort 3 Verwijder de clip van de lterzeef Vuilnisbak klik Ontgrendelknop...
- Seite 103 ONDERHOUD 4 Neem de lterzeef eruit. 5 Verwijder het vuil op de lterzeef en de zeefklem met een reinigingsborstel. Filtergaas Spns lter...
- Seite 104 ONDERHOUD 6 Draai de kraan open om de vuilnisbak schoon te maken 8 Verwijder het beslag van het waterreservoir van de machine volgens de illustratie en draai het om, verwijder de mop en maak deze schoon. 7 Open het deksel van het waterreservoir en giet er een geschikte hoeveelheid water in.
-
Seite 105: Basisparameters
8. BASIS PARAMETERS Item Parameter BLUEBOT Comfort Plus Model 350X350X98mm Totale afmeting ROBOT 3.65 kg Product gewicht Li-ion batterij 14.4V 5000mAh Nominale spanning 1.2A Item Parameter 260x210X350mm Totale afmeting AUTO STATION 220-240V ~ 50/60Hz 950W Nominaal vermogen 1.2A Nominale output... -
Seite 106: Gebruiksbeperkingen
9. GEBRUIKSBEPERKINGEN • Het product wordt alleen gebruikt voor vloerreiniging in een thuisomgeving en • Verplaats het apparaat niet door de beschermkap van de laserafstandssensor en kan niet buitenshuis (zoals een open terras), weg van de grond de bumper vast te houden. (zoals op een bank) of in commerciële of industriële omgevingen worden gebruikt. -
Seite 107: Probleemoplossing
10. PROBLEEMOPLOSSING Wanneer de machine abnormaal werkt, zal de stroomindicator oranje knipperen, en de machine zal een stemmelding geven wanneer zich enkele storingen voordoen. Raadpleeg de onderstaande tabel voor een oplossing. Wanneer de machine abnormaal werkt, zal de stroomindicator oranje knipperen, en de machine zal een stemmelding geven wanneer zich Raadpleeg de onderstaande tabel voor een oplossing. - Seite 108 Wanneer de machine abnormaal werkt, zal de stroomindicator oranje knipperen, en de machine zal een stemmelding geven wanneer zich Raadpleeg de onderstaande tabel voor een oplossing. enkele storingen voordoen. Het auto-station is geblokkeerd of te ver weg; Zet het auto-station in de open ruimte, en zet de machine in de buurt van het auto-station om het opnieuw te proberen;...
-
Seite 109: Garantie
Blaupunkt is geautoriseerd. De garantie is alleen geldig met de bij aankoop overhandigde kassabon/factuur. Blaupunkt verbindt zich ertoe de bovenvermelde diensten tijdens de garantieperiode enkel te verlenen op plaatsen waar zij een geautoriseerde dienst onderhoudt. Consumenten die zich niet in de nabijheid van een geautoriseerd servicecentrum bevinden, zijn zelf verantwoordelijk voor de kosten en risico's van vervoer naar de geautoriseerde service van hun keuze. - Seite 110 ¡Bienvenido! Normas de seguridad ..............111 Información del producto ............113 Gracias por elegir el Blaupunkt Bluebot Comfort Plus. Instalación del robot ..............116 Instalación del robot y de la estación automática ..... 118 Con este manual nos gustaría ayudarlo en la con guración y uso de su robot Blaupunkt Bluebot.
-
Seite 111: Normas De Seguridad
1. NORMAS DE SEGURIDAD NORMAS GENERALES DE SEGURIDAD: Antes de utilizar este producto, lea las siguientes instrucciones de seguridad y siga todas las precauciones de seguridad habituales. Lea atentamente las instrucciones y consérvelas. Cualquier operación inconsistente con este manual de instrucciones puede causar daños a este producto. ADVERTENCIA: ·... - Seite 112 NORMAS DE SEGURIDAD NOTA · Sólo los técnicos autorizados pueden desmontar este producto. No se recomienda a los usuarios desmontar este producto por sí mismos. · Compruebe cuidadosamente si el adaptador de corriente está conectado a la toma de corriente ·...
-
Seite 113: Información Del Producto
2. INFORMACIÓN DEL PRODUCTO Comfort Plus robot Estación automática de Manual de instrucciones Side Brush (1 instalado + 1 extra) recogida de polvo y carga Soporte de la mopa Paño de limpieza (2x) Cepillo de limpieza Cubierta del cepillo principal con cuchillo (instalado) Filtro HEPA n°14 +... -
Seite 114: Parte Inferior
INFORMACIÓN DEL PRODUCTO PARTE SUPERIOR Y FRONTAL PARTE INFERIOR Montaje del Limpieza on&o paño de la Sensor anticolisión para radar Carga/limpieza local fregona Sensor de distancia láser LDS Indicador luminoso Tapa del ltro Pared, Cubierta Anti-colisión, del cepillo Sensores de recarga Cepillo enrollador principal por infrarrojos... - Seite 115 INFORMACIÓN DEL PRODUCTO RECORDATORIO DE INDICADORES Espera Luz azul larga brillante Luz apagada Cargando Luz azul respiración Luz apagada Pausa Luz azul lentamente intermitente Luz apagada Limpieza/mando a distancia Luz azul larga brillante Luz apagada Recarga Luz apagada Luz naranja brillante durante mucho tiempo Anormal Luz roja parpadeo rápido Luz apagada...
-
Seite 116: Instalación Del Robot
3. INSTALACIÓN DEL ROBOT Y DE LA ESTACIÓN AUTOMÁTICA AUTO STATION 2 Asegúrese de que no hay obstáculos a 1,2 m delante de la autoestación y a 1 Coloque la autoestación en el suelo plano a más de 5 cm de la pared, 0,5 m a ambos lados. -
Seite 117: Montaje Del Producto
INSTALACIÓN DEL ROBOT Y DE LA ESTACIÓN AUTOMÁTICA MONTAJE DEL PRODUCTO 4 Cargue completamente el robot (antes de usarlo por primera vez) 1 Instale el cepillo lateral con un destornillador hasta que esté bien apretado. 5 Conéctese con la aplicación Bluebot (opcional) 6 Empiece a limpiar NOTA •... -
Seite 118: Instalación Del Robot Y De La Estación Automática
4. INSTALACIÓN DE LA APLICACIÓN BLUEBOT APLICACIÓN BLUEBOT 1 Cargar completamente el robot 2 Descargar la aplicación Bluebot 3 Pasos para el registro 4 Conectar el robot con la aplicación (pasos) Asegúrese de que el robot esté encendido, mantenien- Retire el robot de la estación de carga. Coloque el robot en la estación de carga para cargarlo do presionado el 'botón de encendido' durante unos y asegúrese de que esté... - Seite 119 INSTALACIÓN DE LA APLICACIÓN BLUEBOT Seleccione el Seleccione su red wi , ingrese Bluebot COMFORT PLUS la contraseña y presione (2.4 + 5 Ghz). Después de su registro, asegúrese de que el robot con rmar. se retire de su estación de carga. Encienda su robot presionando el 'botón de encendido' .
-
Seite 120: Carga Del Robot
5. USO DEL ROBOT Y DE LA ESTACIÓN AUTOMÁTICA RETIRE LA BARRA DE LÍMITE • Cargue completamente el robot antes de comenzar la limpieza. • Antes de comenzar la limpieza, recoja los cables y artículos en el suelo Coloque el robot en el suelo plano de interior y retire el dispositivo de para evitar daños causados por enrollamiento o arrastre y los golpes protección de la barra de límite en ambos extremos del parachoques durante la limpieza. -
Seite 121: Modo De Limpieza
USO DEL ROBOT Y DE LA ESTACIÓN AUTOMÁTICA LIMPIEZA PUNTUAL MODO DE LIMPIEZA Cuando un área local necesita un barrido profundo, el usuario especifica Una vez encendido, el robot escaneará y generará el mapa y lo dividirá un punto en el mapa en la APP, la máquina se dirigirá automáticamente a la vecindad del punto, tomará... -
Seite 122: Ajustes De Limpieza
6. AJUSTES DE LIMPIEZA MÁS OPCIONES Registro* Ver todos sus registros anteriores de limpieza con aspiradora. Puedes ver Temporizador* cuántos m2 se han limpiado y el tiempo que ha tardado. Aquí también Configure un temporizador para programar el robot para que limpie a una puede cargar mapas previamente guardados. -
Seite 123: Mantenimiento
7. MANTENIMIENTO REEMPLAZAR LA BOLSA DE POLVO LIMPIE EL PASO DEL POLVO Cuando la bolsa de polvo está llena, la señal "FULL UP" se ilumina continuamente y se da un aviso de la aplicación. Por favor, sustituya Si la señal "FULL UP", la señal "COLLECTING" y la señal "BATTERY" la bolsa de polvo a tiempo. - Seite 124 MANTENIMIENTO LIMPIAR LA PANTALLA DEL FILTRO DEL VENTILADOR LIMPIE LA LENTE INFRARROJA/EL CABEZAL DEL La pantalla del ltro del ventilador está debajo de la bolsa de polvo. Si hay SENSOR DE CARGA Y DE RECOGIDA DE POLVO acumulación de polvo, límpiela suavemente con un paño limpio, suave y seco.
- Seite 125 MANTENIMIENTO CLEAN THE CEPILLO ENROLLADOR EN ESPIRAL 2 Corte el pelo enganchado en el cepillo principal con la cuchilla de El cepillo principal es consumible y debe limpiarse al menos una vez a la limpieza, y luego limpie el cepillo principal con el cepillo de limpieza con el otro extremo de la cuchilla de limpieza.
- Seite 126 MANTENIMIENTO LIMPIAR/SUSTITUIR EL CEPILLO LATERAL 1 Retire el cepillo lateral con un destornillador. 2 Vuelva a instalar el cepillo lateral después de la limpieza, o instale un cepillo lateral nuevo.
-
Seite 127: Limpieza De Los Sensores
MANTENIMIENTO LIMPIEZA DE LOS SENSORES Se recomienda utilizar un paño limpio, suave y seco para limpiar suavemente cada sensor cada semana para garantizar el uso normal de la máquina. Robot: Sensor anti-caída X4 Sensor de infrarrojos X3 Punta del electrodo de carga X2 Sensor Detector sensible a la posición de la pared X1 anti-caída... -
Seite 128: Actualización Del Firmware
MANTENIMIENTO Estación automática: BATERÍA Lente de infrarrojos X2 Sensor de carga y recogida de polvo head X2 · El robot está provisto de baterías de iones de litio de alto rendimiento. · Para mantener el rendimiento de la batería, por favor, mantenga el robot cargado en el uso diario ·... - Seite 129 MANTENIMIENTO Limpiar el depósito de agua 2en1 1 Mantenga pulsado el botón de liberación del depósito de agua 2 Abra el cubo de la basura presionando el botón del cubo de la 2en1 y al mismo tiempo tire de él hacia fuera. basura Contenedor de polvo Tapa del depósito de agua / puerto de...
- Seite 130 MANTENIMIENTO 4 Saque la rejilla del ltro. 5 Elimine la suciedad de la pantalla del ltro y del clip de la pan- talla con un cepillo de limpieza. Tapa del ltro Esponja...
- Seite 131 MANTENIMIENTO 6 Abra el grifo para limpiar el cubo de basura 8 Retire los accesorios del depósito de agua de la máquina según la ilustración e inviértala, retire la mopa y límpiela. 7 Abra la tapa del depósito de agua e inyecte una cantidad adec- uada de agua..
-
Seite 132: Parámetros Básicos
PARÁMETROS BÁSICOS Item Parámetro Modelo BLUEBOT Comfort Plus 350X350X98mm Dimensión global ROBOT 3.65 kg Peso del producto Batería de Li-ion 14.4V 5000mAh 1.2A Tensión nominal Item Parámetro ESTACIÓN AUTOMÁTICA 260x210X350mm Dimensión global DE RECOGIDA DE POLVO Y CARGA Potencia nominal 220-240V ~ 50/60Hz 950W 1.2A... -
Seite 133: Limitaciones De Uso
LIMITACIONES DE USO • El producto sólo se utiliza para la limpieza de suelos en un entorno do- de distancia láser y el parachoques de colisión. méstico y no se puede utilizar en exteriores (como una terraza abierta), en • Por favor, limpie o mantenga el robot y la estación de carga cuando esté zonas sin suelo (como un sofá) o en un entorno comercial o industrial. -
Seite 134: Solución De Problemas
10. SOLUCIÓN DE PROBLEMAS Cuando la máquina funciona de forma anormal, el indicador de alimentación parpadea en naranja y la máquina emite un aviso de voz cuando se producen algunos fallos. Consulte la tabla siguiente para obtener una solución. Aviso de voz/fenómeno de fallo Posibles causas Solución Retire el obstáculo o traslade la máquina a un lugar abierto y vuelva a... - Seite 135 Aviso de voz/fenómeno de fallo Posibles causas Solución La estación automática está bloqueada o demasiado lejos; Por favor, ponga la estación automática en el área abierta, y ponga la máquina cerca de la estación automática para volver a la estación automática no está conectada a la fuente de La recarga ha fallado.
-
Seite 136: Garantía
(según el manual de instrucciones). Esta garantía quedará anulada si se comprueba que el aparato ha sido manipulado, ha sido reparado por una persona o servicio no autorizado por Blaupunkt. La garantía sólo es válida con el recibo/factu- ra entregado en el momento de la compra. - Seite 137 Bem vindo(a)! Normas de segurança ..............138 Informação sobre o produto ............140 Obrigado por escolher o Blaupunkt Bluebot Comfort Plus. Instalação do robô e da estação automática ......143 Instalação da aplicação Bluebot ..........145 Com este manual gostaríamos de o apoiar na con guração e utilização do seu robô...
-
Seite 138: Normas De Segurança
1. NORMAS DE SEGURANÇA REGULAMENTOS GERAIS DE SEGURANÇA: Antes de utilizar este produto, leia as seguintes instruções de segurança e siga todas as precauções de segurança de rotina. Por favor, leia atentamente as instruções, por favor, mantenha as instruções. Qualquer operação inconsistente com este manual de instruções pode causar danos a este produto. ADVERTÊNCIA: ·... - Seite 139 NORMAS DE SEGURANÇA NOTA · Apenas técnicos autorizados podem desmontar este produto. Os utilizadores não são · Não colocar este produto num local onde seja fácil cair (por exemplo, em secretárias e recomendados a desmontar este produto por si próprios. cadeiras junto à...
-
Seite 140: Informações Do Produto
2. INFORMAÇÕES DO PRODUTO Comfort Plus robot Estação automática para recolha e Manual de instruções Escovas laterais (1 instalado+ 1 extra) carregamento de pó Suporte da esfregona Esfregona (2x) Escova de limpeza Tampa da escova com faca principal (instalado) Filtro HEPA n°14 + Saco de pó... - Seite 141 INFORMAÇÕES DO PRODUTO TOPO & FRENTE BASE Montagem Cleaning on&o de pano de Sensor anti-colisão para radar Charging/local cleaning esfregona Sensor de alcance laser LDS Indicator light Tampa do ltro Sensores: Muro, Tampa da es- Anticolisão, cova principal de recarga de infraver- Escova Principal melhos Rodas laterais...
- Seite 142 INFORMAÇÕES DO PRODUTO LEMBRETE DE INDICADORES Espera/pausa Luz azul piscando lentamente Luz apagada Carregamento Luz azul brilhante Luz apagada Pausa Luz azul piscando lentamente Luz apagada Limpeza/controlo remoto Luz azul longa e brilhante Luz apagada Recarregamento Luz apagada Luz laranja com brilho longo Anormal Luz vermelha rápida intermitente Luz apagada...
-
Seite 143: Instalação Do Robô E Da Estação Automática
3. INSTALAÇÃO DA ROBOT & ESTAÇÃO AUTOMÁTICA ESTAÇÃO AUTOMÁTICA 2 Certi que-se de que não há obstáculos a 1,2m em frente da estação 1 Colocar a estação automática no solo plano a mais de 5cm de distância da automática e 0,5m em ambos os lados. parede, inserir a cha na tomada que cumpre os requisitos, e ligar a fonte de alimentação. -
Seite 144: Montagem Do Produto
INSTALAÇÃO DA ROBOT & ESTAÇÃO AUTOMÁTICA MONTAGEM DO PRODUTO 4 Carregar totalmente o robô (antes da 1ª utilização) 1 Instalar a escova lateral com uma chave de fendas até car bem apertada. 5 Ligar com a aplicação Bluebot (opcional) 6 Começar a limpeza NOTA •... -
Seite 145: Instalação Da Aplicação Bluebot
4. INSTALAÇÃO DA APLICAÇÃO BLUEBOT APLICAÇÃO BLUEBOT 1 Carragar o robô completamente 2 Fazer download da app 3 Passos para cadastro 4 Conectar robô com a app (passos) Certi que-se de que o robô está ligado, segurando Retirar o robô da estação de carga. Colocar o robot na estação de carga para carregar e no botão "On"... - Seite 146 INSTALAÇÃO DA APLICAÇÃO BLUEBOT Seleccionar o Seleccione a sua rede wi , BLUEBOT COMFORT PLUS introduza a palavra-passe e (2.4 + 5Ghz) Após o seu registo, certi que-se de que o robô é prima con rmar. removido da sua estação de carregamento. Ligue o seu robot premindo o botão "On".
-
Seite 147: Utilização Do Robô E Da Estação Automática
5. USO DO ROBÔ & ESTAÇÃO AUTOMÁTICA REMOVER A BARRA DE LIMITE • Carregar completamente o robô antes de iniciar a limpeza. Coloque o robot no solo plano interior, e retire o dispositivo de protecção • Antes de iniciar a limpeza, arrumar os fios e artigos no chão para evitar da barra de limite em ambas as extremidades da frente pára-choques. - Seite 148 USO DO ROBÔ & ESTAÇÃO AUTOMÁTICA MODELO DE LIMPEZA LIMPEZA DE ESPAÇO ESPECÍFICO Após o robô ser ligado, irá digitalizar e gerar o mapa e dividi-lo em áreas de Quando uma área local precisa de uma varredura profunda, o forma inteligente. Depois varrerá as áreas uma a uma ao longo da parede utilizador especifica um ponto no mapa no APP, a máquina conduzirá...
-
Seite 149: Definições De Limpeza
6. CONFIGURAÇÕES DE LIMPEZA Assim, o robô pode lembrar-se, por área, qual a rota a utilizar para a limpeza. MAIS OPÇÕES Registo* Veja todos os seus registos anteriores de limpeza a vácuo. Pode ver Temporizador* Definir um temporizador para programar o robô para limpar a uma deter- quantos m2 foram limpos e o tempo que levou. -
Seite 150: Manutenção
7. MANUTENÇÃO SUBSTITUIR O SACO DO PÓ LIMPAR A PASSAGEM DO PÓ Quando o saco do pó está cheio, o sinal "FULL UP" tem um brilho Se o sinal 'FULL UP' , o sinal 'COLLECTING' e o sinal BATTERY estiverem elevado contínuo, e é... - Seite 151 MANUTENÇÃO LIMPAR AS LENTES/CARGA DE INFRAVERMELHOS E A LIMPAR O ECRÃ DO FILTRO DO VENTILADOR CABEÇA DO SENSOR DE RECOLHA DE PÓ O ltro do ventilador está por baixo do saco do pó. Se houver acumulação de pó, limpe-o suavemente com um pano limpo, macio e seco. Recomen- Limpe-os suavemente com um pano limpo, macio e seco.
- Seite 152 MANUTENÇÃO CLEAN THE ESCOVA DE ROLETES EM ESPIRAL 2 Corte o pêlo torcido na escova principal com a faca de limpeza, e A escova principal é um consumível e deve ser limpa pelo menos uma vez depois limpe a escova principal com a escova de limpeza com a outra por semana.
- Seite 153 MANUTENÇÃO LIMPAR/SUBSTITUIR AS LATERAIS DE ESCOVAS 1 Retirar a escova lateral com uma chave de fendas. 2 Reinstalar a escova lateral após a limpeza, ou instalar uma nova escova lateral.
-
Seite 154: Limpar Os Sensores
MANUTENÇÃO LIMPAR OS SENSORES Recomenda-se a utilização de um pano limpo, macio e seco para limpar suavemente cada sensor todas as semanas para garantir a utilização normal da máquina. Robô: Sensor anti-queda X4 Sensor infravermelho X3 Ponto de carregamento X2 Sensor anti-queda Detector de posição sensível à... -
Seite 155: Actualização Do Firmware
MANUTENÇÃO ESTAÇÃO AUTOMÁTiCA: BATERIA Lentes infravermelho X2 · O robô é fornecido com baterias de iões de lítio de alto desempenho. Cabeça do sensor de carga e recolha de poeira X2 · Para manter o desempenho da bateria, por favor manter o robô carregado no uso diário ·... - Seite 156 MANUTENÇÃO Limpar o depósito de água 2 em 1 1 Premir e segurar o botão de libertação do tanque de água dois 2 Abrir o caixote do lixo pressionando a mola do caixote do lixo em um e, ao mesmo tempo, puxá-lo para fora. Caixote de lixo Cobertura do tanque de água / porta de injecção de água...
- Seite 157 MANUTENÇÃO 4 Retirar o ltro do ecrã. 5 Retirar a sujidade no ltro e no clip do ecrã com uma escova de limpeza. Gaze com ltro Filtro...
- Seite 158 MANUTENÇÃO 6 Abrir a torneira para limpar o caixote do lixo 8 Retirar os acessórios do depósito de água da máquina de acordo com a ilustração e inverter, retirar a esfregona e limpá-la. 7 Abrir a tampa do depósito de água e injectar uma quantidade apropriada de água.
-
Seite 159: Parâmetros Básicos
8. PARÂMETROS BÁSICOS Item Parâmetro BLUEBOT Comfort Plus Modelo 350X350X98mm Dimensão Total ROBÔ 3.65 kg Peso do produto 14.4V 5000mAh Bateria Li-ion 1.2A Voltagem nominal Item Parâmetro 260x210X350mm Dimensão Total 220-240V ~ 50/60Hz 950W ESTAÇÃO AUTOMÁTICA Potência nominal 1.2A Potência nominal... -
Seite 160: Limitações De Utilização
9. LIMITAÇÕES DE UTILIZAÇÃO • O produto só é utilizado para a limpeza do chão num ambiente doméstico e não • Por favor, não limpar qualquer parte do produto utilizando um pano húmido ou pode ser utilizado para o exterior (como um terraço aberto), não-terra (como um qualquer líquido. -
Seite 161: Resolução De Problemas
10. RESOLUÇÃO DE PROBLEMAS Quando a máquina funciona anormalmente, o indicador de potência piscará em laranja, e a máquina dará um aviso de voz quando ocorrerem algumas falhas. Por favor, consulte a tabela abaixo para uma solução. Fenómenos de aviso de voz/falhas Possíveis causas Solução Remover o obstáculo ou mover a máquina para um local aberto e... - Seite 162 Fenómenos de aviso de voz/falhas Possíveis causas Solução A estação automática está bloqueada ou demasiado afasta- Por favor, colocar a estação automática na área aberta, e colocar a máquina perto da estação automática para nova tentativa; por da; a estação automática não está ligada à fonte de alimen- A recarga falhou.
-
Seite 163: Garantia
(de acordo com o Manual do Proprietário). Esta garantia será anulada se se veri car que o dispositivo foi manipulado, foi reparado por uma pessoa ou serviço não autorizado pela Blaupunkt. A garantia só... - Seite 164 ELIMINAZIONE DISPOSAL THIS APPLIANCE AND ITS ACCESSORIES AND BATTERY ARE RECYCLABLE QUESTO APPARECCHIO, I SUOI ACCESSORI E LA BATTERIA SONO RICICLABILI. Il simbolo presente sul materiale, sugli accessori o sulla confezione indica che il prodotto non può essere smaltito tra i ri uti domestici. Conferire e meaning of the symbol on the material, its accessory or packaging indicates that this product shall not be treated as household waste.
- Seite 165 blaupunktrobotics.eu +31(0)885667700 support@blaupunktrobotics.eu Enjoy it. Published by Smart Life B.V.