
Verwandte Anleitungen für Klarstein METROBREEZE ROM


Inhaltszusammenfassung für Klarstein METROBREEZE ROM
- Seite 1 METROBREEZE Klimaanlage Air Conditioner Aire acondicionado Climatiseur Condizionatore d’aria 10029856 10029857 www.klarstein.com...
-
Seite 3: Inhaltsverzeichnis
Sehr geehrter Kunde, wir gratulieren Ihnen zum Erwerb Ihres Gerätes. Lesen Sie die folgenden Hinweise sorgfältig durch und befolgen Sie diese, um möglichen Schäden vorzubeugen. Für Schäden, die durch Missachtung der Hinweise und unsachgemäßen Gebrauch entstehen, übernehmen wir keine Haftung. Scannen Sie den folgenden QR-Code, um Zugriff auf die aktuellste Bedienungsanleitung und weitere Informationen rund um das Produkt zu erhalten. -
Seite 4: Hinweise Zum Kältemittel R290
HINWEISE ZUM KÄLTEMITTEL R290 Warnhinweise • Die Klimaanlage muss aufrecht aufbewahrt und transportiert werden. Andernfalls können irreparable Kompressorschäden entstehen. Lassen Sie das Gerät im mindestens 24 Stunden stehen, bevor Sie es in Betrieb nehmen. • Schalten Sie den das Gerät vor der Reinigung aus und trennen Sie es von der Stromversorgung. -
Seite 5: Sicherheitshinweise
SICHERHEITSHINWEISE Spezielle Hinweise • Verwenden Sie zum Entfrosten oder zum Reinigen ausschließlich vom Hersteller empfohlene Mittel. • Lagern Sie das Gerät keinesfalls in einem Raum, in welchem sich permanent Zündquellen befinden (beispielsweise: offene Flammen, ein eingeschaltetes Gasgerät oder ein eingeschaltetes elektrisches Heizgerät). •... - Seite 6 • Decken Sie das Gerät, zur Vermeidung von Brandgefahr, nicht ab. • Alle Anschlüsse des Lüfters müssen den lokalen Vorschriften für elektrische Sicherheit entsprechen. Falls notwendig, informieren Sie sich über diese Vorschriften. • Beaufsichtigen Sie Kinder, damit diese nicht mit dem Gerät spielen. •...
-
Seite 7: Geräteübersicht
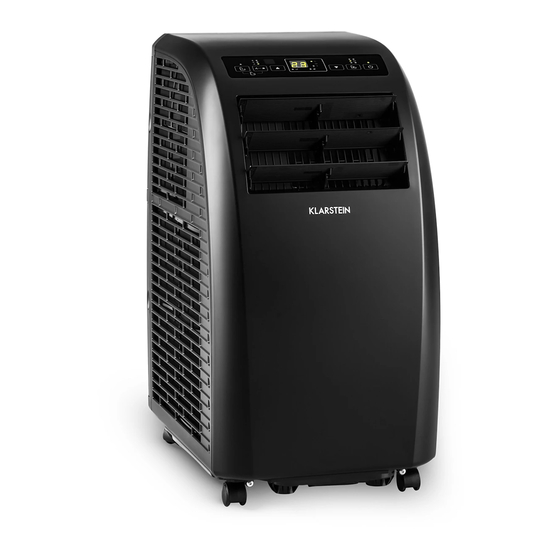
GERÄTEÜBERSICHT Luftauslass-Lamelle Filter Bedienfeld Halterung für den Stecker Lufteinlass Kabelhalterung Abluftschlauch Wasserauslass Räder Netzkabel und Stecker Handgriff Abluftauslass... -
Seite 8: Bedienfeld
BEDIENFELD POWER Drücken Sie diese Taste um das Gerät einzuschalten. Die Betriebsanzeige beginnt zu leuchten. MODE Drücken Sie diese taste während das Gerät eingeschaltet oder der Timer gestellt ist, um einen Modus, wie Kühlung, Entfeuchtung oder Ventilator zu wählen. UP/DOWN Falls der Timer aus oder an ist können Sie mit diesen Tasten die Zeit einstellen, nach deren Ablauf das Gerät automatisch ein- oder ausgeschaltet wird. -
Seite 9: Fernbedienung
FERNBEDIENUNG POWER: Gerät ein- und ausschalten. Modelle mit reiner Kühlfunktion TIMER: Timer einstellen. SWING: Horizontale Schwingung der Lamellen. TEMPERATUR: Von °C zu °F wechseln COOL: Kühlmodus starten. HEAT: Wärmfunktion starten DRY: Entfeuchtungsmodus starten. FAN: Ventilator einschalten. Modelle mit Kühl- und Wärmfunktion UP/DOWN: Temperatur und Timer einstellen. -
Seite 10: Inbetriebnahme Und Bedienung
INBETRIEBNAHME UND BEDIENUNG Aus-Timer einstellen Drücken Sie die Timer-Taste während das Gerät läuft. Die Timer-Kontrollleuchte geht an und im Display blinkt 5 Mal hintereinander die Anzeige „00“. Drücken Sie in dieser Zeit auf eine der Pfeiltasten, um den Timer auf eine Zeit zwischen 1 und 24 Stunden zu stellen. - Seite 11 • Drücken Sie im Kühlmodus (COOL) oder Heizmodus (HEAT) auf die SLEEP- Taste (Nachtmodus) an der Fernbedienung oder gleichzeitig auf die Tasten UP (Pfeil nach oben) und TIMER am Bedienfeld, um den Nachtmodus zu starten. Falls der Ventilator mit hoher oder mittlerer Geschwindigkeit läuft wird die Geschwindigkeit auf niedrig gesetzt.
-
Seite 12: Installation
INSTALLATION Standort Stellen Sie das Gerät auf einen trockenen, ebenen Untergrund. Lassen Sie um das Gerät herum mindestens 50 cm Platz, damit die Luft ausreichend zirkulieren kann. Abluftschlauch anbringen • Befestigen Sie den Schlauch mit dem runden Ende am Gerät. •... - Seite 13 Wichtige Hinweise zur Installation Im Kühlmodus muss das Gerät in der Nähe eines Fensters oder einer Öffnung aufgestellt werden, damit die warme Abluft nach außen geleitet werden kann. Stellen Sie das Gerät zunächst auf einem flachen Boden auf und stellen Sie sicher, dass um das Gerät herum ein Mindestabstand von 45 cm eingehalten wird und dass es sich in der Nähe einer Steckdose...
-
Seite 14: Befestigung Der Fensterdichtung
BEFESTIGUNG DER FENSTERDICHTUNG Befestigung des Dichtungsrahmen für Schiebefenster Der Dichtungsrahmen für Schiebefenster wurde so konzipiert, dass er in die meisten vertikalen und horizontalen Standard-Fenster passt. Es kann jedoch erforderlich sein, dass Sie einige Aspekte der Installation für bestimmte Fenstertypen ändern müssen. - Seite 15 Befestigung der Dichtung für seitlich zu öffnende Fenster und Dachfenster Die Montage der Fensterdichtung ist einfach. Sie können die Dichtung an ein gekipptes Fenster, ein seitlich geöffnetes Fenster oder ein Dachfenster anbringen. Wir haben hier zur Demonstration ein seitlich geöffnetes Fenster gewählt. Es eignet sich besonders gut, weil sich der Abluftschlauch seitlich weit nach unten anbringen lässt.
-
Seite 16: Wasser Ablassen
WASSER ABLASSEN • Wenn Sie den Kühl- oder Entfeuchtungsmodus benutzen sammelt sich mehr Kondenswasser an. Sobald der Tank voll ist wird der Wasser-voll Alarm ausgelöst und das Gerät stoppt. Die Anzeige für den vollen Tank leuchtet auf. Ein Alarmton ertönt, bis der Wasserstand im Tank unterhalb des Sensors ist oder der Tank manuell geleert wurde. - Seite 17 Filterreinigung Falls die Filter mit Staub zugesetzt sind, kann die Luft nur noch unzureichend zirkulieren und die Effizienz des Geräts lässt deutlich nach. Wenn Sie das Gerät über einen längeren Zeitraum benutzen, empfehlen wir Ihnen die Filter alle zwei Wochen zu reinigen. Ziehen Sie die Filter wie abgebildet aus dem Gerät.
-
Seite 18: Fehlerbehebung
FEHLERBEHEBUNG Fehler Mögliche Ursache Lösung Das Gerät läuft nicht. Das Gerät ist Schalten Sie das Gerät ausgeschaltet. ein. Stecker nicht Stecken Sie den Stecker eingesteckt. fest ein. Sicherung raus oder Tauschen Sie die kaputt. Sicherung aus. Timer falsch eingestellt. Ändern Sie die eingestellte Zeit. -
Seite 19: Fehlermeldungen
FEHLERMELDUNGEN E1: Die Sensorspule funktioniert nicht richtig. Hinweis: Wenn die Heizanzeige angeht, befindet sich das Gerät E2: Fehler am Raumtemperatur-Sensor im Anti-Frost-Modus oder im E4: Anti-Frost-Schutz Abtaumodus. Das ist normal und stellt keinen Fehler dar. FL: Der Wassertank ist voll und muss geleert werden. -
Seite 20: Produktdatenblatt
PRODUKTDATENBLATT Angaben nach Verordnung (EU) Nr. 626/2011 Warenzeichen des Lieferanten: Klarstein Modellkennung des Lieferanten: 10029856, 10029857 Schallleistungspegel in lnnenräumen bei Norm-Nennbedingungen im Kühlbetrieb in 63 dB Der Austritt von Kältemittel (R290) trägt zum Klimawandel bei. Kältemit- tel mit geringerem Treibhauspotenzial tragen im Fall eines Austretens weniger zur Erderwärmung bei als solche mit höherem Treibhauspoten-... - Seite 21 Angaben nach Verordnung (EU) Nr. 206/2012 Modellkennung(en) 10029856, 10029857 Bezeichnung Symbol Wert Einheit Nenn-Leistung im Kühlbetrieb rated Kühlbetrieb Nenn-Leistung im Heizbetrieb rated Heizbetrieb Nenn-Leistungsaufnahme im Kühlbetrieb Nenn-Leistungsaufnahme im Heizbetrieb Nenn-Leistungszahl im Kühlbetrieb EERd Nenn-Leistungszahl im Heizbetrieb COPd Leistungsaufnahme im Betriebszustand „Temperaturregler aus“...
-
Seite 22: Spezielle Entsorgungshinweise Für Verbraucher In Deutschland
SPEZIELLE ENTSORGUNGSHINWEISE FÜR VERBRAUCHER IN DEUTSCHLAND Entsorgen Sie Ihre Altgeräte fachgerecht. Dadurch wird gewährleistet, dass die Altgeräte umweltgerecht verwertet und negative Auswirkungen auf die Umwelt und menschliche Gesundheit vermieden werden. Bei der Entsorgung sind folgende Regeln zu beachten: • Jeder Verbraucher ist gesetzlich verpflichtet, Elektro- und Elek- tronikaltgeräte (Altgeräte) sowie Batterien und Akkus getrennt vom Hausmüll zu entsorgen. - Seite 23 • Bei einem Vertrieb unter Verwendung von Fernkommunikationsmitteln ist die unentgeltliche Abholung am Ort der Abgabe auf Elektro- und Elektronikgeräte der Kategorien 1, 2 und 4 gemäß § 2 Abs. 1 ElektroG, nämlich „Wärmeüberträger“, „Bildschirmgeräte“ (Oberfläche von mehr als 100 cm²) oder „Großgeräte“...
-
Seite 24: Hinweise Zur Entsorgung
HINWEISE ZUR ENTSORGUNG Wenn es in Ihrem Land eine gesetzliche Regelung zur Entsorgung von elektrischen und elektronischen Geräten gibt, weist dieses Symbol auf dem Produkt oder auf der Verpackung darauf hin, dass dieses Produkt nicht im Hausmüll entsorgt werden darf. Stattdessen muss es zu einer Sammelstelle für das Recycling von elektrischen und elektronischen Geräten gebracht werden. - Seite 25 Dear Customer, Congratulations on purchasing this device. Please read the following instructions carefully and follow them to prevent possible damages. We assume no liability for damage caused by disregard of the instructions or improper use. Scan the QR code to get access to the latest user manual and more product information.
-
Seite 26: Notes On Refrigerant R290
NOTES ON REFRIGERANT R290 Warnings • The air conditioning system must be kept and transported upright. Otherwise, irreparable compressor damage may occur. Leave the unit for at least 24 hours before putting it into operation. • Switch off the device and disconnect it from the power supply before cleaning. •... -
Seite 27: Safety Instructions
SAFETY INSTRUCTIONS Special notes • Only use agents recommended by the manufacturer for defrosting or cleaning. • Never store the appliance in a room in which there are permanent sources of ignition (e.g. open flames, a switched-on gas appliance or a switched-on electric heater). - Seite 28 • To avoid the risk of fi re, do not cover the unit. • All fan connections must comply with local electrical safety regulations. If necessary, refer to these regulations. • Supervise children so that they do not play with the unit. •...
-
Seite 29: Device Overview
DEVICE OVERVIEW Air outlet lamella Filter Control panel Connector holder Air inlet Cable holder Exhaust air hose Water outlet Wheels Power cord and plug Handle Exhaust air outlet... -
Seite 30: Control Panel
CONTROL PANEL POWER Press this key to switch on the device. The power indicator will start to light up. MODE Press this button while the unit is on or the timer is set to select a mode such as cooling, dehumidification or fan. UP/DOWN If the timer is off or on, you can use these buttons to set the time after which the unit will automatically turn on or off. -
Seite 31: Remote Control
REMOTE CONTROL POWER: Switch the device on and off. Models with cooling function only TIMER: Set the timer. SWING: Horizontal oscillation of the fins. TEMPERATURE: Change from °C to °F. COOL: Start cooling mode. HEAT: Start heating mode DRY: Start dehumidification mode. FAN: Switch on fan. -
Seite 32: Commissioning And Operation
COMMISSIONING AND OPERATION Setting the off timer Press the timer key while the unit is running. The timer indicator light turns on and the display flashes „00“ 5 times in succession. During this time, press one of the arrow keys to set the timer to a time between 1 and 24 hours. Between 1 and 24 hours, adjust the time in 1-hour increments. - Seite 33 • In COOL or HEAT mode, press the SLEEP button on the remote control or the UP and TIMER buttons on the control panel simultaneously to start the night mode. If the fan is running at high or medium speed, the speed will be set to low.
-
Seite 34: Installation
INSTALLATION Location Place the device on a dry, level surface. Leave at least 50 cm of space around the unit so that the air can circulate sufficiently. Attach exhaust air hose • Attach the hose with the round end to the device. •... - Seite 35 Important notes on installation In cooling mode, the unit must be placed near a window or an opening so that the warm exhaust air can be directed outside. First place the appliance on a flat floor and ensure that there is a minimum distance of 45 cm around the appliance and that it is close to a power outlet.
-
Seite 36: Fixing The Window Seal
FIXING THE WINDOW SEAL Fixing the sealing frame for sliding windows The sliding window sealing frame is designed to fit most standard vertical and horizontal windows. However, you may need to change some aspects of the installation for certain types of windows. The sealing frame can be fixed with screws. Vertical sliding windows Horizontal sliding windows Sealing frame... - Seite 37 Fixing the seal for side-opening windows and roof windows The installation of the window seal is simple. You can attach the seal to a tilted window, a side-opened window or a roof window. We have chosen a side-opened window for demonstration purposes. It is particularly suitable because the exhaust hose can be attached to the side far down.
-
Seite 38: Drain Water
DRAIN WATER • When you use the cooling or dehumidification mode, more condensed water accumulates. When the tank is full, the water-full alarm is triggered and the unit stops. The full tank indicator will light up. An alarm will sound until the water level in the tank is below the sensor or the tank has been manually emptied. - Seite 39 Filter cleaning If the filters are clogged with dust, the air can only circulate insufficiently and the efficiency of the device decreases significantly. If you use the unit for a long period of time, we recommend that you clean the filters every two weeks. 1. Pull the filters out of the unit as shown.
-
Seite 40: Troubleshooting
TROUBLESHOOTING Error Possible cause Solution The device does not run. The device is switched Switch on the device. off. Plug not inserted. Insert the plug firmly. Fuse out or blown. Replace the fuse. Timer incorrectly set. Change the set time. Water tank is full. -
Seite 41: Error Codes
ERROR CODES E1: The sensor coil is not working properly. Note: When the heating indicator turns on, the unit is in anti-freeze E2: Room temperature sensor error mode or defrost mode. This is E4: Anti-freeze protection normal and does not represent an error. -
Seite 42: Product Data Sheet
PRODUCT DATA SHEET Information according to regulation (EU) No. 626/2011 Supplier‘s trademark: Klarstein Supplier‘s model identifier: 10029856, 10029857 Inside sound power levels at standard rating conditions on cooling mode in 63 dB Refrigerant (R290) leakage contributes to climate change. Refrigerant... - Seite 43 Information according to regulation (EU) No. 206/2012 Model identifier(s) 10029856, 10029857 Description Symbol Value Unit Rated capacity for cooling rated cooling Rated capacity for heating rated heating Rated power input for cooling Rated power input for heating Rated Energy efficiency ratio EERd Rated Coefficient of performance COPd...
-
Seite 44: Disposal Considerations
DISPOSAL CONSIDERATIONS If there is a legal regulation for the disposal of electrical and electronic devices in your country, this symbol on the product or on the packaging indicates that this product must not be disposed of with household waste. Instead, it must be taken to a collection point for the recycling of electrical and electronic equipment. - Seite 45 Estimado cliente, Le felicitamos por la adquisición de este producto. Lea atentamente las siguientes instrucciones y sígalas para evitar posibles daños. No asumimos ninguna responsabilidad por los daños causados por el incumplimiento de las instrucciones y el uso inadecuado. Escanee el siguiente código QR para obtener acceso a la última guía del usuario y más información sobre el producto.
-
Seite 46: Indicaciones Sobre El Refrigerante R290
INDICACIONES SOBRE EL REFRIGERANTE R290 Advertencias • Transporte y guarde el aparato en posición vertical. De lo contrario, podría dañar de forma irreparable el compresor. Deje el aparato en posición vertical durante al menos 24 horas antes de ponerlo en marcha. •... -
Seite 47: Indicaciones De Seguridad
INDICACIONES DE SEGURIDAD Indicaciones especiales • Para descongelar o limpiar, utilice solamente los productos recomendados por el fabricante. • En ningún caso almacene el aparato en una estancia donde se encuentren fuentes de ignición de manera permanente (por ejemplo: llamas abiertas, un aparato a gas conectado o un radiador eléctrico encendido). - Seite 48 • No tape el aparato para evitar peligro de incendio. • Todas las conexiones del ventilador deben cumplir con la normativa local de seguridad eléctrica. Si fuera necesario, infórmese sobre dicha normativa. • Los niños no deben jugar con el aparato. •...
-
Seite 49: Descripcion Del Producto
DESCRIPCION DEL PRODUCTO Lamas de salida del aire Filtro Panel de control Soporte para el enchufe Entrada de aire Soporte para el cable Tubo de extracción de aire Desagüe Cable de alimentación y Ruedas enchufe Salida de extracción del aire... -
Seite 50: Panel De Control
PANEL DE CONTROL POWER Pulse el botón para encender el aparato. El indicador de funcionamiento se iluminará. MODE Pulse el botón con el aparato en marcha o con el temporizador programado para elegir entre uno de los modos: refrigeración, deshumidificación o ventilación. UP/DOWN Si el temporizador está... -
Seite 51: Mando A Distancia
MANDO A DISTANCIA POWER: Encender y apagar el aparato. Modelos con función refrigeración TIMER: Ajustar el temporizador. SWING: Oscilación horizontal de las lamas. Temperatura: Elegir entre °C y °F. COOL: Iniciar modo refrigeración. HEAT: iniciar función calefacción DRY: Iniciar modo deshumidificación. FAN: Encender ventilador. -
Seite 52: Puesta En Marcha Y Uso
PUESTA EN MARCHA Y USO Ajustar el temporizador de apagado. Pulse el botón del temporizador con el aparato en marcha. El indicador del temporizador se enciende y en el display parpadea 5 veces consecutivas el símbolo „00“. En ese momento, pulse los botones de dirección para configurar el temporizador entre un rango de tiempo de 1 y 24 horas. - Seite 53 • En modo refrigeración o modo de calefacción, pulse el botón SLEEP (modo noche) del mando a distancia o los botones UP (flecha hacia arriba) y TIMER simultáneamente en el panel de control para activar el modo noche. Si el ventilador está...
-
Seite 54: Instalación
INSTALACIÓN Lugar de instalación Coloque el aparato en una superficie plana y estable. Deje al menos 50 cm de distancia alrededor del aparato para que el aire pueda circular correctamente. Montaje del conducto de extracción • Fije el extremo circular del conducto al aparato. - Seite 55 Notas importantes sobre la instalación En el modo de refrigeración, el aparato debe colocarse cerca de una ventana o abertura para que el aire caliente de salida pueda dirigirse al exterior. En primer lugar, coloque el aparato en un suelo plano y asegúrese de que hay una distancia mínima de 45 cm alrededor del aparato y de que está...
-
Seite 56: Fijación De La Junta De La Ventana
FIJACIÓN DE LA JUNTA DE LA VENTANA Fijación para ventanas correderas La junta de sellado de la ventana corredera ha sido diseñado para adaptarse a la mayoría de las ventanas verticales y horizontales estándar. Sin embargo, es posible que tenga que modificar algunos aspectos de la instalación para determinados tipos de ventanas. - Seite 57 Fijación de la junta para ventanas de apertura lateral o de techo El montaje de la junta para ventana es sencillo. Puede montarla en una ventana de corredera o en una ventana abatible o una ventana de techo. Para la demostración, hemos seleccionado una ventana de corredera.
-
Seite 58: Drenar El Agua
DRENAR EL AGUA • Si utiliza el modo refrigeración o deshumidificación, se acumulará más agua condensada. Cuando el depósito se llene, saltará la alarma del depósito lleno y el climatizador se detendrá. El indicador del depósito lleno se ilumina. El tono de alarma suena cada hasta que el nivel de agua haya descendido o haya vaciado el depósito manualmente. - Seite 59 Limpieza del filtro Si el filtro está obstruido por el polvo, el aire no podrá circular correctamente y la eficiencia del aparato se reduce notablemente. Si utiliza el aparato durante un periodo prolongado de tiempo, le recomendamos limpiar el filtro cada dos semanas.
-
Seite 60: Resolución De Problemas
RESOLUCIÓN DE PROBLEMAS Problema Posible causa Solución El aparato no funciona. El aparato está apagado. Encienda el aparato. El enchufe no está Conecte el enchufe. conectado. El fusible se ha extraído Sustituya el fusible. o está averiado. El temporizador Modifique el tiempo del se ha configurado temporizador. -
Seite 61: Avisos De Error
AVISOS DE ERROR E1: la bobina del sensor no funciona Advertencia: cuando se encienda correctamente el indicador de la calefacción, el E2: fallo en el sensor de temperatura aparato se encontrará en modo anti- escarcha o en modo descongelación. E4: protección anti-escarcha Se trata de un fenómeno normal y FL: El depósito de agua está... -
Seite 62: Hoja De Datos Del Producto
HOJA DE DATOS DEL PRODUCTO Informaciones de conformidad con el reglamento (UE) No 626/2011 Marca comercial del proveedor: Klarstein Identificador del modelo del proveedor: 10029856, 10029857 Nivel de potencia acústica interior en condiciones estándar, en los modos de refrigeración en dB: 63 dB Las fugas de refrigerante (R290) contribuyen al cambio climático. - Seite 63 Informaciones de conformidad con el reglamento (UE) No 206/2012 Denominación del modelo 10029856, 10029857 Descripción Símbolo Valor Unidad Potencia nominal de para rated refrigeración refrigeración Potencia nominal de calefacción para calefacción rated Potencia nominal utilizada para refrigeración Potencia nominal utilizada para calefacción Factor de eficiencia energética EERd...
-
Seite 64: Indicaciones Sobre La Retirada Del Aparato
INDICACIONES SOBRE LA RETIRADA DEL APARATO Si en su país existe una disposición legal relativa a la eliminación de aparatos eléctricos y electrónicos, este símbolo estampado en el producto o en el embalaje advierte que no debe eliminarse como residuo doméstico. En lugar de ello, debe depositarse en un punto de recogida de reciclaje de aparatos eléctricos y electrónicos. - Seite 65 Chère cliente, cher client, Toutes nos félicitations pour l’acquisition de ce nouvel appareil. Veuillez lire attentivement et respecter les instructions de ce mode d’emploi afin d’éviter d’éventuels dommages. Nous ne saurions être tenus pour responsables des dommages dus au non-respect des consignes et à la mauvaise utilisation de l’appareil.
-
Seite 66: Remarques Concernant Le Réfrigérant R290
REMARQUES CONCERNANT LE RÉFRIGÉRANT R290 Mises en garde • Le climatiseur doit être entreposé et transporté à la verticale. Faute de quoi, le compresseur pourrait être endommagé de façon irréparable. En cas de doute, laissez l‘appareil reposer pendant au moins 24 heures avant de le mettre en service. -
Seite 67: Consignes De Sécurité
CONSIGNES DE SÉCURITÉ Consignes particulières • Pour le dégivrage ou le nettoyage, utilisez uniquement les produits recommandés par le fabricant. • Ne rangez jamais l‘appareil dans une pièce avec des sources d‘inflammation présentes en permanence (par exemple : flammes nues, appareil à gaz allumé ou chauffage électrique allumé). - Seite 68 • Ne couvrez pas l‘appareil pour éviter tout risque d‘incendie. • Tous les raccordements du ventilateur doivent être conformes à la réglementation de sécurité électrique locale. Si nécessaire, informez-vous sur ces réglementations. • Surveillez les enfants pour qu‘ils ne jouent pas avec l‘appareil. •...
-
Seite 69: Aperçu De L'appareil
APERÇU DE L‘APPAREIL Lamelles d’évacuation de l’air Filtre Fixation pour la fiche Panneau de commande d’alimentation Entrée d’air Enrouleur de câble Tuyau d’évacuation de l’air Sortie d’eau Roulettes Cordon et fiche d’alimentation Poignée Évacuation de l’air... -
Seite 70: Panneau De Commande
PANNEAU DE COMMANDE POWER Appuyer sur cette touche pour allumer l’appareil. Le témoin lumineux de marche s’allume. MODE Appuyer sur cette touche lorsque l’appareil est allumé ou lorsque le minuteur est activé pour sélectionner un mode, comme par exemple les modes rafraîchissement, déshumidification ou ventilation. -
Seite 71: Télécommande
TÉLÉCOMMANDE POWER : allumer et éteindre l’appareil. Modèles climatiseurs seuls TIMER : régler le minuteur. SWING : balayage horizontal des lamelles. TEMPÉRATURE : basculer entre °C et °F. COOL : démarrer le mode rafraîchissement. HEAT : démarrer la fonction chauffage DRY : démarrer la déshumidification. -
Seite 72: Mise En Marche Et Utilisation
MISE EN MARCHE ET UTILISATION Minuteur d’éteinte automatique Appuyer sur la touche du minuteur pendant le fonctionnement de l’appareil. Le témoin lumineux de marche s’allume et l’indication « 00 » clignote 5 fois de suite sur l’affichage. Pendant ce temps, appuyer sur une des touches fléchées pour régler le temps du minuteur entre 1 et 24 heures. - Seite 73 • En mode rafraîchissement ou mode chauffage, appuyer sur la touche SLEEP (mode nuit) de la télécommande ou simultanément sur les touches UP (flèche vers le haut) et TIMER sur le panneau de commande pour démarrer le mode nuit. Si la vitesse du ventilateur est à ce moment élevée ou intermédiaire, elle basculera en vitesse basse.
-
Seite 74: Installation
INSTALLATION Emplacement Placer l’appareil sur une surface sèche et plane. Laisser 50 cm tout autour de l’appareil pour permettre une bonne circulation de l’air. Monter le tuyau d’évacuation de l’air • Fixer le tuyau à extrémité ronde à l’appareil. • Fixer l’extrémité... - Seite 75 Consignes d‘installation importantes En mode refroidissement, l‘appareil doit être placé près d‘une fenêtre ou d‘une ouverture afin que l‘air chaud évacué puisse être dirigé vers l‘extérieur. Tout d‘abord, placez l‘appareil sur un sol plat et assurez- vous qu‘il y a un dégagement minimum de 45 cm tout autour de l‘appareil et qu‘il se trouve à...
-
Seite 76: Installation Du Joint De Fenêtre
INSTALLATION DU JOINT DE FENÊTRE Fixation du cadre d‘étanchéité pour les fenêtres coulissantes Le cadre d‘étanchéité de fenêtre coulissante est conçu pour s‘adapter à la plupart des fenêtres verticales et horizontales standard. Cependant, vous devrez peut-être modifier certains aspects de l‘installation pour certains types de fenêtres. Le cadre d‘étanchéité... - Seite 77 Fixation du joint pour fenêtres à ouverture latérale et puits de lumière L‘installation du joint de fenêtre est simple. Vous pouvez fixer le joint à une fenêtre inclinée, à une fenêtre coulissante ou à une lucarne. Nous avons choisi une fenêtre coulissante à...
-
Seite 78: Vidange
VIDANGE • De l’eau de condensation s’accumule lors du fonctionnement en mode rafraîchissement ou déshumidification. Lorsque le réservoir est plein, le signal de surplus d’eau se déclenche et l’appareil s’arrête. L’affichage de réservoir plein s’allume. Un signal d’alarme retentit jusqu’à ce que le niveau d’eau du réservoir repasse sous le capteur ou que le réservoir soit vidé... - Seite 79 Nettoyage des filtres Si les filtres sont empoussiérés, il est possible que l’air ne puisse pas circuler convenablement et que les performances de l’appareil soient significativement amoindries. En cas d’utilisation prolongée de l’appareil, il est recommandé de nettoyer les filtres toutes les deux semaines. Retirer les filtres comme illustré...
-
Seite 80: Résolution Des Problèmes
RÉSOLUTION DES PROBLÈMES Problème Cause possible Solution L’appareil ne fonctionne L’appareil est éteint. Mettre l’appareil en pas. marche. L’appareil est débranché. Brancher l’appareil à une prise. Fusible sorti ou Remplacer le fusible. défectueux. Mauvais réglage du Modifier le réglage du minuteur. -
Seite 81: Messages D'erreur
MESSAGES D’ERREUR E1 : la bobine capteur ne fonctionne pas correctement Remarque : lorsque le témoin E2 : erreur de capteur de température de chauffage s‘allume, l‘appareil ambiante se trouve en mode anti gel ou décongélation. Ceci est normal et E4 : protection anti gel n‘est pas un message d‘erreur. -
Seite 82: Fiche De Données Produit
FICHE DE DONNÉES PRODUIT Informations conformément au règlement (UE) n° 626/2011 Marque du fournisseur : Klarstein Référence du modèle donnée par le 10029856, 10029857 fournisseur : Niveaux de puissance acoustique intérieur dans les conditions nominales, pour les fonctions de refroidissement en dB : 63 dB Les fuites de réfrigérants (R290) accentuent le changement climatique. - Seite 83 Informations conformément au règlement (UE) n° 206/2012 Référence (s) du produit 10029856, 10029857 Description Symbole Valeur Unité Puissance frigorifique nominale rated frigorifique Puissance calorifique nominale calorifique rated Puissance frigorifique absorbée nominale Puissance calorifique absorbée nominale Coefficient d‘efficacité énergétique EERd nominal Coefficient de performance nominal COPd Consommation d‘électricité...
-
Seite 84: Informations Sur Le Recyclage
INFORMATIONS SUR LE RECYCLAGE S‘il existe une réglementation pour l‘élimination ou le recyclage des appareils électriques et électroniques dans votre pays, ce symbole sur le produit ou sur l‘emballage indique que cet appareil ne doit pas être jeté avec les ordures ménagères. - Seite 85 Gentile cliente, La ringraziamo per aver acquistato il dispositivo. La preghiamo di leggere attentamente le seguenti istruzioni per l’uso e di seguirle per evitare possibili danni. Non ci assumiamo alcuna responsabilità per danni scaturiti da una mancata osservazione delle avvertenze di sicurezza e da un uso improprio del dispositivo.
-
Seite 86: Avvertenze Sul Refrigerante R290
AVVERTENZE SUL REFRIGERANTE R290 Avvertenze • Il climatizzatore deve essere conservato e trasportato in verticale, altrimenti possono risultare danni irreparabili al compressore. Lasciare il dispositivo in posizione verticale per almeno 24 ore prima di metterlo in funzione. • Spegnere il dispositivo e staccare la spina prima di pulirlo. •... -
Seite 87: Avvertenze Di Sicurezza
AVVERTENZE DI SICUREZZA Avvertenze speciali • Utilizzare solo il prodotto consigliato dal produttore per pulire o sbrinare. • Non riporre assolutamente il dispositivo in un locale in cui ci sono fonti di ignizione (ad es. fiamme libere, un dispositivo a gas acceso o un dispositivo elettrico di riscaldamento acceso). - Seite 88 • Per evitare incendi, non coprire il dispositivo. • Tutti i collegamenti del dispositivo devono essere conformi alle normative locali per la sicurezza elettrica. Se necessario, informarsi su queste normative. • Tenere sotto controllo i bambini, in modo che non giochino con il dispositivo. •...
-
Seite 89: Descrizione Del Prodotto
DESCRIZIONE DEL PRODOTTO Lamelle uscita aria Filtro Pannello dei comandi Supporto spina Ingresso aria Porta cavo Tubo di scarico Uscita acqua Rotelline Cavo di alimentazione e spina Impugnatura Scarico aria... -
Seite 90: Pannello Dei Comandi
PANNELLO DEI COMANDI POWER Premere questo tasto per accendere il dispositivo. La spia di operatività si accende. MODE Premere questo tasto mentre si accende il dispositivo oppure mentre si imposta il timer per selezionare una modalità (raffreddamento, deumidificazione, ventilazione). UP/DOWN Impostare con questi tasti il tempo di spegnimento o di accensione automatico del dispositivo. -
Seite 91: Telecomando
TELECOMANDO Modello con sola funzione di POWER: accendere e spegnere il dispositivo. raffreddamento TIMER: impostare il timer. SWING: oscillazione orizzontale delle lamelle. TEMPERATURA: passare da °C a °F. COOL: avviare la modalità di raffreddamento. HEAT: avviare la funzione di riscaldamento DRY: avviare la modalità... -
Seite 92: Messa In Funzione E Utilizzo
MESSA IN FUNZIONE E UTILIZZO Impostare lo spegnimento del timer Premere il tasto del timer mentre il dispositivo è in funzione. La spia di controllo del timer si accende e sul display lampeggia 5 volte consecutive il simbolo “00“. Premere uno dei tasti freccia per impostare il timer tra le 1 e le 24 ore. Tra le 1 e le 24 ore, il tempo si modifica a intervalli di 1 ora. - Seite 93 • Per attivare la modalità notturna, premere in modalità di raffreddamento o modalità di riscaldamento il tasto SLEEP (modalità notturna) posto sul telecomando oppure premere contemporaneamente i tasti UP (freccia rivolta verso l’alto) e il tasto TIMER posto sul pannello dei comandi. Se la ventola è...
-
Seite 94: Installazione
INSTALLAZIONE Collocazione Posizionare il dispositivo su una superficie asciutta e piana. Lasciare almeno 50 cm di spazio libero intorno al dispositivo affinché l’aria possa circolare. Installare il tubo di scarico dell’aria • Assemblare il tubo all’estremità tonda. • Fissare allo scarico dell’aria l’estremità... - Seite 95 Note importanti sull’installazione In modalità di raffreddamento, il dispositivo deve essere posizionato vicino a una finestra o a un’apertura, in modo da poter condurre all’esterno l’aria calda. Posizionare il dispositivo su una superficie piana e assicurarsi che ci siano almeno 45 cm di spazio intorno e che ci sia una presa elettrica nelle vicinanze.
-
Seite 96: Installare La Guarnizione
INSTALLARE LA GUARNIZIONE Fissaggio del telaio di guarnizione per finestre scorrevoli Il telaio di guarnizione per finestre scorrevoli è stato concepito in modo da essere adatto alla maggior parte di finestre standard orizzontali e verticali. Tuttavia, può essere necessario modificare alcuni aspetti dell’installazione per determinati tipi di finestre. - Seite 97 Fissaggio della guarnizione per finestre ad apertura laterale o da soffitto Installare la guarnizione per la finestra è semplice. E´ possibile installare la guarnizione ad una finestra, ad apertura inclinata, ad una finestra ad apertura laterale oppure ad un lucernario. La dimostrazione in basso è eseguita con una finestra ad apertura laterale.
-
Seite 98: Far Defluire L'acqua
FAR DEFLUIRE L’ACQUA • In modalità di raffreddamento o di deumidificazione, viene raccolta più acqua di condensa. Appena il serbatoio è pieno, viene emesso un segnale acustico e il dispositivo si arresta. La spia del serbatoio pieno si accende. Un segnale acustico viene a che il livello dell’acqua si trova di nuovo al di sotto del sensore oppure fino a che non si svuota il serbatoio. - Seite 99 Pulizia dei filtri Se i filtri sono impolverati, l‘aria non può circolare a sufficienza e ciò influisce negativamente sulle prestazioni del dispositivo. In caso di utilizzo prolungato del dispositivo, si consiglia di pulire i filtri ogni due settimane. Estrarre i filtri come mostrato nella figura. Pulire i filtri a 40°C in acqua calda con un detergente neutro.
-
Seite 100: Fehlerbehebung
FEHLERBEHEBUNG Errore Causa possibile Soluzione Il dispositivo non Il dispositivo è spento. Accendere il dispositivo. funziona. La spina non è inserita Inserire la spina nella nella presa. presa. Il fusibile è guasto. Sostituire il fusibile. Il timer non è impostato Modificare il tempo correttamente. -
Seite 101: Messaggi Di Errore
MESSAGGI DI ERRORE E1: la bobina del sensore non funziona correttamente Nota: quando la spia di riscaldamento si accende, il E2: errore del sensore della dispositivo si trova in modalità temperatura ambiente antigelo o in modalità di E3: protezione antigelo scongelamento. -
Seite 102: Scheda Informativa Del Prodotto
SCHEDA INFORMATIVA DEL PRODOTTO Indicazioni conformi al regolamento (UE) n. 626/2011 Marchio del fornitore: Klarstein Identificazione del modello del fornitore: 10029856, 10029857 Livelli di potenza sonora interna alle condizioni nominali standard per le funzioni di raffreddamento in dB: 63 dB La perdita di refrigerante contribuisce al cambiamento climatico. - Seite 103 Indicazioni conformi al regolamento (UE) n. 206/2012 Identificazione del modello (i) 10029856, 10029857 Descrizione Simbolo Valo- Unità Capacità nominale di per il nominale raffreddamento raffreddamento Capacità nominale di per il nominale riscaldamento riscaldamento Potenza nominale assorbita per il raffreddamento Potenza nominale assorbita per il riscaldamento Indice di efficienza energetica EERd...
-
Seite 104: Avviso Di Smaltimento
AVVISO DI SMALTIMENTO Se nel proprio paese si applicano le regolamentazioni inerenti lo smaltimento di dispositivi elettrici ed elettronici, questo simbolo sul prodotto o sulla confezione segnala che questi prodotti non possono essere smaltiti con i rifiuti normali e devono essere portati a un punto di raccolta di dispositivi elettrici ed elettronici.