Inhaltsverzeichnis
Werbung
Verfügbare Sprachen
Verfügbare Sprachen
Quicklinks
Operating Instructions/Bedienungsanleitung/
AVC-Intra Codec Board/ AVC-Intra Codec Baugruppe /
Carte Codec AVC-Intra / Scheda Codec AVC-Intra /
Before operating this product, please read the instructions carefully and save this
manual for future use.
Bitte lesen Sie vor Inbetriebnahme dieses Produkts die Anleitungen sorgfältig durch
und bewahren Sie dieses Handbuch für spätere Verwendung auf.
Avant de vous servir de ce produit, veuillez lire attentivement les instructions et
enregistrer ce manuel pour une utilisation ultérieure.
Prima di utilizzare questo prodotto, leggere attentamente le istruzioni di questo
manuale e conservarlo per riferimento futuro.
Antes de poner este producto en funcionamiento, lea atentamente las instrucciones
y conserve este manual para uso futuro.
このたびは、 "パナソニック製品"をお買い上げいただき、まことにありがとうございます。
_ 取扱説明書をよくお読みの上、正しく安全にお使いください。
_ 保証書は、「お買い上げ日・販売店名」などの記入を確かめ、取扱説明書とともに大切に保管
してください。
F0707T0 -F @
Printed in Japan
Mode d'emploi/Istruzioni per l'uso/
Instrucciones de funcionamiento/
Placa de Códecs de AVC-Intra /
AVC-Intra コーデックボード
Model No.
AJ-YBX200G
取扱説明書
VQT1K80
日
本
語
Werbung
Inhaltsverzeichnis

Verwandte Anleitungen für Panasonic AVC-Intra AJ-YBX200G


Inhaltszusammenfassung für Panasonic AVC-Intra AJ-YBX200G
- Seite 1 Operating Instructions/Bedienungsanleitung/ Mode d’emploi/Istruzioni per l’uso/ Instrucciones de funcionamiento/ 取扱説明書 AVC-Intra Codec Board/ AVC-Intra Codec Baugruppe / Carte Codec AVC-Intra / Scheda Codec AVC-Intra / Placa de Códecs de AVC-Intra / AVC-Intra コーデックボード AJ-YBX200G Model No. Before operating this product, please read the instructions carefully and save this manual for future use.
- Seite 2 CAUTION: These servicing instructions are for use by qualified service personnel only. To reduce the risk of fire or electric shock do not perform any servicing other than that contained in the operating instructions unless you are qualified to do so. This product is licensed under the AVC patent portfolio license for the personal and non-commercial use of a consumer to (i) encode video in compliance with the AVC Standard (“AVC Video”) and/or (ii) decode AVC Video that was encoded by a consumer engaged in a personal and non-commercial...
- Seite 3 For the latest information regarding firmware, visit the P2 Support Desk at the following Web sites. English: https://eww.pavc.panasonic.co.jp/pro-av/ Features The new AVC-Intra codec is supported by installing this product. With Intra-frame compression technology is based on the latest motion picture compression format, the H.264 standard, to achieve...
- Seite 4 Installation in AJ-HPX2000/2100 CAUTION: These servicing instructions are for use by qualified service personnel only. To reduce the risk of fire or electric shock do not perform any servicing other than as directed in the operating instructions unless you are qualified to do so. Unscrew the two screws from the AJ- Unlock the two parts to disconnect the two YBX200G to remove the bracket.
- Seite 5 Place the AJ-YBX200G into the terminal of the board in Step and fix it by using the four 2.6 mm screws. 2.6 mm screws Reconnect the cable removed in Step it was originally. Reinsert the No.5 board into its original position.
-
Seite 6: Setting Menu
Setting AJ-HPX2000/2100 When recording with the AJ-HPX2000/2100 DIAGNOSTIC 2 screen in MAINTENANCE using the AVC-Intra codec, settings are adjusted Item/ on the <SYSTEM MODE> screen in SYSTEM Variable Data Remarks range SETTING of the setup menu. storage To adjust the settings, see the operation manual AVC-I SOFT Display the control software of the AJ-HPX2000/2100. - Seite 7 Installation into the AJ-HPM100 CAUTION: These servicing instructions are for use by qualified service personnel only. To reduce the risk of fire or electric shock, do not perform any servicing other than as directed in the operating instructions unless you are qualified to do so. Unscrew the two screws from the AJ- Remove the cooling sheets if they remain YBX200G to remove heat sink 1.
- Seite 8 Place the AJ-YBX200G into the terminal of Replace the top panel, and screw it on. the AJ-HPM100 running along the slot of AJ-HPM100, and secure it using the two 3.0 mm screws. Slot Screws Settings for the AJ-HPM100 When recording with the AJ-HPM100 using the AVC-Intra codec, settings are adjusted in the setup menu.
- Seite 9 Error message When this product is equipped with the AJ-HPM100, the following error message is added. Error Details Operation Number Message E-39 CONFIG Displayed when the AVC-I optional board cannot be initialized. The AJ-HPM100 stops ERROR Because failure of the optional board is possible, contact the working.
- Seite 10 VORSICHT: Diese Wartungsanleitung ist nur für qualifiziertes Wartungspersonal vorgesehen. Um die Gefahr von elektrischen Schlägen zu reduzieren, sollten Sie keine anderen Wartungsarbeiten außer den in der Bedienungsanleitung enthaltenen durchführen, wenn Sie nicht dafür qualifiziert sind. Dieses Produkt wird unter der “AVC Patent Portfolio License” für die persönliche und nicht kommerzielle Nutzung durch einen Endverbraucher lizenziert.
-
Seite 11: Unterstützte Modelle
Aktualisierung der Firmware des Hauptgerätes notwendig sein. Für neuste Informationen zur Firmware, besuchen Sie bitte das P2 Support Desk auf den folgenden Webseiten: Englisch: https://eww.pavc.panasonic.co.jp/pro-av/ Eigenschaften Der neue AVC-Intra Codec wird durch die Installation dieses Produktes unterstützt. Mit der Intra-Frame Komprimierungstechnologie die welche auf dem neusten Video-Komprimierungsformat basiert, dem H.264-Standard, erhält man hohe Bildqualität, hohe Komprimierungsrate und hohe... - Seite 12 Installation in AJ-HPX2100 VORSICHT: Diese Wartungsanleitung ist nur für qualifiziertes Wartungspersonal vorgesehen. Um die Gefahr von elektrischen Schlägen zu reduzieren, sollten Sie keine anderen Wartungsarbeiten außer den in der Bedienungsanleitung enthaltenen durchführen, wenn Sie nicht dafür qualifiziert sind. Entfernen Sie die Beiden Schrauben von Lösen Sie die beiden Teile, um die zwei der AJ-YBX200G um die Klammer zu Folienkabel zu entfernen und entfernen Sie...
- Seite 13 Bringen Sie die AJ-YBX200G in den Anschluss der Baugruppe von Schritt und befestigen Sie sie mit den vier Schrauben 2,6 mm. 2,6 mm Schrauben Schließen Sie das in Schritt entfernte Kabel wieder wie ursprünglich an. Stecken Sie die Baugruppe Nr.5 wieder in ihre ursprüngliche Position.
-
Seite 14: Einstellung Aj-Hpx2100
Einstellung AJ-HPX2100 Wenn mit dem AJ-HPX2100 unter Verwendung des Bildschirmanzeige DIAGNOSTIC 2 in AVC-Intra Codec aufgenommen wird, werden die MAINTENANCE Einstellungen im Bildschirm <SYSTEM MODE> in Element/ den SYSTEM SETTING des Einstellungsmenüs Variabler Datenspeic Bemerkungen Bereich vorgenommen. herung Zur Änderung Einstellungen, siehe AVC-I SOFT... - Seite 15 Installation in AJ-HPM100 VORSICHT: Diese Wartungsanleitung ist nur für qualifiziertes Wartungspersonal vorgesehen. Um die Gefahr von elektrischen Schlägen zu reduzieren, sollten Sie keine anderen Wartungsarbeiten außer den in der Bedienungsanleitung enthaltenen durchführen, wenn Sie nicht dafür qualifiziert sind. Entfernen Sie die beiden Schrauben an der AJ-YBX200G um das Kühlblech 1 zu Entfernen Sie die Wärmeleitbleche, wenn entfernen.
-
Seite 16: Einstellungen Des Aj-Hpm100
Setzen Sie die AJ-YBX200G in den Bringen Sie die obere Verkleidung wieder anschluss des AJ-HPM100 und entlang an und schrauben Sie sie fest. den Schlitz von AJ-HPM100 lauft, und sichern Sie mit den zwei 3,0 mm Schrauben. Schlitz Schrauben Einstellungen des AJ-HPM100 Wenn mit dem AJ-HPM100 unter Verwendung des AVC-Intra Codec aufgenommen wird, werden die Einstellungen im Setupmenü... -
Seite 17: Spezifikationen
Fehlermeldung Wenn dieses Produkt mit dem AJ-HPM100 ausgestattet wird, werden folgende Fehlermeldungen hinzugefügt. Fehler Details Operation Nummer Meldung E-39 CONFIG Wird angezeigt wenn die Baugruppe AVC-I nicht initialisiert Der AJ-HPM100 arbeitet ERROR werden kann. Weil ein Defekt der Baugruppe möglich ist, nicht mehr. - Seite 18 ATTENTION: Ces instructions d’entretien sont conçues exclusivement à l’attention d’un personnel d’entretien qualifié. Pour réduire tout risque de feu ou de choc électrique, ne pas effectuer d’autre entretien que celui qui est traité dans ces instructions, à moins d’être qualifié pour. Ce produit est sous licence AVC Patent Portfolio License pour un usage personnel et non commercial par le consommateur de (i) l’encodage vidéo en conformité...
-
Seite 19: Caractéristiques
à jour le firmware de l’appareil. Pour des informations mises à jour sur le firmware, visitez le P2 Support Desk sur les sites Web suivants. Anglais: https://eww.pavc.panasonic.co.jp/pro-av/ Caractéristiques La nouvelle carte codec AVC-Intra est prise en charge en installant ce produit. La technologie de compression Intra-Frame est basée sur le format de compression vidéo de dernière génération, le... - Seite 20 Installation de AJ-HPX2000/2100 ATTENTION: Ces instructions d’entretien sont conçues exclusivement à l’attention d’un personnel d’entretien qualifié. Pour réduire tout risque de feu ou de choc électrique, ne pas effectuer d’autre entretien que celui qui est traité dans ces instructions, à moins d’être qualifié pour. Dévissez les deux vis de l’AJ-YBX200G Débloquez les deux parties pour pour enlever le support.
- Seite 21 Placez l’AJ-YBX200G dans la prise de la carte à la phase et fixez-le au moyen de quatre vis 2,6 mm. 2,6 mm Rebranchez le câble enlevé à la phase dans la position d’origine. Remettez en place la carte n° 5 dans sa position d’origine.
-
Seite 22: Configuration Menu
Configuration de l’AJ-HPX2000/2100 Lorsque l’on enregistre avec l’AJ-HPX2000/2100 Ecran DIAGNOSTIC 2 sous MAINTENANCE en utilisant le codec AVC-Intra, les paramétrages Option/ Plage sont réglés dans l’écran <SYSTEM MODE> de Stockage Remarques disponible l’option SYSTEM SETTING menu données d’installation. AVC-I SOFT Affichez la version du logiciel de contrôle de la Pour régler les paramétrages, voir le mode... - Seite 23 Installation dans l’AJ-HPM100 ATTENTION: Ces instructions d’entretien sont conçues exclusivement à l’attention d’un personnel d’entretien qualifié. Pour réduire tout risque de feu ou de choc électrique, ne pas effectuer d’autre entretien que celui qui est traité dans ces instructions, à moins d’être qualifié pour. Dévissez les deux vis de l’AJ-YBX200G pour enlever le dissipateur 1.
- Seite 24 Placez l’AJ-YBX200G dans la prise de la Remettez en place le panneau supérieur et carte de l’AJ-HPM100, fonctionnant le vissez-le. longment de la fente d’AJ-HPM100 et fixez- le au moyen de deux vis 3,0 mm. Logement Paramétrages pour l’AJ-HPM100 Lorsque l’on enregistre avec l’AJ-HPM100 en utilisant le codec AVC-Intra, les paramétrages sont réglés dans le menu d’installation.
-
Seite 25: Spécifications
Message d’erreur Quand ce produit est équipé de l’AJ-HPM100, le message d’erreur suivant est ajouté. Erreur Détails Fonctionnement Numéro Message E-39 CONFIG Affiché quand la carte AVC-I en option ne peut pas être L’AJ-HPM100 cesse de ERROR initialisée. Il est possible qu’il s’agisse d’un défaut de la carte en fonctionner. - Seite 26 ATTENZIONE: Queste istruzioni di servizio sono soltanto per il personale di servizio qualificato. Per ridurre il pericolo di scosse elettriche, non eseguire alcun intervento diverso da quelli descritti nelle istruzioni per l’uso, a meno di essere qualificati per farlo. Questo prodotto è concesso in licenza ai sensi della licenza per portafoglio di brevetti AVC, per uso personale e non commerciale da parte di un consumatore ai fini della (i) codifica di video in conformità...
-
Seite 27: Modelli Supportati
è possibile che sia necessario aggiornare il firmware dell’unità centrale. Per prendere visione delle informazioni più aggiornate sul firmware, visitare P2 Support Desk nei seguenti siti Web. Inglese: https://eww.pavc.panasonic.co.jp/pro-av/ Caratteristiche L’installazione di questo prodotto consente di supportare il nuovo codec AVC-Intra. Con l’impiego della tecnologia di compressione Intra-Frame basata sul più... - Seite 28 Installazione in AJ-HPX2100 ATTENZIONE: Queste istruzioni di servizio sono soltanto per il personale di servizio qualificato. Per ridurre il pericolo di scosse elettriche, non eseguire alcun intervento diverso da quelli descritti nelle istruzioni per l’uso, a meno di essere qualificati per farlo. Svitare le due viti dall’unità...
- Seite 29 Posizionare l’unità AJ-YBX200G nel terminale della scheda al punto e fissarla tramite le quattro viti da 2,6 mm. Viti da 2,6 Ricollegare il cavo rimosso al punto come era in origine. Reinserire la scheda N. 5 nella posizione originale. Durante questa operazione, consentire che il cavo collegato al punto possa scorrere lungo lo slot della scheda N.
-
Seite 30: Menu Delle Impostazioni
Impostazione dell’unità AJ-HPX2100 Quando si registra con l’unità AJ-HPX2100 Schermata DIAGNOSTIC 2 in MAINTENANCE utilizzando il codec AVC-Intra, è possibile Opzione/ configurare le necessarie impostazioni dalla Intervallo Memorizzazione Commenti variabile schermata <SYSTEM MODE> in SYSTEM dati SETTING del menu di configurazione. AVC-I SOFT Visualizza la versione del Per configurare le impostazioni, vedere il... - Seite 31 Installazione nell’unità AJ-HPM100 ATTENZIONE: Queste istruzioni di servizio sono soltanto per il personale di servizio qualificato. Per ridurre il pericolo di scosse elettriche, non eseguire alcun intervento diverso da quelli descritti nelle istruzioni per l’uso, a meno di essere qualificati per farlo. Rimuovere gli elementi di raffreddamento Svitare le due viti dall’unità...
-
Seite 32: Menu Di Configurazione
Posizionare l’unità AJ-YBX200G nel Riposizionare il pannello superiore e terminale dell’unità AJ-HPM100, avvitarlo. funzionante lungo la slot di AJ-HPM100 e fissarla tramite le due viti da 3,0 mm. Slot Viti Impostazioni per l’unità AJ-HPM100 Quando si registra con l’unità AJ-HPM100 utilizzando il codec AVC-Intra, le impostazioni vengono regolate dal menu di configurazione. -
Seite 33: Specifiche Tecniche
Messaggio di errore Se questo prodotto è equipaggiato con l’unità AJ-HPM100, viene aggiunto il seguente messaggio di errore. Errore Dettagli Operazione Numero Messaggio E-39 CONFIG Visualizzato quando non è possibile inizializzare la scheda L’unità AJ-HPM100 ERROR opzionale AVC-I. Il guasto della scheda opzionale è smette di funzionare. - Seite 34 PRECAUCIÓN: Estas instrucciones de servicio han sido preparadas para que las utilice solamente el personal de servicio cualificado. Para reducir el riesgo de producir un incendio o sufrir una descarga eléctrica, no haga ningún trabajo de servicio que no esté explicado en las instrucciones de funcionamiento, a menos que usted esté...
-
Seite 35: Vista General
Para obtener la información más reciente del firmware, visite P2 Support Desk en los sitios Web siguientes: Inglés: https://eww.pavc.panasonic.co.jp/pro-av/ Características Al instalar este producto se consigue la compatibilidad con el nuevo códec AVC-Intra. La tecnología de compresión Intra-frame se basa en lo último en formato de compresión de imágenes en movimiento, el... - Seite 36 Instalación en AJ-HPX2100 PRECAUCIÓN: Estas instrucciones de servicio han sido preparadas para que las utilice solamente el personal de servicio cualificado. Para reducir el riesgo de producir un incendio o sufrir una descarga eléctrica, no haga ningún trabajo de servicio que no esté explicado en las instrucciones de funcionamiento, a menos que usted esté...
- Seite 37 Coloque la AJ-YBX200G en el terminal de la placa del paso y fíjela con los cuatro tornillos de 2,6 mm. Tornillos de 2,6 mm Vuelva a conectar el cable extraído en el paso donde estaba. Vuelva a insertar la placa núm. 5 en su posición original.
-
Seite 38: Menú De Configuración
Configurando la AJ-HPX2100 Al grabar con la AJ-HPX2100 utilizando el códec Pantalla DIAGNOSTIC 2 en MAINTENANCE AVC-Intra, la configuración se realiza en la Objeto/ Alcance pantalla <SYSTEM MODE> dentro de SYSTEM Almacenamiento Observaciones variable SETTING en el menú de configuración. de datos Para realizar los ajustes consulte el manual de AVC-I SOFT... - Seite 39 Instalación dentro de la AJ-HPM100 PRECAUCIÓN: Estas instrucciones de servicio han sido preparadas para que las utilice solamente el personal de servicio cualificado. Para reducir el riesgo de producir un incendio o sufrir una descarga eléctrica, no haga ningún trabajo de servicio que no esté explicado en las instrucciones de funcionamiento, a menos que usted esté...
- Seite 40 Coloque la AJ-YBX200G en el terminal de Sustituya el panel superior y atorníllelo. la AJ-HPM100, funcionando a lo largo de la ranura de AJ-HPM100 y fìjela con los dos tornillos de 3,0 mm. Ranura Tornillos Ajustes para la AJ-HPM100 Al grabar con la AJ-HPM100 usando el códec AVC-Intra, los ajustes se realizan en el menú de configuración.
-
Seite 41: Especificaciones
Mensaje de error Al equipar este producto con la AJ-HPM100, se añade el siguiente mensaje de error. Error Detalles Funcionamiento Número Mensaje E-39 CONFIG Se visualiza cuando la placa opcional AVC-no puede ser La AJ-HPM100 deja de ERROR inicializada. Dado que es posible que se trate de un fallo de la funcionar. - Seite 42 AJ-YBX200G を各機種に取り付ける際は、必ず販売店に ご相談ください。 本製品は、 AVC Patent Portfolio License に基づきライセンスされており、お客様が個人的かつ非営 利目的において以下に記載する行為に係る個人使用を除いてはライセンスされておりません。 AVC 規格に準拠する動画(以下、 AVC ビデオ)を記録する場合 個人的かつ非営利的活動に従事する消費者によって記録された AVC ビデオを再生する場合 ライセンスをうけた提供者から入手された AVC ビデオを再生する場合 詳細については米国法人 MPEG LA, LLC ( http://www.mpegla.com )をご参照下さい。 保証とアフターサービスについては、装着する機器側の取扱説明書を参照してください。...
- Seite 43 AJ-YBX200G は、メモリーカードカメラレコーダー AJ-HPX2100 、メモリーカードポータブルレ コーダー / プレーヤー AJ-HPM100 、メモリーカードレコーダー AJ-HPS1500 用の AVC-Intra コー デックボードです。 本ボードを正しく装着したにもかかわらず、 AVC-Intra の記録再生ができない場合、本体側ファーム ウェアのアップデートが必要となる場合があります。ファームウェアに関する最新情報は、下記ウェ ブサイトより P2 のサポートページをご覧ください。 日本語: http://panasonic.biz/sav/ 英語 : https://eww.pavc.panasonic.co.jp/pro-av/ 特 長 本製品を装着することにより、新コーデック AVC-Intra に対応します。 HD 映像を最新の動画圧縮技 術 H.264 規格ベースのフレーム内( Intra-Frame )圧縮方式により、高画質、高圧縮率、高編集精度を 実現します。 本製品の AVC-Intra コーデックでは下記の 2 方式に対応しています。...
- Seite 44 AJ-HPX2100 への取り付け AJ-YBX200G を各機種に取り付ける際は、必ず販売店にご相談ください。 AJ-YBX200G から 2 本のネジを外し、金具 で外した No.5 基板からケーブルを外しま を外します。 す。このときケーブルを引っ張ると断線す る恐れがありますので、コネクターを持っ て抜いてください。 ネジ 金具 ケーブル コネクター 溝 の No.5 基板の端子に AJ-YBX200G をはめ AJ-HPX2100 の電源が OFF になっているこ 込み、付属の 2.6mm 径ネジ 4 本を使って固 とを確認してください。 定します。 AJ-HPX2100 の正面から見て左側のネジを 6 本外し、サイドパネルを外します。 2.6mm 径...
- Seite 45 AJ-HPX2100 の設定 AJ-HPX2100 で AVC-Intra コーデックを使用し MAINTENANCE の DIAGNOSTIC2 画面 て記録する場合は、設定メニューの SYSTEM 項 目 / SETTING ページの <SYSTEM MODE> 画面で設 可変範囲 備 考 データ保存 定します。 AVC-I SOFT AVC-I 基板(オプション) メニューの設定については、 AJ-HPX2100 の取 の制御ソフトバージョンを 扱説明書を参照してください。 表示します。 AVC-I FPGA AVC-I 基板(オプション) メインメニュー設定 の FPGA プログラムバー ジョンを表示します。...
- Seite 46 AJ-HPM100 への取り付け AJ-YBX200G を各機種に取り付ける際は、必ず販売店にご相談ください。 AJ-YBX200G から 2 本のネジを外し、放熱 AJ-HPM100 の電源が OFF になっているこ 板 1 を外します。 とを確認してください。 AJ-HPM100 からネジを 7 本外し、 天板を外 します。 放熱板 1 ネジ ネジ(黒) AJ-YBX200G から 3 本のネジとナットを外 し、放熱板 2 を外します。 AJ-YBX200G を、 AJ-HPM100 の端子に溝 に沿わせて差し込み、付属の 3.0mm 径ネ 放熱板...
- Seite 47 AJ-HPM100 の設定 AJ-HPM100 で、 AVC-Intra コーデックを使用して記録する場合はセットアップメニューで設定します。 セットアップメニューの設定方法については、本体の取扱説明書を参照してください。 セットアップメニュー設定 記録フォーマット 25: SYSTEM FREQ 020: SYS FORMAT 025: REC FMT (HD) 1080/59.94i 1080i AVC-Intra 100 AVC100 720/59.94P 720p 59.94 1080/59.94i 1080i AVC-Intra 50 AVC50 720/59.94P 720p 1080/50i 1080i AVC-Intra 100 AVC100 720/50P 720p 1080/50i 1080i...
- Seite 48 AJ-HPS1500 への取り付け AJ-YBX200G を各機種に取り付ける際は、必ず販売店にご相談ください。 AJ-YBX200G から 2 本のネジを外し、金具 放熱板 1 と 2 を外したあとに、 AJ-YBX200G を外します。 に放熱シートが残っていた場合は、はがし てください。 放熱シート ネジ 金具 放熱 シート AJ-HPS1500 の電源が OFF になっているこ AJ-YBX200G から 2 本のネジを外し、放熱 とを確認してください。 板 1 を外します。 AJ-HPS1500 からネジを 2 本外し、天板を 外します。 放熱板 1 ネジ...
- Seite 49 AJ-YBX200G を AJ-HPS1500 の端子にはめ 込み、付属の 2.6mm 径ネジ 4 本を使って固 定します。 ネジ 端子 天板をはめ込み、ネジ止めします。 日 本 語...
- Seite 50 AJ-HPS1500 の設定 AJ-HPS1500 で、 AVC-Intra コーデックを使用し セットアップメニュー設定 て記録する場合はセットアップメニューで設定 記録フォーマット します。 020: SYS 025: REC FORMAT FMT (HD) セットアップメニューの設定方法については、 本体の取扱説明書を参照してください。 1080/59.94i 1080i AVC- AVC100 Intra 100 720/59.94P 720p 再生時はフォーマットを自動的に判別して再生 1080/59.94i 1080i AVC- します。ただし、システム周波数の異なるク AVC50 Intra 50 720/59.94P 720p リップの再生はできません。 セットアップメニュー 本製品を AJ-HPS1500 に装着すると、下記のセットアップメニューが有効になります。 項目...
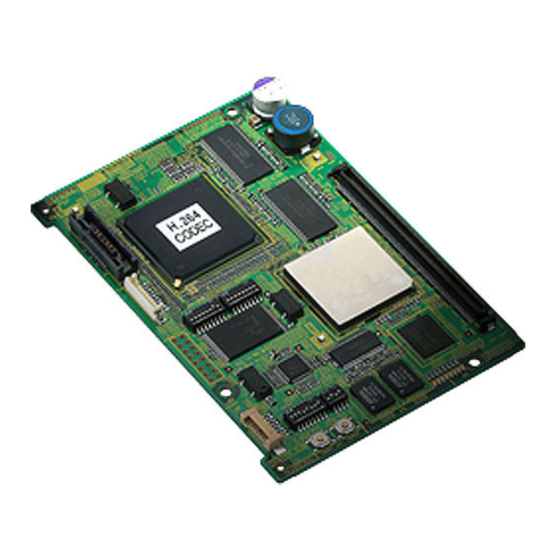
- Seite 51 定 格 AVC-Intra コーデックボード 外形寸法(幅 a 高さ a 奥行き) : 115 mm a 84mm a 13mm (金具・放熱板を除く) 質量 : 80 g (金具・放熱板を除く) ビデオ 記録フォーマット : AVC-Intra100 、 AVC-Intra50 サンプリング周波数 : Y : 74.1758 MHz ( 59.94 Hz ) : 37.0879 MHz ( 59.94 Hz ) Y :...
- Seite 52 San Gabriel Industrial Park, 65th Infantry Ave., Km. 9.5, Carolina, Puerto Rico 00630 (787) 750-4300 Professional & Broadcast IT Systems Business Unit Europe Panasonic AVC Systems Europe a Division of Panasonic Marketing Europe GmbH Hagenauer Str. 43, 65203 Wiesbaden-Biebrich Deutschland Tel: 49-611-235-481 松下電器産業株式会社 システム事業グループ...