
Verwandte Anleitungen für Medion MD 83533


Inhaltszusammenfassung für Medion MD 83533
- Seite 1 Reproductor DVD Slimline de diseño MEDION LIFE ® ® P71014 (MD 83533) Manual de instrucciones Instruction Manual Bedienungsanleitung...
-
Seite 2: Inhaltsverzeichnis
Índice Vista general ........................5 Aparato principal ..........................5 Pantalla ............................. 6 Mando a distancia ..........................7 Acerca de las presentes instrucciones ................. 9 Símbolos de aviso y palabras clave utilizadas en estas instrucciones ..........9 Advertencias de seguridad ....................10 No permita que los niños toquen los aparatos eléctricos .............. - Seite 3 Ajustes en el menú SETUP ....................30 Navegar en los menús ........................30 Submenús y menús de selección ....................30 Abandonar el menú ........................30 Menú General Setup Page ....................31 TV Display ............................31 Angle Mark ............................31 OSD Lang ............................31 Captions ............................
-
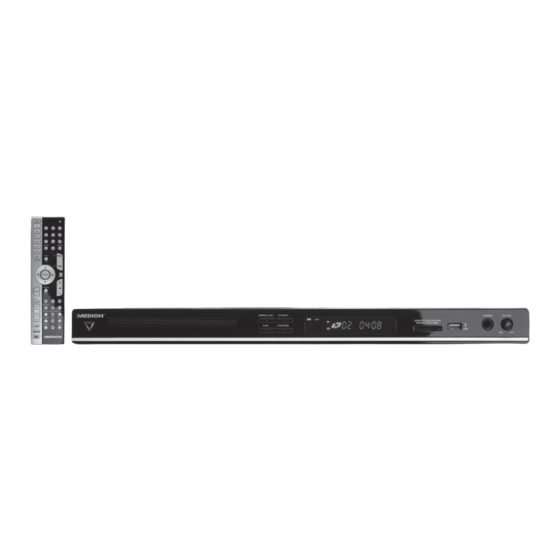
Seite 4: Vista General
Vista general Aparato principal Parte frontal Piloto LED azul para el modo standby Compartimento para los discos : Reproducción PLAY : Abrir y cerrar el compartimento para los discos OPEN/CLOSE : Encender desde el modo standby y volver al modo standby STANDBY : Parar la reproducción;... -
Seite 5: Pantalla
Pantalla Medio: VCD Medio: DVD Reproducción Pausa activada Repetición activada Disco en formato de sonido "dts" Disco en formato de sonido Dolby Digital Tiempo transcurrido en formato H:MM:SS título actual / capítulo actual PBC: Función Playback-Control activada (video-CD ) Medio: CD 10. -
Seite 6: Mando A Distancia
Mando a distancia En estas instrucciones están descritas las funciones de las teclas para el manejo del reproductor DVD. No obstante, con este mando a distancia se podrá manejar aún más aparatos. La funcionalidad del mando a distancia como mando a distancia universal se describe en el capítulo "El mando a distancia universal", page 38. - Seite 7 : Repetición de un fragmento definido REPEAT A-B : Reproducir el título de forma aleatoria RANDOM : Posición de cámara (ángulo de vista) ANGLE : Efectos de sonido como Rock, Pop, etc. Indicación título actual / tiempo transcurrido DISPLAY:...
-
Seite 8: Acerca De Las Presentes Instrucciones
Acerca de las presentes instrucciones Rogamos lea este capítulo y todas las instrucciones detenidamente y tenga en cuenta todas las advertencias contenidas. De esta manera garantizará un funcionamiento fiable y una larga vida de su reproductor MP3. Mantenga este manual de instrucciones siempre a mano, cerca del aparato y guárdelo para, en caso de vender o ceder el aparato, poder pasarlo a su nuevo propietario. -
Seite 9: Advertencias De Seguridad
Advertencias de seguridad No permita que los niños toquen los aparatos eléctricos Los niños desconocen los peligros que pueden surgir del uso de aparatos eléctricos. No deje los aparatos eléctricos al alcance de niños pequeños sin vigilancia. Mantenga también los embalajes alejados de los niños. Existe peligro de asfixia. Coloque el aparato de forma segura Coloque el aparato sobre una superficie firme y lisa. -
Seite 10: El Reproductor De Cds
El reproductor de CDs El reproductor de CDs es un producto láser de Clase 1. El aparato está equipado con un sistema de seguridad que impide la salida de los peligrosos rayos láser durante su uso normal. Para evitar lesiones en los ojos, no manipule o dañe nunca el sistema de seguridad del aparato. -
Seite 11: Aspectos Generales
Aspectos generales Acerca de los DVDs El DVD - Digital Versatile Disc (inglés para "disco digital versátil") es un medio de almacenamiento digital de información. Los DVDs están señalizados con uno de los símbolos que aparecen en el margen. Dependiendo de cómo ha sido grabada la información, existen diferentes tipos de DVD con diferentes capacidades de almacenamiento. -
Seite 12: Formatos De Sonido Surround Disponibles
MPEG4 MPEG4 es una tecnología de compresión para datos de vídeo y multimedia ("MPEG" = "Moving Picture Experts Group"). Formatos de sonido surround disponibles El aparato puede leer dos formatos de sonido surround. Dolby Digital 5.1 Con el formato de sonido Dolby-Digital el material de audio se memoriza en forma digital. -
Seite 13: Preparación
Preparación Desembalar el aparato Retire la totalidad del material de embalaje, incluidas las láminas plásticas en la parte frontal del aparato. ¡PELIGRO! No permita que los niños pequeños jueguen con el plástico. ¡Existe peligro de asfixia! Compruebe el volumen de suministro Cuando desembale la caja, asegúrese de que están incluidos los siguientes artículos: Reproductor DVD Cable Euroconector... -
Seite 14: Conexiones Y Posibilidades De Conexión
Conexiones y posibilidades de conexión El aparato puede conectarse de muchas formas distintas con otros aparatos de entrada o salida. ¡ATENCIÓN! Apague todos los aparatos antes de conectarlos. No conecte los aparatos a la red hasta que no haya realizado todas las conexiones. Colocación del aparato Coloque el aparato sobre una superficie firme y lisa. - Seite 15 Conexión con el televisor a través de un cable S-Video. En caso de que su televisor no disponga de una conexión de Euroconector, puede utilizar un cable S- Video para conectarlo al aparato (enchufe S-VIDEO) . De este modo conseguirá una buena calidad de imagen.
-
Seite 16: Conexiones Para Componentes
Conexiones para componentes Si su televisor dispone de entradas de componentes (Y, Cb/Pb, Cr/Pr), se puede conectar el aparato a través de estas conexiones con el televisor o también con un proyector. Estas conexiones realizan el así llamado „formato de color YUV". Para la transmisión de imagen conecte los enchufes Y, Pb y Pr del aparato mediante un cable cinch de vídeo tripolar con los correspondientes enchufes del televisor o del proyector. -
Seite 17: Conexión Tv Con Función Progressive Scan
Puede conectar el reproductor DVD a un televisor con HDMI, así como también con entrada DVI (HDMI es retrocompatible con DVI, "Digital Visual Interface"). Para la conexión a una entrada HDMI solamente se necesita un cable HDMI. En caso de que su televisor disponga de una toma DVI, necesitará Usted, además, un adaptador (HDMI –... -
Seite 18: Transmisión De Sonido Digital
Transmisión de sonido digital Conecte un cable coaxial o un cable óptico con la salida del reproductor DVD y con COAXIAL OPTICAL la entrada correspondiente del amplificador. ¡NOTA! Para poder disfrutar de todos los aspectos de la reproducción de sonido envolvente, desactive la emisión de sonido en su televisor. -
Seite 19: Funciones De Las Teclas
Funciones de las teclas Control en el aparato o desde el mando a distancia Teclas de función en la parte frontal del aparato Las teclas en la parte frontal del aparato le permiten activar las funciones de reproducción esenciales de su aparato. -
Seite 20: Leer Tarjetas De Memoria O Stick De Memoria Usb
Leer tarjetas de memoria o Stick de memoria USB Su reproductor DVD dispone de un lector de tarjetas de memoria para tarjetas SD, tarjetas multimedia y un Stick de memoria, así como una conexión para un Stick de memoria USB u otro reproductor USB. Tarjeta de memoria Introduzca una tarjeta de memoria con los contactos hacia abajo y la parte biselada hacia delante y a la derecha dentro del lector de tarjetas de memoria del frontal del... -
Seite 21: Funciones De Búsqueda
(STOP) Para detener la reproducción, pulse ) una vez. En pantalla aparecerá el STOP símbolo de Stop . En este modo puede reanudar la reproducción en este mismo sitio pulsando PLAY Vuelva a pulsar para finalizar la reproducción definitivamente. El aparato se encuentra ahora en modo Stop. -
Seite 22: Funciones De Repetición
DISPLAY Con la tecla puede mostrar durante la reproducción, pulsando DISPLAY repetidas veces consecutivamente, el tiempo transcurrido y el restante. Cada vez que pulse la tecla, se modifica la indicación del siguiente modo: DVD: Título reproducido > Título pendiente > Capítulo reproducido > Capítulo pendiente >Desactivar pantalla. -
Seite 23: Selección Directa De Título/Tiempo - Search
CDs audio / VCD Pulse la tecla . En pantalla aparece una tabla con PROGRAM posiciones de programación. En el encabezamiento aparece el número de títulos que contiene el CD. La posición de programación 0 1 aparece sobre un trasfondo en color. Indique a través del teclado numérico del mando a distancia el título deseado para la posición de programación 01 . -
Seite 24: Marcar Un "Punto De Localización" - Bookmark
Marcar un "punto de localización" – BOOKMARK Tiene la opción de crear „ marcas de lectura", para volver a iniciar la reproducción en un punto determinado. Durante la reproducción pulse la tecla . En pantalla aparecerá el BOOKMARK menú BOOKMAR K con doce casillas. Para cancelar esta función, vuelva a pulsar BOOKMARK Para definir la primera "marca de lectura"... -
Seite 25: Random E Intro (Sólo Cd Audio)
Sinopsis de capítulos Vaya al menú Digest, seleccione la opción C hap ter D iges t y confirme con . Después de ENTER unos momentos en los que se cargan las imágenes, aparecen todos los capítulos del título actual en pequeñas ventanas. -
Seite 26: Posición De La Cámara - Angle (Sólo Dvd)
Posición de la cámara – ANGLE (sólo DVD) ¡NOTA! Algunos DVDs disponen de escenas especiales grabadas con distintas posiciones de cámara. Pulse la tecla , para activar la función. Si la escena dispone de ANGLE distintas posiciones de cámara, aparecerá el símbolo así... -
Seite 27: Title Menu, Dvd Menu
TITLE MENU, DVD MENU Los menús del DVD Normalmente los DVDs disponen de uno o varios menús mediante los que puede navegar por ellos. Los nombres de dichos menús dependen de cada DVD; pueden denominarse, por ejemplo, "Menú DVD", "Menú Disco", "Menú... -
Seite 28: Navegar En Los Soportes De Datos Mp3 Y Jpeg
Navegar en los soportes de datos MP3 y JPEG En los soportes de datos MP3 y JPEG los títulos de música y las imágenes se almacenan en carpetas, como en un medio de datos. Coloque un medio de reproducción MP3 o JPEG en el reproductor. En pantalla aparece un menú con la estructura superior de carpetas del CD. -
Seite 29: Ajustes En El Menú Setup
Ajustes en el menú SETUP En el menú SETUP, al que se accede pulsando la tecla , pueden efectuarse SETUP todos los ajustes. Tales como, por ejemplo, los formatos de imagen, los ajustes de sonido o el bloqueo infantil. Pulse . -
Seite 30: Menú General Setup Page
Menú General Setup Page TV Display En este submenú puede ajustar el aparato al formato de imagen de su televisor. Selección para televisores con formato 4:3. El formato Pan Scan presenta las Normal/PS películas en formato 16:9 en su altura íntegra; los dos laterales quedan recortados. Selección para televisores con formato 4:3. -
Seite 31: Menú Audio
Menú Audio Speaker Configuration Dow nmix: En caso de que utilice la salida analógica 5.1, en este menú puede realizar los correspondientes ajustes. Se emite el sonido a través de los canales izquierdo y derecho. L T /RT El sonido se emite en estéreo. Ster eo El sonido estéreo analógico se convierte virtualmente en sonido surround. -
Seite 32: Channel Delay
Channel Delay Si conecta altavoces independientes, la forma ideal de colocarlos es en disposición circular (ver el lado izquierdo de la ilustración). Si eso no es posible, en esta opción puede compensar las desviaciones de la línea circular. En el ejemplo que aparece más abajo (ver el lado derecho de la ilustración), el valor para el altavoz trasero izquierdo se desplazaría unos 50 cm;... -
Seite 33: Menú Dolby Digital
Menú DOLBY DIGITAL Dual Mono Algunos DVDs/VCDs son compatibles con un canal doble de sonido con el que se pueden representar varias pistas sonoras por separado o simultáneamente. Seleccione aquí si se ha de reproducir sólo la pista sonora izquierda, la derecha o ambas. Si el soporte de datos insertado no es compatible con el canal de doble sonido, este ajuste no tiene ninguna función. -
Seite 34: Menú Video
Menú Video Vide o-Ou t : Aquí se seleccionan los ajustes para la salida de vídeo deseada. Seleccione la opción RGB si por la salida normal del euroconector también debe emitirse una señal RGB. Seleccione la opción S- Vid eo para que la señal de vídeo se emita por la salida S-Video. Para lograr la mejor calidad de imagen posible, emplee la salida de componentes y seleccione la opción YU V, siempre y cuando su televisor sea compatible con este formato. -
Seite 35: Menú Preferences
Menú PREFERENCES Únicamente podrá acceder al menú Pre f ere nc e cuando el aparato esté en modo Stop. Si el aparato está reproduciendo, pulse dos veces STOP En este menú podrá realizar los ajustes de los idiomas, el control para padres así como la contraseña. TV-Type Seleccione aquí... -
Seite 36: Password
Si un DVD ha sido codificado, por ejemplo, con el nivel de autorización 7 (NC 17 ) u 8 (Adult ) y Usted ha seleccionado uno de los niveles entre 1 y 6 aparecerá un aviso solicitando la contraseña. También es posible que sólo partes del DVD, es decir determinadas escenas de la película, estén codificadas con uno u otro nivel de autorización. -
Seite 37: El Mando A Distancia Universal
El mando a distancia universal Advertencias de seguridad ¡Jamás trate de reparar el mando a distancia usted mismo! El mando a distancia universal dispone de un diodo de infrarrojos de la clase 1M. ¡No mire jamás el láser a través de instrumentos ópticos! No exponga el mando a distancia a polvo, luz solar intensa, humedad, altas temperaturas o sacudidas fuertes. -
Seite 38: Búsqueda Manual De Códigos
Búsqueda manual de códigos Así puede buscar los códigos de forma manual: Encienda manualmente el aparato correspondiente. Pulse brevemente la tecla de fuentes ( Mantenga pulsada la tecla durante 3 segundo aprox. hasta que el LED se encienda CODE permanentemente después de haber parpadeado brevemente. Pulse repetidamente (hasta 350 veces) la tecla ) (sólo para VCR), STANDBY... -
Seite 39: Emisión Cada Segundo O Cada Tres Segundos
CODE permanentemente después de haber parpadeado brevemente. Introduzca el código de un dígito según la siguiente tabla: Tecla 1 = Medion, Tchibo Tecla 2 = Philips, Radiola, Philco, Erres, Pye Tecla 3 = Sony, Akai, Panasonic, JVC, Sharp, Toshiba, Daewoo... -
Seite 40: Funcionamiento Normal
Funcionamiento normal Controlar aparatos por separado Cuando haya concluido la programación del mando a distancia para sus aparatos de audio y vídeo, el mando a distancia controlará las funciones principales más usuales, igual que el mando original del respectivo aparato. Oriente el mando a distancia hacia el dispositivo que desea controlar y pulse la tecla de selección de fuentes correspondiente. - Seite 41 Asignar la función universal volumen / MUTE a un tipo de dispositivo diferente o a un dispositivo determinado De fábrica, el mando a distancia universal está ajustado de tal forma que las funciones de volumen y MUTE controlen automáticamente el televisor siempre que haya pulsado una tecla de selección de fuentes asignada a un dispositivo que reproduzca imágenes (DVD, vídeo, etc.).
-
Seite 42: Solución De Problemas
Solución de problemas El mando a distancia no funciona: Compruebe si sus dispositivos están correctamente conectados y encendidos. Compruebe si las pilas del mando a distancia están colocadas correctamente teniendo en cuenta su polaridad +/– . Si las pilas estuvieran demasiado gastadas, cámbielas por pilas nuevas. Para la marca de mi aparato hay listados varios códigos de dispositivo. -
Seite 43: En Caso De Problemas
En caso de problemas En caso de que se produzca algún problema, compruebe primero si puede solucionarlo Usted mismo. La siguiente tabla puede ayudarle a ello. ¡ATENCIÓN! En ningún caso trate de arreglar Usted mismo el aparato. Si fuera necesario reparar el aparato, diríjase a nuestro servicio de reparación o a un taller especializado. - Seite 44 Imagen distorsionada Compruebe si el DVD está sucio y, si fuera necesario, límpielo cuidadosamente con un paño suave y seco desde el centro hacia afuera. Pequeños defectos de imagen son normales. Imagen muy distorsionada Eventualmente la norma de su DVD no coincide con la norma de su Imagen sin colores televisor (PAL –...
-
Seite 45: Eliminación
Eliminación Embalaje Su reproductor DVD está embalado para protegerlo contra eventuales daños durante el transporte. Los embalajes son materias primas y por ello son reutilizables o aptos para ser devueltos al ciclo de reciclaje de materias primas. Aparato Al final de la vida útil del reproductor DVD no lo tire bajo ningún concepto a la basura doméstica normal. -
Seite 46: Especificaciones Técnicas
Este manual está protegido por la ley de propiedad intelectual. Queda prohibida por las leyes de copyright la reproducción de esta información de forma, mecánica, electrónica o por cualquier otro medio sin el consentimiento escrito del fabricante. El Copyright pertenece a la empresa MEDION. - Seite 48 Table of contents Table of contents ........................ 3 Overview ..........................5 Main device ............................5 Remote control ..........................7 Information about these instructions ................. 9 Symbols and key words used in these instructions ................9 Safety instructions ......................10 Keep electrical equipment out of reach of children ................10 Setting the appliance up safely ......................
- Seite 49 Settings in the SETUP menu ..................... 29 Navigating in the menus ....................... 29 Sub- and selection menus ......................29 Exit menu ............................29 System menu ..........................30 Audio menu ........................31 Speaker configuration ........................31 SPDIF ............................... 31 Channel delay ..........................32 Equalizer Setting ..........................
-
Seite 50: Overview
Overview Main device Front view Blue LED light for standby mode Disc compartment PLAY: Play OPEN/CLOSE: Open and close disc compartment STANDBY: Switch standby mode on and off STOP/RES: Stop playback; Press repeatedly: Select resolution for HDMI and Progressive Scan IR: Receiver field for the remote control USB: LED light for USB mode Display (see below) - Seite 51 Display Medium: VCD Medium: DVD Playback Pause active Repeat active Disc in dts sound format Disk in Dolby Digital sound format Expired time in H:MM:SS format Current title/chapter PBC: Playback control active (video CD) Medium: CD Medium: MP3...
-
Seite 52: Remote Control
Remote control This view describes the button functions on the remote control. The remote control can be used for other devices. The use of the remote control as a universal remote control is described in the section "The universal remote control", page 37. If the DVD player fails to react to a button press the source button Switching on from standby mode and vice-versa Source key for selecting the device... - Seite 53 : Camera position (perspective) ANGLE : Virtual surround function Display current title/lapsed time DISPLAY:...
-
Seite 54: Information About These Instructions
Information about these instructions Please read these instructions carefully before using the device. Note the warnings on the device and in the operating instructions Always keep the operating instructions close to hand. If you sell or give the unit away, please ensure that you also pass on these instructions. -
Seite 55: Safety Instructions
Safety instructions Keep electrical equipment out of reach of children Children can be injured by electrical devices. Never allow children to use electrical appliances unat- tended. Keep plastic packaging out of the reach of children. There is a risk of suffocation. Setting the appliance up safely Place the device on a sturdy, level surface. -
Seite 56: Headphones
Headphones WARNING! Listening to the unit at a high volume with headphones or ear phones can damage your hearing. Lower the volume before putting on head/earphones Your hearing can be damaged if you listen at high volumes over a long period or if the volume is increased too suddenly. In the event of functional damage If the unit is malfunctioning there might have been a electrical discharge. -
Seite 57: General Information
General information About DVDs A DVD – Digital Versatile Disc – is a digital medium for storing infor- mation. DVDs are marked with one of the symbols shown here. There are different types of DVD with different storage capacities de- pending on how the information is stored. -
Seite 58: Available Surround Sound Formats
MPEG4 MPEG4 is a compression technology for multimedia/video data ("MPEG" = "Moving Picture Experts Group"). Available surround sound formats The unit recognises two different surround sound formats. Dolby Digital 5.1 In Dolby Digital sound format the audio material is saved digitally. In this instance, up to five separate full-frequency audio channels (front left and front right, centre, rear left and rear right) as well as an effect or depth channel (5.1) are stored separately. -
Seite 59: Preparation
Preparation Unpacking the device Remove all packaging materials including the film on the front of the unit. WARNING! Do not let children play with the plastic wrapping. There is a risk of suffocation. Check package contents When unpacking, ensure that the following parts are included: DVD player SCART cable Remote control... -
Seite 60: Connections And Connection Options
Connections and connection options The unit can be connected in various ways to other input and output devices. CAUTION! Switch off all devices before connecting them. Only connect the units to the mains when the other connections are complete. Setting up the unit Place the unit on a sturdy, level surface. - Seite 61 Connection with the television via the S-VHS cable If your television does not have a SCART connection you can connect with the unit via the S-VHS cable (S-VIDEO socket). This will provide good image quality. An audio cinch cable must also be connected. Please note the colour codes for left/right on the cinch plugs.
-
Seite 62: Component Connections
Component connections If your unit has so-called component connections (Y, Cb/Pb, Cr/Pr), you can also connect the unit to the television or data projector using theses connections. These connections use the so-called „YUV colour format". Connect the unit’s Y, Pb and Pr socket to the corresponding socket via a three-pole video-cinch cable with the corresponding sockets on the television set or image projector. -
Seite 63: Tv Connection With Progressive Scan Function
You can connect the device to the television set with HDMI and DVI inputs (HDMI is downwards com- patible to DVI – "Digital Visual Interface"). You will also need a HDMI cable for connecting to a HDMI input. If your television set has a DVI socket, you will also need an adapter (HDMI – DVI), which is also available is specialist stores. -
Seite 64: Digital Sound Transfer
Digital sound transfer Connect either a coaxial cable or an optical cable to the output on the DVD/ player COAXIAL OPTICAL and the corresponding input on the amplifier. NOTICE! Switch off the sound output at your television, in order to enjoy digital sound reproduction completely. -
Seite 65: Button Functions
Button functions Operating the player using the controls on the player or remote control Buttons on the front of the player You can activate the main play functions of the player using the buttons on the front of the unit. Buttons on the remote control In addition to these basic controls the remote control also provides numerous additional options for using all functional elements of your DVD player. -
Seite 66: Reading The Memory Card And Usb Memory Stick
Reading the memory card and USB Memory Stick. Your DVD player has a special memory card drive for SD cards, multi-media cards and a memory stick, as well as a connection for a USB Memory Stick or other USB Memory card Insert a memory card into the memory drive at the front of the unit with the contacts facing down and the bevelled corners on the front right-hand side. -
Seite 67: Search Functions
STOP/RES Press once to stop playing. The stop symbol is displayed on the STOP screen . In this mode you can continue on from the same point with Press again to stop the DVD. The unit is now in stop mode. Search functions SKIP During playback press the... -
Seite 68: Repeat Functions
DISPLAY You can press repeatedly during playback to display the elapsed and DISPLAY remaining time. The display changes each time you press the button: DVD: Title elapsed > Title remaining > Chapter elapsed > Chapter remaining > Display off. CD/VCD: Title elapsed >... -
Seite 69: Direct Title/Time - Search
Start list As soon as the first program place has been entered the word START appears in the lower edge of the table. Use the navigation buttons to move the cursor to the S T AR T and press PLAY ENTER The word PRO GRA M is displayed briefly on the screen. -
Seite 70: Select Section - Digest (Dvd And Vcd)
Select section – DIGEST (DVD and VCD) You can use the DIGEST function with the help of image preview to navigate through your DVD. Press the button during playbeck. You can invoke the D IG E S T DIGEST menu using the following options (B OO K MAR K D I G E ST only if book- marks have already been set , see below): List of titles NOTICE! -
Seite 71: Random And Intro (Audio Cd Only)
RANDOM and INTRO (audio CD only) Random playback Press the button. RANDOM Press to start random playback. Playback stops after 20 minutes. PLAY Press again for normal playback. RANDOM Intro function Press the button. This plays the first six seconds of each title. DIGEST Press again for normal playback. -
Seite 72: Title Menu, Dvd Menu
3D sound You can achieve a 3D or surround effect for CDs that are coded in Dolby Pro Logic, Dolby Digital or dts formats if two loudspeakers are connected. Press the button repeatedly to call up one of the following sound effects: Su r- round: Rock >... -
Seite 73: Pbc Function (Vcd 2.0 Only)
PBC function (VCD 2.0 only) Some type-2.0 VCDs that have a title/chapter structure, have a playback control (PBC) option. to activate playback control (Taste ). Addi- TITLE MENU TITLE MENU tional functions for controlling the title/chapter are available, such as –Direct selection of titles/chapters –... -
Seite 74: Settings In The Setup Menu
Settings in the SETUP menu All settings are made in the SETUP menu, which you can open using the SETUP key. These settings relate to such items as image format, sound settings and child protection. Press SETUP. The main page of the SETUPmenu appears on the screen with the four main Sys tem, Au dio , Do lb y, Vide o and Pre fer ence page. -
Seite 75: System Menu
System menu TV Display Here you set the unit's display format to match that of the television. Normal/PS : Selection for televisions with 4:3 format. The Pan Scan format depicts 16:9 film formats in full height, the sides of the image will be cropped. Normal/LB : Selection for televisions with 4:3 format. -
Seite 76: Audio Menu
Audio menu Speaker configuration Dow nmix: If you use the analogue 5.1 output you can change the loudspeaker settings from this menu. L T /RT : The left and right audio channels are used. Ster eo : This option produces stereo sound. V SURR : The analog stereo sound will be converted virtually as surround sound. -
Seite 77: Channel Delay
Channel delay If you connect separate loudspeakers they should ideally be set up in a circle (refer to left side of the dia- gram). If this is not possible you can compensate for differences in the circle shape here. In the example below (see the right side of the illustration) the left and rear left loudspeakers are moved by 50 cm and by 40 cm for the rear right loudspeakers. -
Seite 78: Dolby Digitalmenu
Dolby Digitalmenu Dual Mono Some DVDs/VCDs support a dual-channel sound, with which you can represent several tracks separately or at the same time. Select whether only the left, only the right audio track or both audio tracks should be replayed here. This setting will be functionless, if the inserted data media does not support the function. -
Seite 79: Video Menu
Video menu V i de o Ou t: Here you can choose your preferred video output settings. Choose RGB if you also want an RGB signal to be relayed via the normal SCART output. Choose S- Vid eo to have the video signal emitted at the S-Video output. Use the component output to attain the best picture quality and choose Y U V if this format is sup- ported by your TV set. -
Seite 80: Preferences Menu
Preferences menu You can only access the Pre f ere nc es menu in stop mode. If playback is in progress press STOP twice. In this menu you choose the settings for the language, parental control and password. TV type Select the colour standard for the image replay here. -
Seite 81: Password
For example , if you have inserted a DVD that is coded with authorisation class 7 (NC 17 ) or 8 (A dult ) and you have selected authorisation classes 1 to 6, a message appears and the viewer must enter a password. -
Seite 82: The Universal Remote Control
The universal remote control Safety instructions Do not repair the device yourself The universal remote control has a class 1M infrared diode. Do not examine the laser with optical in- struments! Do not subject your remote control to dust, strong sunlight, moisture, high temperatures or strong vi- brations. -
Seite 83: Manual Code Search
CODE remains on. Enter the one-digit code according to the following table: Key 1 = Medion, Tchibo Key 2 = Philips, Radiola, Philco, Erres, Pye Key 3 = Sony, Akai, Panasonic, JVC, Sharp, Toshiba, Daewo Key 4 = Thomson, Brandt, Fergusson... -
Seite 84: Second Or 3 Second Intervals
Code identification Code identification gives you the opportunity to determine codes that have already been entered and stored in the remote control. Proceed as follows: Switch the relevant device on manually. Briefly press the required source key ( Keep the key pressed for approx. -
Seite 85: Normal Operation
Normal operation Operating individual devices After you have finished programming your remote control for your audio/video devices, the remote con- trol will work in the common main functions just like the original remote control of the respective de- vice. Point your remote control at the desired device and press the relevant source key. The key will light up briefly but will not remain lit. - Seite 86 Press a source key for the device for which you want to control the volume and mute functions. The blue LED will turn on. Press the MUTE ) key; the blue LED will go out. Restoring the universal volume/mute functions If you have changed the universal volume and mute functions, as described in the previous two sections, you can reset the functions back to the factory settings and thus restore the "Punch Through"...
-
Seite 87: Troubleshooting
Troubleshooting The remote control does not work: Check whether your devices have been properly connected and are switched on. Check whether the remote control batteries have been correctly inserted and have matching +/– polarity. If the batteries are too weak then replace them with new ones. There are several device codes listed under the brand name of my de- vice. -
Seite 88: Troubleshooting
Troubleshooting If errors occur, check first whether you can correct the problem yourself. The following overview may help you. CAUTION! Never try to repair the device yourself. Contact our service centre or other qualified personnel if a repair is necessary. PROBLEM POSSIBLE CAUSE / REMEDY General... - Seite 89 Distorted picture Check whether the DVD is dirty and if necessary clean it carefully, wip- ing it from the centre to the edge with a soft, dry cloth. Slight picture distortion is not a malfunction. Very distorted picture Your DVD standard may not match your television set standard (PAL – Image has no colours NTSC, SETUP menu >...
-
Seite 90: Disposal
Disposal Packaging Your DVD player is wrapped in packaging to protect it from damage during transport. Packag- ing is a raw material and can be re-used or added to the recycling system. Appliance At the end of its life, the DVD player must not be disposed of in household rubbish. Seek the advice of your local authority on correct, environmentally-friendly disposal. -
Seite 91: Technical Data
Technical and visual changes and printing errors reserved. Copyright © 2010 All rights reserved. This Handbook is protected by copyright. Duplicating in mechanical, electronic or any other form is for- bidden without the written permission of the manufacturer. The copyright lies with the MEDION Company. - Seite 92 Inhalt Übersicht ..........................5 Hauptgerät ............................5 Fernbedienung ..........................7 Hinweise zu dieser Anleitung ..................... 8 In dieser Anleitung verwendete Warnsymbole und Signalwörter ............8 Sicherheitshinweise ......................9 Elektrische Geräte nicht in Kinderhände ..................... 9 Das Gerät sicher aufstellen ......................... 9 Netzanschluss............................
- Seite 93 Menü System ........................30 TV-Format ............................30 Kamerapos. Anz..........................30 OSD-Sprache ........................... 30 Gehörlos.Titel ..........................30 Bildschirmschoner ........................... 30 Auto-Mark............................30 Menü Audio ........................31 Lautsprecherkonfiguration ......................31 SPDIF ............................... 31 Kanalverzögerung ........................... 32 Klangeinstellung ..........................32 3D-Bearbeitung ..........................32 Menü...
-
Seite 94: Übersicht
Übersicht Hauptgerät Vorderseite Blaue LED-Leuchte für Standby-Modus Diskfach : Wiedergabe PLAY : Diskfach öffnen und schließen OPEN/CLOSE : Vom Standby-Modus ein- und wieder in Standby schalten STANDBY : Wiedergabe stoppen; STOP/RES Wiederholt drücken: Auflösung wählen : Empfangsfeld für den Sender der Fernbedienung : LED-Leuchte für USB-Modus Display (siehe unten) 10 Kartenlesegerät für verschiedene Speicherkarten... - Seite 95 Display Medium: VCD Medium: DVD Wiedergabemodus Pause aktiv Wiederholung aktiv Disk im dts-Tonformat Disk im Dolby Digital-Tonformat Ablaufende Zeit im Format H:MM:SS Aktueller Titel / aktuelles Kapitel PBC: Playback-Control aktiv (Video-CD) Medium: CD 10 Medium: MP3...
-
Seite 96: Dvd-Fernbedienung Und 5 In 1 Ir-Fernbedienung
Fernbedienung DVD-Fernbedienung und 5 in 1 IR-Fernbedienung In dieser Übersicht sind die Tastenfunktionen für die Bedienung des DVD-Players beschrieben. Mit dieser Fernbedienung können Sie jedoch noch weitere Geräte bedienen. Die Funktionalität der Fernbedienung als Universalfernbedienung wird im Kapitel "Die 5 in 1 IR-Fernbedienung", Seite 37 beschrieben. Falls der DVD-Player nicht auf einen Tastendruck reagiert, drücken Sie ggf. -
Seite 97: Hinweise Zu Dieser Anleitung
Hinweise zu dieser Anleitung Lesen Sie vor Inbetriebnahme die Sicherheitsvorschriften aufmerksam durch. Beachten Sie die Warnun- gen auf dem Gerät und in der Bedienungsanleitung. Bewahren Sie die Bedienungsanleitung immer in Reichweite auf. Wenn Sie das Gerät verkaufen oder weitergeben, händigen Sie unbedingt auch diese Anleitung aus. In dieser Anleitung verwendete Warnsymbole und Signalwörter GEFAHR! Warnung vor unmittelbarer Lebensgefahr! -
Seite 98: Sicherheitshinweise
Sicherheitshinweise Elektrische Geräte nicht in Kinderhände Kinder können Gefahren, die von elektrischen Geräten ausgehen, nicht erkennen. Lassen Sie Kinder da- her niemals unbeaufsichtigt elektrische Geräte benutzen. Halten Sie auch die Verpackungsfolien von Kindern fern. Es besteht Erstickungsgefahr. Das Gerät sicher aufstellen Stellen Sie das Gerät auf eine feste, ebene Oberfläche. -
Seite 99: Der Cd-Spieler
Der CD-Spieler Der CD-Spieler ist ein Laserprodukt der Klasse 1. Das Gerät ist mit einem Sicherheits- system ausgerüstet, das das Austreten von gefährlichen Laserstrahlen während des normalen Gebrauchs verhindert. Um Augenverletzungen zu vermeiden, manipulieren oder beschädigen Sie niemals das Sicherheitssystem des Geräts. Kopfhörer WARNUNG! Übermäßiger Schalldruck bei der Verwendung von Ohrhörern oder Kopfhörern kann... -
Seite 100: Allgemeines
Allgemeines Über DVD Die DVD - Digital Versatile Disc (englisch für "vielseitige digitale Scheibe") ist ein digitales Speichermedium für Informationen. DVDs sind durch eins der nebenstehenden Symbole gekennzeichnet. Abhängig davon, wie die Informationen aufgebracht sind, ergeben sich verschiedene DVD-Typen mit unterschiedlichen Speicherkapazitäten. -
Seite 101: Verfügbare Surround-Tonformate
MPEG4 Bei MPEG4 handelt es sich um eine Kompressionstechnologie für Multimedia-/Video-Daten ("MPEG" = "Moving Picture Experts Group"). Verfügbare Surround-Tonformate Das Gerät kann zwei Surround-Tonformate lesen und ausgeben. Dolby Digital 5.1 Beim Dolby-Digital-Tonformat wird das Audiomaterial digital gespeichert. Dabei wer- den bis zu fünf separate Vollfrequenz-Audiokanäle (vorne links und rechts, Mitte, hin- ten links und rechts) sowie ein Effekt- bzw. -
Seite 102: Vorbereitung
Vorbereitung Gerät auspacken Entfernen Sie sämtliches Verpackungsmaterial, auch die Folien an der Gerätefront. GEFAHR! Lassen Sie kleine Kinder nicht mit Folie spielen. Es besteht Erstickungsgefahr! Lieferumfang prüfen Vergewissern Sie sich beim Auspacken, dass folgende Teile mitgeliefert wurden: DVD-Player SCART-Kabel Fernbedienung 2 Batterien (1,5 V;... -
Seite 103: Anschlüsse Und Anschlussmöglichkeiten
Anschlüsse und Anschlussmöglichkeiten Das Gerät kann auf vielseitige Weise mit anderen Eingangs- und Ausgangsgeräten verbunden werden. ACHTUNG! Schalten Sie alle Geräte aus, bevor Sie sie anschließen. Nehmen Sie die Geräte erst ans Netz, wenn die Anschlüsse vorgenommen wurden. Gerät aufstellen Stellen Sie das Gerät auf eine ebene, feste Oberfläche. -
Seite 104: Verbindung Mit Dem Fernseher Über S-Video-Kabel
Verbindung mit dem Fernseher über S-Video-Kabel Falls Ihr Fernsehgerät nicht über einen SCART-Anschluss verfügt, können Sie ihn über ein S-Video-Kabel mit dem Gerät (S-VIDEO-Buchse) verbinden. Sie erreichen damit eine gute Bildqualität. Zusätzlich muss ein Audio-Cinch-Kabel angeschlossen werden. Achten Sie bei den Cinch-Steckern auf die Farbkodierung für links/rechts. -
Seite 105: Digitale Bild- Und Tonübertragung: Hdmi
Komponentenanschlüsse Wenn Ihr Fernseher über Komponenteneingänge verfügt (Y, Cb/Pb, Cr/Pr), können Sie das Gerät über diese Anschlüsse mit dem Fernseher, oder auch mit einem Beamer, verbinden. Diese Anschlüsse realisie- ren das so genannte „YUV-Farbformat“. Verbinden Sie zur Bildübertragung die Y-, Pb- und Pr-Buchse des Geräts über ein dreipoliges Video- Cinch-Kabel mit den entsprechenden Buchsen des Fernsehers oder Beamers. -
Seite 106: Tv-Anschluss Mit Progressive Scan-Funktion
Sie können den DVD-Player sowohl an einen Fernsehgerät mit HDMI- als auch mit DVI-Eingang anschlie- ßen (HDMI ist abwärtskompatibel zu DVI – "Digital Visual Interface") . Für den Anschluss an einen HDMI- Eingang benötigen Sie lediglich ein HDMI-Kabel. Falls Ihr Fernsehgerät eine DVI-Buchse besitzt, benöti- gen Sie zusätzlich einen Adapter (HDMI –... -
Seite 107: Digitale Tonübertragung
Digitale Tonübertragung Verbinden Sie entweder ein Koaxialkabel oder ein optisches Kabel mit dem Ausgang bzw. COAXIAL am DVD-Player und dem entsprechenden Eingang am Verstärker. TICAL HINWEIS! Um in den vollen Genuss der digitalen Klangwiedergabe zu kommen, schalten Sie die Ton- ausgabe bei Ihrem Fernseher aus. -
Seite 108: Tastenfunktionen
Tastenfunktionen Steuerung am Gerät oder über die Fernbedienung Tasten an der Gerätefront Mit den Tasten an der Gerätefront können Sie die wesentlichen Wiedergabefunktionen Ihrem Geräts aktivieren. Tasten an der Fernbedienung Die Fernbedienung bietet über diese Grundfunktionen hinaus zahlreiche zusätzliche Bedienelemente für die volle Funktionalität Ihres Geräts. -
Seite 109: Speicherkarte Und Usb Memory Stick Einlesen
Speicherkarte und USB Memory Stick einlesen Ihr DVD-Player verfügt über ein Speicherkarten-Laufwerk für SD-Karten, Multimedia-Karten oder Memory Sticks, sowie einen Anschluss für einen USB Drive oder anderes USB-Abspielgerät. Speicherkarte Schieben Sie eine Speicherkarte mit den Kontakten nach unten und der abgekanteten Ecke nach vorne rechts in das Speicherkarten-Laufwerk an der Gerätefront ein. -
Seite 110: Suchfunktionen
(STOP) Drücken Sie ) einmal, um die Wiedergabe zu stoppen. Auf dem STOP Bildschirm erscheint das Stopp-Symbol . In diesem Modus können Sie die Wiedergabe an derselben Stelle mit ) fortsetzen. PLAY Drücken Sie ) ein weiteres Mal, um die DVD endgültig zu stoppen. STOP Das Gerät befindet sich jetzt im Stopp-Modus. -
Seite 111: Wiederholungsfunktionen
DISPLAY Mit der Taste können Sie sich während der Wiedergabe durch wieder- DISPLAY holtes Drücken nacheinander die abgelaufene und verbleibende Zeit anzeigen lassen. Mit jedem Tastendruck erhalten Sie eine entsprechende Bildschirmmel- dung: DVD: T i te l abg ela u fen > Tite l ve rb le ibe nd > Ka pite l a bge - Ka pitel verb le ib en d >... -
Seite 112: Direktanwahl Titel/Zeit - Search
Audio-CDs/VCD Drücken Sie die Taste . Auf dem Bildschirm erscheint PROGRAM eine Tabelle mit Programmplätzen. Im Tabellenkopf steht die An- zahl der Titel auf der CD. Der Programmplatz 0 1 ist farbig unter- legt. Geben Sie mit den Zifferntasten der Fernbedienung den ge- wünschten Titel für Programmplatz 0 1 ein. -
Seite 113: Lesezeichen" Setzen - Bookmark
"Lesezeichen" setzen – BOOKMARK Sie haben die Möglichkeit, "Lesezeichen" zu setzen, um die Wiedergabe an einer bestimmten Stellen wieder zu starten. Drücken Sie während der Wiedergabe die Taste . Auf dem Bild- BOOKMARK schirm erscheint das BOOKMAR K-Menü mit zwölf Feldern. Wenn Sie die Funktion abbrechen möchten, drücken Sie erneut. -
Seite 114: Random Und Intro (Nur Audio-Cd)
Kapitelübersicht Wählen Sie im Digest-Menü die Option Ka pitelübe rsic h t an und bestätigen Sie mit . Nach ENTER einer kurzen Ladezeit werden alle Kapitel des aktuellen Titels in kleineren Fenstern angezeigt und kurz angespielt. Pro Bildschirmseite werden bis zu sechs Kapitel dargestellt. Wählen Sie das Kapitel genauso aus wie einen Titel (siehe oben). -
Seite 115: Klangfunktionen
Kameraposition – ANGLE (nur DVD) HINWEIS! Auf wenigen DVDs sind einzelne Szenen aus verschiedenen Kamerapositionen aufgenom- men. Drücken Sie die Taste , um die Funktion zu aktivieren. Sofern die Szene ANGLE verschiedene Blickwinkel enthält, werden das Symbol sowie der aktuelle Blickwinkel/die Gesamtzahl der Blickwinkel eingeblendet. -
Seite 116: Title, Menu
TITLE, MENU DVD-Menüs Auf DVDs sind üblicherweise ein oder mehrere Menüs hinterlegt, mit dem Sie auf der DVD navigieren können. Die Namen dieser Menüs hängen von der DVD ab; sie können z. B. "DVD-Menü", "Disk-Menü", "Hauptmenü", "Titel- menü", "Root-Menü" oder "Stammmenü" heißen. Das Menü... -
Seite 117: Navigieren Auf Mp3- Und Jpeg-Datenträgern
Navigieren auf MP3- und JPEG-Datenträgern Auf MP3- und JPEG-Datenträgern können die Musik-Titel bzw. Bilder wie auf einem Datenmedium in Ordnern zusammengefasst sein. Legen Sie ein Wiedergabemedium mit MP3- oder JPEG-Daten ein. Auf dem Bildschirm erscheint ein Menü mit der obersten Ordnerstruktur auf der CD. Sofern der Datenträger Ordner enthält, werden sie auf der linken Seite des Menüs aufgeführt. -
Seite 118: Einstellungen Im Setup-Menü
Einstellungen im SETUP-Menü Im SETUP-Menü, das Sie über die Taste aufrufen, nehmen Sie alle Einstel- SETUP lungen vor. Diese Einstellungen umfassen z. B. Bildformate, Toneinstellungen oder die Kindersicherung. Drücken Sie . Auf dem Bildschirm erscheint die Hauptseite des Setup- SETUP Menüs mit den Menüs S ys te m , Audio , D ol b y, Video sowie Vo re ins t . -
Seite 119: Menü System
Menü System TV-Format Stellen Sie hier das Gerät auf das Anzeigeformat des Fernsehgeräts ein. Normal/PS: Auswahl für Fernsehgeräte mit 4:3-Format. Das Pan Scan-Format stellt 16:9- Filmformate in voller Höhe dar, seitliche Bildanteile werden abgeschnitten. Normal/LB : Auswahl für Fernsehgeräte mit 4:3-Format. Das Letterbox-Format verkleinert das 16:9- Filmformat auf Bildschirmbreite. -
Seite 120: Menü Audio
Menü Audio Lautsprecherkonfiguration Dow nmix: Falls Sie einen analogen Audio-Ausgang benutzen, können Sie in diesem Menü hierfür Einstellungen vornehmen. L T /RT : Es werden der linke und der rechte Kanal ausgegeben. Ster eo : Es wird ein Stereoton ausgegeben. V SURR : Der analoge Stereoton wird virtuell als Surroundton umgewandelt. -
Seite 121: Kanalverzögerung
Kanalverzögerung Wenn Sie separate Lautsprecher anschließen, werden diese idealerweise kreisförmig aufgestellt (siehe linke Seite der Abbildung). Wenn dies nicht möglich ist, können Sie Abweichungen von der Kreislinie hier ausgleichen. Im unten stehenden Beispiel (siehe rechte Seite der Abbildung) würde der Wert für den linken Rear- Lautsprecher um 50 cm und für den rechten Rear-Lautsprecher um 40 cm versetzt. -
Seite 122: Menü Dolby Digital
Menü Dolby Digital Zweikanalton Einige DVDs/VCDs unterstützen einen Zweikanalton, mit dem Sie mehrere Tonspuren separat bzw. gleichzeitig darstellen können. Wählen Sie hier, ob nur der linke, nur der rechter oder beide Tonspuren wiedergegeben werden sollen. Unterstützt der eingelegte Datenträger nicht den Zweikanalton, ist diese Einstellung ohne Funktion. Dynamik Das Dolby-Digital-Tonformat unterstützt eine Dynamik-Einstellung, mit der Sie den Lautstärke- Unterschied zwischen leisen und lauten Passagen in einer Skala von AU S bis VO LL in neun Schritten... -
Seite 123: Menü Video
Menü Video Vide o-Ou t : Hier wählen Sie die Einstellungen für den gewünschten Videoausgang. Wählen Sie die Option RBG, wenn über den normalen SCART-Ausgang auch ein RGB Signal gesen- det werden soll. Wählen Sie die Option S-Vi de o, um das Videosignal am S-Video-Ausgang ausgeben zu lassen. Damit Sie die beste Bildqualität erzielen, verwenden Sie den Komponentenausgang und wählen hier die Option YU V, sofern Ihr TV-Gerät das Format verarbeiten kann. -
Seite 124: Menü Voreinstellungen
Menü Voreinstellungen Auf das Menü VOR EIN ST ELLUNG EN können Sie nur im Stopp-Modus zugreifen. Bei laufender Wie- dergabe drücken Sie zweimal STOP TV-Norm Wählen Sie hier den Farbstandard für die Bildwiedergabe aus. PA L : in vielen europäischen Ländern übliches Farbformat. A U T O: Automatische Einstellung auf das korrekte Farbformat. -
Seite 125: Passwort
Wurde eine DVD z. B. mit der Freigabeklasse 7 (N C 17 ) oder 8 (Ad ul t ) kodiert und Sie haben eine der Freigabeklassen 1 bis 6 eingestellt, so erfolgt eine Meldung und es muss das Passwort eingegeben wer- den. -
Seite 126: Die 5 In 1 Ir-Fernbedienung
Die 5 in 1 IR-Fernbedienung Sicherheitshinweise Reparieren Sie die Fernbedienung nicht selbst! Die 5 in 1 IR-Fernbedienung besitzt ein Infrarot-Diode der Klasse 1M. Betrachten Sie die Infrarot-Diode nicht mit optischen Instrumenten! Setzen Sie die Fernbedienung keinem Staub, starker Sonneneinstrahlung, Feuchtigkeit, hohen Tempera- turen oder starken Erschütterungen aus. -
Seite 127: Manueller Code-Suchlauf
Manueller Code-Suchlauf So führen Sie einen manuellen Suchlauf durch: Schalten Sie das betreffende Gerät manuell ein. Drücken Sie die gewünschte Quellentaste ( ) kurz. Halten Sie die Taste für ca. 3 Sekunden gedrückt, bis die blaue LED nach kurzem Blinken dau- CODE erhaft aufleuchtet. -
Seite 128: Codesuche Nach Handelsname
CODE erhaft aufleuchtet. Geben Sie den einstelligen Code laut folgender Tabelle ein: Taste 1 = Medion, Tchibo Taste 2 = Philips, Radiola, Philco, Erres, Pye Taste 3 = Sony, Akai, Panasonic, JVC, Sharp, Toshiba, Daewoo Taste 4 = Thomson, Brandt, Fergusson... -
Seite 129: Normaler Betrieb
Normaler Betrieb Einzelgeräte bedienen Nachdem Sie die Programmierung Ihrer Fernbedienung für Ihre Audio/Video-Geräte vorgenommen ha- ben, arbeitet die Fernbedienung in den gebräuchlichsten Hauptfunktionen wie die Original- Fernbedienung des jeweiligen Gerätes. Richten Sie Ihre Fernbedienung auf das gewünschte Gerät und drücken Sie die entsprechende Quellen- taste. -
Seite 130: Universal-Funktion Lautstärke/Stummschaltung Wieder Einstellen
Universal-Funktion Lautstärke/Stummschaltung auf einen anderen oder bestimmten Gerätetyp programmieren Im Auslieferungszustand ist die 5 in 1 IR-Fernbedienung so eingestellt, dass die Funktionen Lautstärke und Stummschaltung automatisch das TV-Gerät steuern, wenn gerade eine Quellentaste für ein Gerät mit Bildübertragung (DVD, Videorecorder etc.) gedrückt ist. Sie können die 5 in 1 IR-Fernbedienung auch so einstellen, dass die Universal-Funktionen Lautstärke und Stummschaltung einen anderen oder bestimmten Gerätetyp als das TV-Gerät ansteuern. -
Seite 131: Fehlerbehebung
Fehlerbehebung Die Fernbedienung funktioniert nicht Überprüfen Sie, ob Ihre Geräte korrekt angeschlossen und eingeschaltet sind. Überprüfen Sie, ob die Batterien der Fernbedienung korrekt eingelegt sind und die Polung +/– über- einstimmt. Falls die Batterien zu schwach sind, tauschen Sie diese durch neue aus. Es sind mehrere Gerätecodes unter dem Markennamen meines Geräts aufgeführt. -
Seite 132: Wenn Störungen Auftreten
Wenn Störungen auftreten Sollten Störungen auftreten, prüfen Sie bitte zunächst, ob Sie das Problem selbst beheben können. Die folgende Übersicht kann Ihnen dabei helfen. ACHTUNG! Versuchen Sie auf keinen Fall, das Gerät selbst zu reparieren. Wenn eine Reparatur notwendig ist, wenden Sie sich bitte an unser Service-Center oder eine andere geeignete Fachwerkstatt. -
Seite 133: Dvd-Spezifisch
Verzerrtes Bild Kontrollieren Sie, ob die DVD verschmutzt ist und wischen Sie sie ggf. mit einem weichen, trockenen Tuch von der Mitte zum Rand vorsich- tig ab. Kleine Bildstörungen sind keine Fehlfunktionen. Sehr verzerrtes Bild Die Norm Ihrer DVD stimmt eventuell nicht mit der Norm Ihres Fern- Keine Farbe im Bild sehgeräts überein (PAL –... -
Seite 134: Entsorgung
Entsorgung Verpackung Ihr Gerät befindet sich zum Schutz vor Transportschäden in einer Verpackung. Verpackungen sind Rohstoffe und somit wiederverwendungsfähig oder können dem Rohstoffkreislauf zurück- geführt werden. Gerät Werfen Sie das Gerät am Ende seiner Lebenszeit keinesfalls in den normalen Hausmüll. Erkundi- gen Sie sich in Ihrer Stadt- oder Gemeindeverwaltung nach Möglichkeiten einer umwelt- und sachgerechten Entsorgung. -
Seite 135: Technische Daten
Technische und optische Änderungen sowie Druckfehler vorbehalten. Copyright © 2010 Alle Rechte vorbehalten. Dieses Handbuch ist urheberrechtlich geschützt. Vervielfältigung in mechanischer, elektronischer und jeder anderen Form ohne die schriftliche Genehmigung des Herstellers ist verboten. Das Copyright liegt bei der Firma MEDION. - Seite 136 Índice / Table of content / Inhaltsverzeichnis Índice / Table of content / Inhaltsverzeichnis ..................1 TV ................................. 2 VCR ............................... 6 DVD ..............................8 CD ..............................10 SAT ..............................11 DVD-R ..............................14 DECODER ............................15 HDD Digital Video Recorder (Hard Disk Drive, DVR, PVR, etc) .............. 16 TV/VCR (COMBOS) ..........................
- Seite 137 BUSH 0028 0027 0032 0009 0011 0019 0205 0039 0051 0068 0169 0107 0115 0131 0139 0167 0245 0248 0024 0132 0120 0062 ACME 0011 CAPSONIC 0002 0018 CARREFOUR 0027 0006 0007 CASCADE 0009 ADMIRAL 0019 0108 0002 0001 0047 0000 CATHAY 0051...
- Seite 138 DURABRAND 0228 1006 1007 1008 1009 0933 HINARI 0171 0009 0011 0027 0051 0006 1085 1086 1087 1088 0169 0248 0043 0137 0169 HISAWA 0011 0113 0120 DYNATRON 0051 0169 HISENSE 0156 HITACHI 0027 0019 0085 0134 0153 0213 0140 0144 0003 0118...
- Seite 139 0062 0026 0030 0076 0111 0118 0131 0139 0141 MATSUSHITA 0065 0120 0121 0132 MCMICHAEL 0041 MEDIATOR 0051 0169 MEDION 0177 0038 0171 0002 0009 0206 PACKARD BELL 0204 0203 1015 0200 0205 0207 0208 0210 PAEL 0003 0211 0169...
- Seite 140 STENWAY 0120 STERN 0019 0157 0021 QUASAR 0129 SUNKAI 0009 0026 0062 QUELLE 0169 0205 0002 0003 0016 0022 SUNWOOD 0009 0051 0051 0129 0131 0135 0141 0017 SUPERLA 0003 0018 0026 0030 SUPERTECH 0118 QUESTA 0027 SUPRA 0009 SUSUMU 0011 SUTRON 0009...
-
Seite 141: Vcr
VOXSON 0019 0051 0108 0021 0043 0000 ELTA 0275 EMERSON 0231 0256 0301 0339 WALTHAM 0003 0133 0138 0037 0245 WATSON 0051 0169 ETZUKO 0275 WATT RADIO 0003 0014 0131 0037 WEGA 0000 0027 WELLTECH 0042 FERGUSON 0294 0259 0271 0278 0293 0281... - Seite 142 0256 MARANTZ 0257 0271 0281 0299 0231 0264 0245 MATSUI 0233 0256 0248 0301 0275 0319 MEDIATOR 0257 SEI-SINUDYNE 0257 MEDION 0233 0311 0262 0269 0319 0256 SELECO 0293 0248 0291 0338 0905 0906 SENTRA 0250 MELECTRONIC 0231 SENTRON 0275...
-
Seite 143: Dvd
DAEWOO 0353 0354 0965 0355 0347 0380 0925 0971 DANSAI 0351 DAYTRON 0925 0356 ACCOUSTIC SOLUTIONS 0383 0350 DENON 0364 0389 0894 0333 DENVER 0381 1051 0894 AFREEY 0386 DENZEL 0392 AIRIS 0357 DESAY 0958 AIWA 0383 0377 DIAMOND 0373 0341 AKAI 0369... - Seite 144 1070 1071 MAXIM 0331 0350 1067 1066 1068 0905 0343 0924 0396 0383 0382 0933 0375 0906 0338 0372 0334 MEDION 0356 0930 0373 0932 0330 0335 0344 0664 0894 0339 0340 0341 0342 0345 0352 PROCASTER 0905 0358 0371...
- Seite 145 ROTEL 0361 TRUTECH 1075 ROWA 0384 0922 0923 UMAX 0382 UNITED 0333 0348 0357 0894 SABA 0373 0915 0360 UNIVERSUM 0350 0375 0333 SAIVOD 0356 SALORA 0375 SAMPO 0341 0386 0923 0895 1051 VENTURER 0333 SAMSUNG 0367 1050 0338 0963 0919 VESTEL 0350...
-
Seite 146: Sat
TOSHIBA 0722 0723 MAGNUM 0730 0742 0743 0744 0745 0746 0747 UNIVERSUM 0732 MARANTZ 0695 0732 MATSUI 0696 0732 MEDION 0843 0664 0668 0674 0675 0694 0730 0742 0743 0744 0745 0746 VECTOR RESEARCH 0663 0747 0801 0802 0803 0807... - Seite 147 BRANDT 0565 0566 0567 0574 FORTEC STAR 0470 BSKYB 0584 0555 FOXTEL 0602 0643 0584 BT SATELLITE 0574 FRACARRO 0562 BUSH 0508 0562 0410 FRANCE SATELLITE/TV 0477 FREECOM 0405 0489 0422 0496 FUBA 0548 0439 0428 0438 0405 0424 CANAL SATELLITE 0569 0599 0431 0477...
- Seite 148 0428 0442 0466 MEDIAMARKT 0419 0478 0484 0493 0504 0511 0514 MEDIASAT 0569 0432 0535 0546 0566 0583 0586 0587 MEDION 0412 0413 0423 0428 0442 0466 0618 0619 0644 0650 0652 0653 0478 0484 0493 0504 0511 0514 1130...
-
Seite 149: Dvd-R
1051 VECTOR 0468 VENTANA 0552 VIA DIGITAL 0568 VIA SAT 0568 MAGNAVOX 0979 0980 VISIOSAT 0594 0444 0462 0586 0593 0595 MEDION 0895 0905 0906 0923 0959 1071 0596 0597 1117 VIVANCO 0536 0624 MICROMAXX 0895 0905 0906 0923 0959... -
Seite 150: Decoder
PIONEER 0977 1084 PRO2 0895 0905 0906 0923 0959 1071 MARMITEK 0636 PROVISION 1051 MELITA 0554 MNET 0602 0474 MOTOROLA 0494 0923 MOVIE TIME 0551 MULTICHOICE 0474 0602 SAMPO 1051 SAMSUNG 1050 NOKIA 0564 SANYO 1060 NOOS 1143 1158 1175 1183 SCHAUB LORENZ 1089 0606... -
Seite 151: Hdd Digital Video Recorder (Hard Disk Drive, Dvr, Pvr, Etc)
1071 1117 CROWN 0245 LITEON 0959 CYBERCOM 0248 0291 LORENTZEN 1156 CYBERMAXX 0248 0291 CYTRON 0248 0291 MARMITEK OCTOPUS 0655 MEDION 0905 0412 0423 0514 0644 0653 DAEWOO 0245 1130 0959 1071 1139 1115 1181 DAYTRON 0245 1117 DUAL 0248... -
Seite 152: Tv/Dvd (Combos)
0933 & 0228 1085 & 1006 1085 & 1007 MAGNUM 0291 1086 & 1008 MATSUI 0248 1087 & 1008 MEDION 0248 0291 1088 & 1009 MICROMAXX 0248 0291 MICROSTAR 0248 0291 H & B 0343 & 0228 1089 & 1011... -
Seite 153: Dvd/Vcr (Combos)
0906 0513 0519 0526 0532 0600 0646 0375 & 0256 0647 0648 0649 0651 MAGNAVOX 0914 & 0285 GERICOM 0443 MEDION 0338 GOODMANS 0451 0526 0896 GOODWAY 1163 1164 0906 GRUNDIG 0512 1172 0375 & 0256 MICROMAXX 0338 0896 HAUPPAUGE... -
Seite 154: Distintos Descodificadores / Auxiliary Set-Top Boxes / Verschiedene Set-Top Boxen
0650 Digital Set Top Boxes ECHOSTAR 0657 TEVION 0650 0645 0423 MARMITEK OCTOPUS 0655 YUNG 1166 MATSUI 0649 0526 0451 MEDION 0645 0650 Misc. Set Top Boxes MICO 1135 MICROMAXX 0645 0650 PARDY LIGHT 1171 MICROSTAR 0645 0650 HTIB NOKIA... -
Seite 155: Aux
SANSUI 0727 SCHNEIDER 0791 MEDION 0334 SHERWOOD 0782 0372 SONY 0739 0740 0755 0757 0758 0759 0344 & 0775 0760 1069 0841 0775 0776 0806 1066 TEAC 0794 0796 1118 TECHNICS 0764 0777 0788 MICROMAXX 0334 TEVION 0775 0776 0815... -
Seite 156: Búsqueda De Códigos Por Nombres Comerciales / Code Searching By Brand Name / Code-Suche Nach Handelsname
5 TELEFUNKEN / SABA / NORMENDE / FERGUSON / BAIRD 6 GRUNDIG / BLAUPUNKT 7 NOKIA / FINLUX / ITT 1 MEDION / LIFETEC / MICROMAXX / MICROSTAR / TEVION / TCM / GENERAL TECHNIC / INNOVATION 2 PHILIPS / PHILCO... - Seite 157 Medion Service Center Visonic S.A. c/ Miguel Faraday, 6 Parque Empresarial "La Carpetania", N-IV Km. 13 28906 Getafe, Madrid España Hotline: 902196437 · Fax: 914604772 E-Mail: service-spain@medion.com www.medion.es...